Sponsoring a Guest on the NMU Network

Documentation

All computers that wish to use the NMU Wireless or Wired connections on campus must be registered. Current NMU Faculty, Staff, Students, and Retirees can register machines on the network. If there is a guest on campus that needs internet access, currently only Faculty and Staff can sponsor them. To sponsor a guest:

  1. Open a Web Broswer
  2. In the URL bar, go to http://register.nmu.edu and click the Need to sponsor someone, go here link. You can login with your current NMU UserID and password.
  3. Once you login, you will see a window similar to the one below. Click on "Enter Guest Sponsor Function" to continue.
  4. Fill in the top portion of the screen to add a new sponsor. Be sure to carefully type in each requested piece of information, as it may be needed later. You can choose a start date up to a month in advance. If you know a guest is arriving, and they need internet access, it is best to complete this prior to their arrival. It can take up to an hour for this part to register in our system.
  5. Click on "Submit Request" to add the sponsor request. You will notice a green bar at the top of the screen that indicates your sponsor request was successful. 
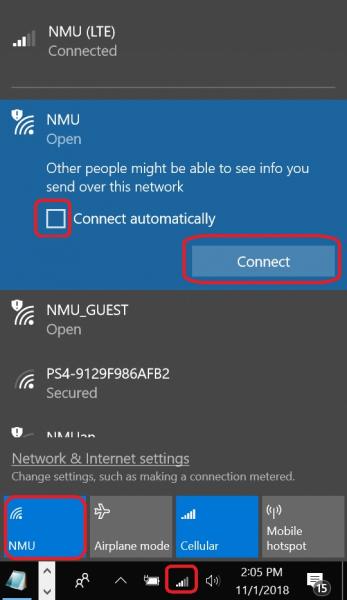
  6. It may take up to an hour for the request to be active. Once it is active, the guest should connect to the WiFi access point named "NMU", open a web browser, and navigate to "http://register.nmu.edu" on the machine that needs internet access. The guest can use their email address that was used in the request for the User ID and password fields.
  7. After clicking "Sign In", the guest will be able to register their machine. The registration will stay active for one day, so if they need to access the internet during the next day, they will need to register using "http://register.nmu.eduagain. The guest will be able to register their computer for as long as was requested when the guest sponsor entry was added. Once that time period expires, a new entry will have to be made by a current NMU Faculty or Staff member.

Using the Lenovo System Update Tool

Documentation

The Lenovo System Update tool installs unique updates to your ThinkPad computer that are not included in the Microsoft updates. We recommend you routinely run System Update on a monthly basis and install the critical, recommended, and optional updates to keep your computer software up to date.

This page has been split into 2 sections. The first section covers installing the updates related to problems with audio, video and using projectors and takes about 20 minutes to complete. The second section covers installing the full set of recommended updates and takes about an hour to complete. You can do the first section and complete the second section at some later date if you would like.

Section 1 Updates that Resolve Audio, Video, and Projector Problems

WARNING: Lenovo System Updates can contain firmware updates. It is critical that firmware updates are not interrupted. Therefore, we recommend you preform the System Updates with the computer connected to AC power and a fast Internet connection (either NMU WiFi or NMU Ethernet) at a time and place where the update will not be interrupted. If this is something you do not feel comfortable doing yourself, please visit the HelpDesk and get a request to have Micro Repair perform the updates. You should back up your files prior to coming in and Micro Repair currently anticipates a 2 hour turnaround time to have your computer ready.
 

1. Close all other programs and applications.
2. Connect to AC Power.
3. Connect to a fast Internet connection (either NMU WiFi or NMU Ethernet).
4. Run Lenovo's "System Update".  To do this, click on the Windows icon found at the bottom left corner of the desktop on the task bar.  Type "system update" and choose it from the list of choices.
   click on system update
5. If this is your first time running System Update, it will need to update itself.
  
6. Once you are at the System Update home screen, it will look like this...
  
7. Click "Next" and System Updates will prepare all available updates for you to choose from.
  
8. Once you are able to perform updates, make sure the first update you choose is JUST to update “BIOS” under "Critical Updates" or "Recommended Updates".  You will be prompted to reboot your laptop.
  
9. The second update you should choose should JUST be “Intel HD Graphics Driver” under "Critical Updates".  You will be prompted to reboot your laptop.
  
10. The third and final update you should choose should JUST be “Conexant Audio Driver” under "Optional Updates".  You will be prompted to reboot your laptop.
  
11. While connected to projector in classroom via the 15 pin VGA cable, right click on desktop and choose display settings.
  
12. You will be brought to a screen where you choose "Advanced Settings".
  
13. Then click on the recommended resolution...
  
14. Reduce it to "1366x768"


Section 2 All Recommended Updates


The Lenovo System Updates also address network connectivity issues first identified on the T460s ThinkPads in August of 2016 and are recommended for the T460s with the fall 2016 NMU software image. For the T460s ThinkPads as of August 2016 these updates take approximately 1 hour to complete. 

WARNING: Lenovo System Updates can contain firmware updates. It is critical that firmware updates are not interrupted. Therefore, we recommend you preform the System Updates with the computer connected to AC power and a fast Internet connection (either NMU WiFi or NMU Ethernet) at a time and place where the update will not be interrupted. If this is something you do not feel comfortable doing yourself, please visit the HelpDesk and get a request to have Micro Repair perform the updates. You should back up your files prior to coming in and Micro Repair currently anticipates a 2 hour turnaround time to have your computer ready.

1. Close all other programs and applications.
2. Connect to AC Power.
3. Connect to a fast Internet connection (either NMU WiFi or NMU Ethernet).
4. Go to the “Start” menu and type “system update” and select “System Update” from the list of results. The program will start.  


5. The program will start and provide a System Update Welcome screen. Click “Next”.
 

6. The program will search for and download available updates.


7. If prompted to update the System Update tool click “OK”.


8. Lists of available critical, recommended, and optional updates will be displayed in 3 tabs. On the "Critical" and "Optional" tabs, check the “Select All” checkbox to select all the updates. On the "Recommended" tab, select the individual updates excluding "Lenovo Solution Center", "SHAREit", and "Lenovo System Interface Foundation." Click “Next” to begin the update process.


9. You may be prompted to download the updates, Click “Download.”


10. You may be prompted to restart your computer, click “Yes”
.

11. The updates will begin downloading.


12. Wait about an hour and expect at least one restart to complete the process.

Windows Activation

Documentation

Occasionally the Windows software on NMU issued machines may state that it is not activated or genuine (especially if you haven't connected to an on-campus network recently). You may see prompts stating "The activation period has expired," "You may be a victim of software counterfeiting," or "Windows is not genuine." Follow these intstructions to verify and/or troubleshoot Windows activation. 


Activate Windows

1. You will need to be connected to an NMU network (Wifi, Ethernet, or LTE) to activate. If you are off campus, you can also connect using the VPN client.


2. Once connected to an NMU network, you must first ensure that your date and time are correctly synchronized. It is possible for AM/PM to be incorrect, the date to be wrong, or even for the clock to be off by minutes or seconds.  Ensure your time is correct and change it if it isn't by following the instructions at our "Windows Date and Time Zone Settings" page. 

To check activation status in Windows 11, select the Start button, and then select Settings > System and then select Activation .  Your activation status will be listed next to Activation.

Check  activation status in Settings

You'll see one of these activation status messages on the Activation page:

Activation statusDescription
Windows is activated
Windows is activated with a digital license
Windows is activated with a digital license linked to your Microsoft account
  • You are activated.
  • Your Microsoft account is already linked to your digital license.
Windows is not activated
  • You are not activated.
  • You will see an error message explaining the failure.
  • You might need to purchase Windows 11 to activate.


Information for Graduates and Former Students

Documentation

This page provides key IT related information for NMU graduates and former students.

Notebook computer returns and purchase options

  • The immediate return of the NMU notebook is required when any of the following occurs:

    • Complete withdrawal from NMU or graduation from NMU

    • Non-payment of required fees

    • Notification by NMU for the notebook computer's return

  • We prefer you return the notebook to the Micro Repair office in LRC 114 when it is open. NMU Public Safety will accept notebook computer returns 24/7. Make sure the following components are returned with the notebook computer: AC power adapter and cord, LTE MyFi hotspot (if issued), and USB DVD Player (if issued). See the Notebook Computer Return Procedure for details.

What happens to my NMU account after leaving NMU?

  • Access to MyNMU account will continue for 1 year after leaving NMU if you are an undergraduate or 3 years if you are a graduate student regardless of whether you did or didn't graduate. After the 1 or 3 years has passed, your account will be disabled and no longer receive or send new messages.

  • Shortly after leaving NMU your NMU network access, including access to NMU LTE, will be disabled. If you would like to continue NMU LTE access you might consider switching to NMU EAN. See www.nmu.edu/ean for details. NMU EAN doesn’t require an alumni email account but offers discounts to NMU Alumni with "Free E-mail for Life" (G Suite) accounts. See the NMU Alumni Association for details. 

We highly recommend:

  • Saving or printing an unofficial copy of your transcript available in the "Student Services" tab on MyNMU before your account is disabled.

  • Updating your email address and recovery accounts saved on Facebook, airline reservation systems, and similar services. This is especially true for those systems using your NMU email account for resetting an account password such as Facebook or Snapchat. You should update any references to your NMU email account to another accounts you have. The settings are usually available in your ‘My Account’ or ‘Profile’  options for the service.

  • Archiving your messages if you do not plan to use your NMU email account after graduating or leaving NMU. We highly recommend saving any of the messages you want to keep to an email account you will be using and delete them from your NMU email account. Otherwise the stored messages could become an unmonitored repository of data for hackers and identity thieves. If you are on the older NMU email system it might be easiest to forward the messages you want to keep to another account and delete them and the rest of your messaages from your NMU email account. If you are on the new NMU G Suite gmail system the Backing Up NMU G Suite instructions cover how to make a copy of your NMU G Suite content into files you can take with you or restore to another account at a later time. You may want to  apply for a "Free E-mail for Life" (NMU Alumni G Suite) account to use from the NMU Alumni office before you leave NMU. See the NMU Alumni Association for details. Once you have an NMU Alumni account, G Suite makes it easy to transfer all your NMU G Suite content to your NMU Alumni G Suite account. See Backing Up NMU G Suite for instructions.

Educational Access Network

Documentation

The goal of the Educational Access Network (EAN) is to provide broadband access and educational resources to individuals looking to take courses, advance their careers, fulfill personal development needs, explore new topics, or regularly exercise their brains.

Support is currently being provided by:

  •     http://www.nmu.edu/ean (This should answer most questions).
  •     Email: eansupport@nmu.edu
  •     Phone: 888-458-8668

Connecting to NMU LTE

Documentation

Is NMU LTE available in your area?

NMU LTE is available everywhere NMU EAN is available. Go to the Check Availabilty page and click the "Check Availabilty" button. Enter your complete address with Street Address, City, State, and Zip code to see if NMU LTE is available in your location.

If you were issued an NMU ThinkPads NMU LTE is not installed by default. You can get the NMU LTE network and SIM cards installed at no charge so the computer can access the NMU LTE network. If you have not already done so, please stop at the Helpdesk to get a work order for the LTE hardware to be installed. 

Connecting the ThinkPad to NMU (LTE)
 

1.Left click the “WiFi” or “Ethernet” icon in the system tray in the lower right corner of the Windows desktop.
  

2.Make sure an Ethernet cable is not connected,  “NMU" "WiFi” is "Off" (grayed out) and “Cellular"or "Mobile Broadband" is turned "On" (displayed in blue) and click the “NMU (LTE)” icon in the top section of the “Networks” menu.
  

3.Check the “Connect automatically” checkbox if it isn’t already checked and click the “Connect” button. The icon initially may indicate a “Limited” connection but then display “Connected”
 

4.The “LTE” icon will appear in the system tray when NMU (LTE) is in use. The number of white bars indicates the signal strength. You should now be able to access the NMU network using NMU LTE.
  

Connecting the ThinkPad to NMU WiFi (preferred if on campus)

1.Left click the “LTE” or “Ethernet” icon in the system tray in the lower right corner of the Windows desktop. 
  

2.Click the "NMU" "WiFi" to turn on (turn blue) the WiFi network adapter in the “Networks” menu.
  

3.Select the WiFi connection you want to use (Use the “NMU” WiFi connection if on campus). 
 

4.Check the “Connect automatically” checkbox if it isn’t already checked and click the “Connect” button. The icon initially may indicate a “Limited” connection but then display “Connected”.
  

 5.The “WiFi” 
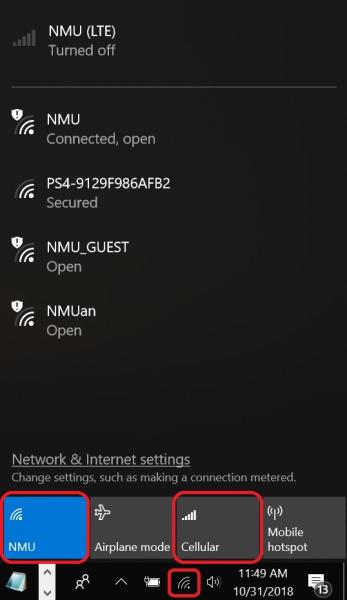
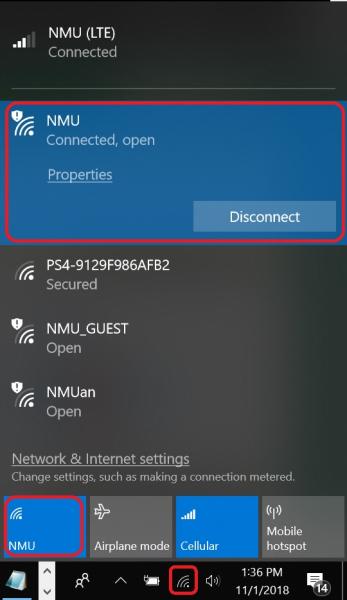
icon will appear in the system tray when WiFi is in use. The number of white bars indicates the signal strength. You should now be able to access the NMU network using NMU WiFi. NOTE: The system will use the WiFi connection by default even if the NMU (LTE) connection is on.

Connect a Device to the NMU Network

Documentation

For full access to the Internet and NMU network services over the NMU on-campus wired and wireless areas, you must register each network interface (wired and wireless are separate entries) on your computer. Before you register, you will only be able to access limited on-campus Web sites, and you will not have E-mail access.


Keep the following mind while registering:

  • Must be on-campus and using the NMU WiFi or Ethernet network to register.
  • Users will be required to register their machine once per semester.
  • NMU issued computers with have both the wired and wireless connections registered when registering using either connection.
  • Your NMU account must be active in order to have computers and devices registered. 
  • You are limited to registering 3 devices via the "register.nmu.edu/device" option.

There is no limit to the number of computers you can register. However, please note that your NMU ID will be attached to each computer you register, and you will be responsible for the actions performed using this machine.

Choose a device type below for instructions on registering it. 

Subscribe to LTE