Documentation
If you need to connect to NMU resources on your home network (or other non-NMU network), such as art servers or department servers, you will need to a VPN connection. VPN is short for Virtual Private Network. A VPN encrypts the information to and from your computer to a server on campus and also simulates an on campus connection. The instructions below will show you how to set up that client to connect to the NMU VPN server.
1. Using your internet browser (Firefox, Chrome, Edge, etc.), open the https://it.nmu.edu/downloads page or click here.
2. Click on the “Download Now” link for the “Cisco AnyConnect VPN Client [Mac]” and you will be prompted to log into the “NVPNSSO”. Click “Login.”

3. This will bring you to the NMU Login page where you sign in with your NMU credentials.

4. Once logged in you will want to click the button that says “AnyConnect” on the left side of the screen.

5. Next click “Start AnyConnect” This will take you to the download page.

6. Click the blue "Download for macOS" button.

7. Double-click the .dmg file once it's done downloading. It will most likely be located in the Downloads folder.

8. Double-click the .pkg file shown below:

9. Click “Continue”, “Continue” again, then “Agree” then “Install”.

10. You should be prompted to login with your computer login password. Once you continue the progam will then install.
11. After the program says "Install complete", click "Finish."
12. Press the magnifying glass symbol in the top right corner of the screen.

13. This will bring up the Spotlight Search. Type in "Cisco" and press enter.

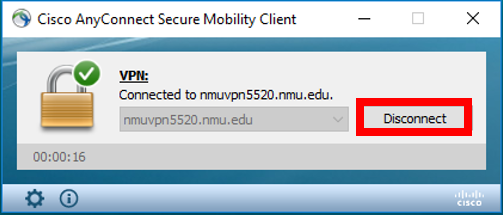
14. The AnyConnect Secure Mobility Client window will pop up. Make sure the box contains “nmuvpn5520.nmu.edu” as shown below. Click "Connect" and you'll be brought to the NMU login page again.

15. Enter your NMU login credentials.

16. Once successful you should see the following message pop up in the lower right corner, indicating you are connected to the VPN: