Paste Options in Microsoft Office Word

Documentation

↵Office offers multiple different pasting options within a document for both words and images. This article will cover the different paste features. 

  1. Open Word with your image or text copied (right click and select copy, or use the key combination Ctrl + "C").
  2. The next step involves pasting. There are multiple ways to paste, and you can choose the one that best fits your needs.
    • Use the key combination Ctrl + "V"
    • Right click empty space on the document and select "Paste."
    • Under the "Home" tab, select the "Paste" button to see the different paste options.

      Paste Options

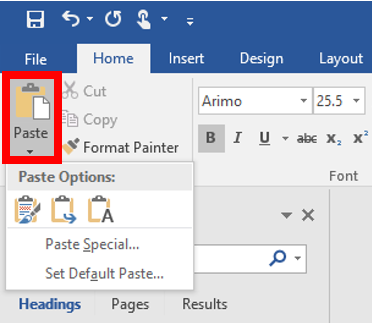
  3. When you paste text into the document, "Paste Options" will appear and allow you to select different options depending on the type of content you're pasting. 

    Paste options for text

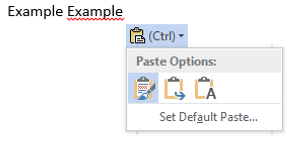
    • Keep source Formatting: This option preserves the look of the original text.
    • Merge Formatting: This option changes the formatting so that it matches the text that surrounds it. 
    • Keep Text Only: This option removes all the original formatting from the text.
  4. When you paste pictures into a document, the paste options will look a bit different. 

    Paste options for images

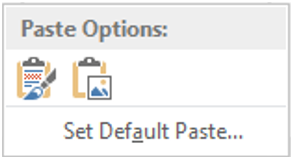
    • Keep Source Formatting: This option preserves the look of the original selection
    • Picture: This option inserts as an image


There are several other paste options that are offered by Microsoft Office 2010, 2013, and 2016.

Photo Editing in Word

Documentation

Microsoft Office has enhanced photo editing features to help when adding pictures in your documents.  You can adjust the picture brightness or contrast, remove the background, use artist affects, add a border, rotate, crop or resize a picture. A preview of most of these features can be seen by hovering over the menu choice before you actually click on the menu choice.


1. Double-click on the image you have inserted into the Word document

2. Use the tools on the "Format" ribbon menu to make the alterations you desire

-The "Format" ribbon menu may look different depending on how large your Microsoft Word window is. All options are presented at all sizes, however some may be hidden in drop-down menu. 

3. If you have made alterations that you do not like and want to reset the image, a simple way to do so it to use the "Reset Picture" option in the "Format" ribbon menu.

4. Explore the different options/effects and have fun making your document look good! 

- Many changes can be previewed by simply hovering the mouse cursor over an option
- Not every type of editing option is available in Microsoft Word
- More advanced photo editing is best left to software designed for photo editing like Adobe Photoshop, GNU GIMP, Paint.NET, etc.

Saving and Exporting a Word document as a PDF file

Documentation

With Microsoft Office, you are able to save and export regular word documents as PDF files. 


1. With the document that you want to export/save as a PDF open, select "File" from the ribbon in the top left corner

2. Select "Export" option that appears along the left-hand side

3. Then select "Create PDF/XPS Document" in the center of the screen

4. Choose a folder to export the PDF 
5. Type a name for the document and select "Publish"


Now you can navigate to the folder where you saved the PDF document will open as a PDF file, instead of a regular Word document. 

Outline Tools in Word

Documentation

There are many Outline tools provided in Word. This article will cover a few of them. Though these screenshots are in 2016, they should be similar or identical to the steps in earlier versions.  
 

1. To create a new outline, click the "Home" tab, and then click on the arrow next to "Multilevel List" under the "Paragraph" section. 


2. From the drop down menu, select any of the layouts from the List Library (hovering over the examples will show a preview).


3. After selecting the appropriate list, you can start typing. Push enter when you wish to start a new line. 

4. If you want to create a new sublist, press the "Tab" key after you enter a new line, or click the "Increase Indent" button. 


5. Once tabbed in on a new bullet point, you can press "Enter" twice or click the "Decrease Indent" button to return to the previous level.

Online Videos in Word

Documentation

You can embed a video from online into a Word document, either with the embed code or by seariching online, making the video visible within the Word document. This article details that process. 

Insert a video with the embed code

  1. Click on the "Insert" Tab on the ribbon menu (at the top left of word).
  2. In the center of the ribbon menu, under the "Media" category, choose "Online Video" Online Video Icon.
  3. This will open up a window to the right like the one below. 

    Insert Video Page

  4. Pasting the video embed code in the "Paste embed code here" field and pressing the arrow to the right of the code will put the video in the document.
  5. ​You can use the points around the video to resize it, the arrow to rotate it, or the box in the upper right to choose how the text surrounds the video.

    Paste Embed Code

  6. Clicking on the play arrow on the video will expand the video on the screen and play it. 

    Video Embeded

Search the web for a video to embed

  1. Use the "Bing Video Search" box (or log into Microsoft for other searches) to directly search for a video to embed. 

    Bing Video Search

  2. Search for the desired video, select it, and select "Insert" to put it on the document. 
  3. Clicking on the video will allow you to expand and watch it within the document.

    Embedded Video

  4. You can use the points around the video to resize it, the arrow to rotate it, or the box in the upper right to choose how the text surrounds the video.
  5. Clicking on the play arrow on the video will expand the video in the screen and play it. 

Microsoft Office Suite Not Activated

Documentation

Microsoft Office is configured to activate when you first use it, however sometimes this activation can fail if your time and date are incorrect or you are not connected to an NMU Network. In order for Microsoft Office to activate you have to be connected to an NMU Network such as WiFi, Wired, or LTE. You can connect through the VPN client if you are off campus and have your own internet service provider. If you're getting messages that Office needs to be activated, follow the steps below.  
 

1. You will need to be connected to an NMU network (Wifi, Ethernet, or LTE) to activate. If you are off campus, you can also connect using the VPN client, as detailed on our Starting Windows VPN Client page


2. Once connected to an NMU network, you must first ensure that your date and time are correctly synchronized. It is possible for AM/PM to be incorrect, the date to be wrong, or even for the clock to be off by minutes or seconds.  Ensure your time is correct and change it if it isn't by following the instructions at our "Windows Date and Time Zone Settings" page. 


3. Open "This PC" ("My Computer" in older versions) from your desktop or select it from the navigation pane in Windows file explorer, then select the "Windows (C:)" Drive. 


4. Open "Program Files (x86)."


5. Open the "Microsoft Office" folder.


6. Open the folder labeled "Office16." You have to have this folder open in order for the powershell commands to work.


7. Click the "File" tab on the file explorer menu and select "Open Windows PowerShell"


8. When the command prompt opens your cursor should be blinking inside it. Type "cscript ospp.vbs /act" exactly as shown and hit "Enter." 


9. Text should appear and indicate that Microsoft Office is activated. If this is not the case and it still doesn't work, you may need to come to the HelpDesk for a re-install of Microsoft Office. 


10. Besides pop-up notifications from Word, you can check if your Office suite is activated by clicking the "Account" option in the "File" menu. Ensure that this displays "Product Activated."


11. If it still will not activate after these steps, please bring your laptop in to the HelpDesk. 

Inking Feature in Office

Documentation

In Office 2013 and 2016, you can use the Inking tool to draw on Word documents, Excel spreadsheets, and more. This is especially useful with a pen in tablet mode or however you want to use it. To learn more about the Inking tool, visit Microsoft Office's webpage. 


1. Open the Office tool you'd like to use and click the "Insert" tab. 
    

2. Click the "Start Inking" button in the upper right to begin Inking. 
    

Flash Fill Feature in Excel

Documentation

Excel offers many tools for you to organize your data.The Flash Fill option will help you format your data quickly.
Below is a step-by-steb guide on how to setup and use Flash Fill.
 

1. Type in the first selection of data the way you would like it to be formatted. In this case, we're concatenating two strings of text.


2. Once you start typing the second selection, Excel will detect what you're trying to do and will provide a preview for the rest of the data formattted this way. 


3. Press Enter and the rest of the data will auto-fill using the Flash Fill feature. 


4. To Accept or Undo Flash Fill actions, click on the small box that appears next to the area that was filled. 
    

Subscribe to Office