Taking a Respondus Lockdown Browser Quiz on Educat

Documentation

  1. Make sure your computer is connected to the Internet in the location where you will be taking the quiz.
  2. Log into your class on Educat in Chrome or Firefox.
  3. Click on the quiz you need to take. If Lockdown Browser is required, it will now launch.
  4. If prompted to close a blocked program (e.g. screen capture, instant messaging) choose "Yes" when prompted. This may occur several times until everything needed to be quit is closed. -- OR -- , close LockDown Browser and then close the blocked program(s) before restarting.
  5. Once a quiz has been started with LockDown Browser, you cannot exit until the "Submit all and finish" button is clicked.

TIPS

  • Prior to your first assessment, complete the practice quiz available in most courses using the LockDown Browser to make sure it works correctly.
  • If a LockDown Browser update is available the program will take time to install it when the Lockdown Browser is a opened. Something you might check for before the day of a major exam.
  • For Windows computers, routinely install Windows updates (due on the second Tuesday of the month after 6 pm) so you don't have to wait for them to install if you have to restart your computer just before the exam.
Outline Tools in Word

Documentation

There are many Outline tools provided in Word. This article will cover a few of them. Though these screenshots are in 2016, they should be similar or identical to the steps in earlier versions.  
 

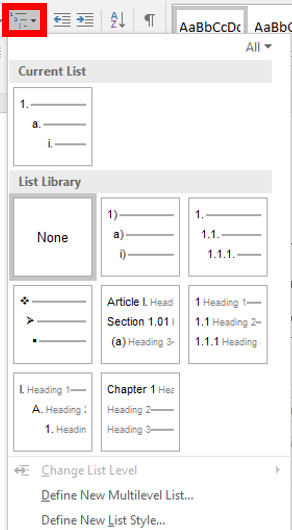
1. To create a new outline, click the "Home" tab, and then click on the arrow next to "Multilevel List" under the "Paragraph" section. 


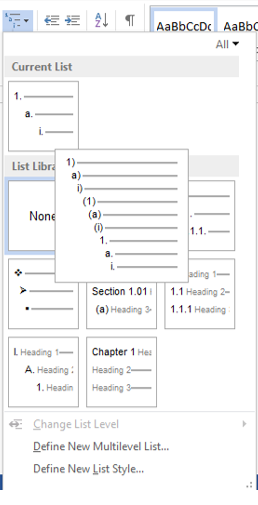
2. From the drop down menu, select any of the layouts from the List Library (hovering over the examples will show a preview).


3. After selecting the appropriate list, you can start typing. Push enter when you wish to start a new line. 

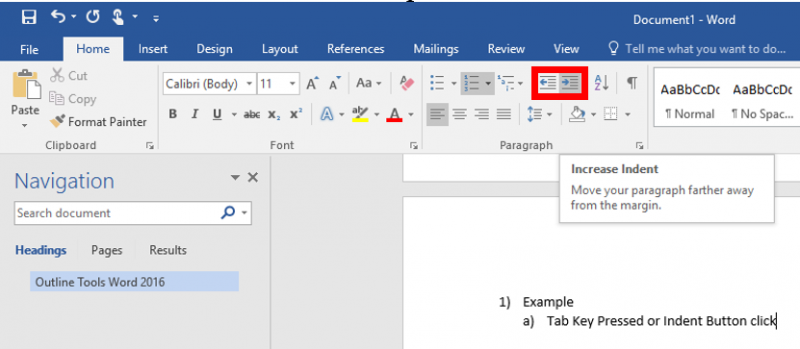
4. If you want to create a new sublist, press the "Tab" key after you enter a new line, or click the "Increase Indent" button. 


5. Once tabbed in on a new bullet point, you can press "Enter" twice or click the "Decrease Indent" button to return to the previous level.

Online Videos in Word

Documentation

You can embed a video from online into a Word document, either with the embed code or by seariching online, making the video visible within the Word document. This article details that process. 

Insert a video with the embed code

  1. Click on the "Insert" Tab on the ribbon menu (at the top left of word).
  2. In the center of the ribbon menu, under the "Media" category, choose "Online Video" Online Video Icon.
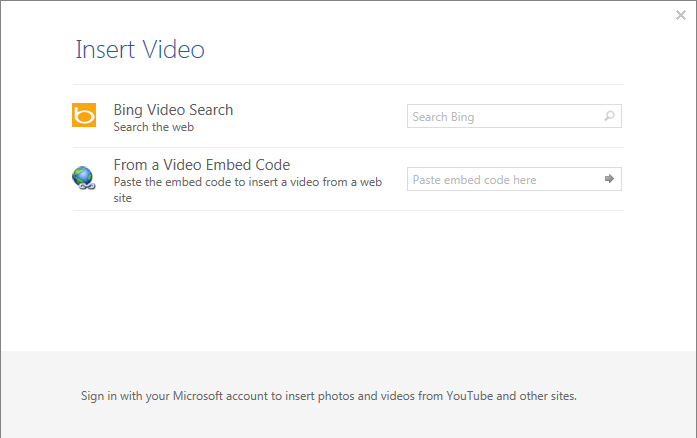
  3. This will open up a window to the right like the one below. 

    Insert Video Page

  4. Pasting the video embed code in the "Paste embed code here" field and pressing the arrow to the right of the code will put the video in the document.
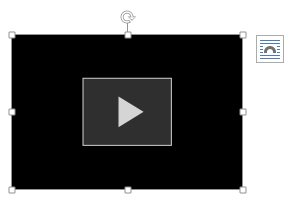
  5. ​You can use the points around the video to resize it, the arrow to rotate it, or the box in the upper right to choose how the text surrounds the video.

    Paste Embed Code

  6. Clicking on the play arrow on the video will expand the video on the screen and play it. 

    Video Embeded

Search the web for a video to embed

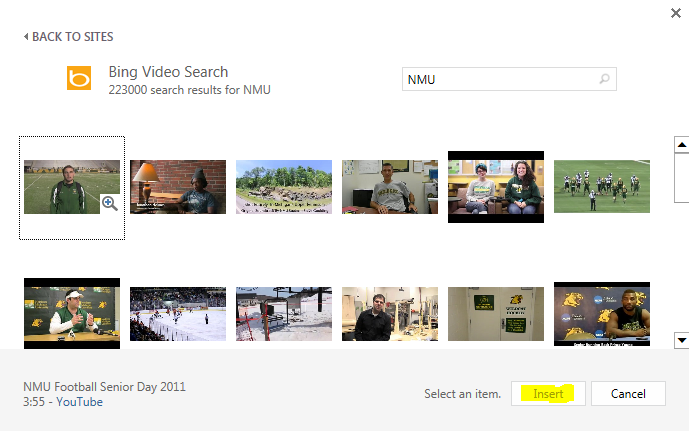
  1. Use the "Bing Video Search" box (or log into Microsoft for other searches) to directly search for a video to embed. 

    Bing Video Search

  2. Search for the desired video, select it, and select "Insert" to put it on the document. 
  3. Clicking on the video will allow you to expand and watch it within the document.

    Embedded Video

  4. You can use the points around the video to resize it, the arrow to rotate it, or the box in the upper right to choose how the text surrounds the video.
  5. Clicking on the play arrow on the video will expand the video in the screen and play it. 

Using Fetch

Documentation

Fetch is a MAC OS X application for transferring files between your computer and a File Transfer Protocol (FTP) server. Using Fetch, you can connect to an FTP server, browse directories and files on both systems, and transfer files between the systems.

Note: While most FTP servers allow you to download files to your computer, your ability to upload a file to a remote server depends on your access privileges.

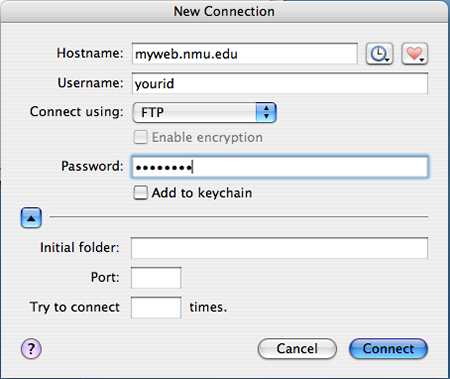
  1. Open Fetch and enter the connection information, then click "OK."
    • For Host, enter the server to which you are connecting.
    • For User ID and Password, enter your NMU ID and password in lower case letters.

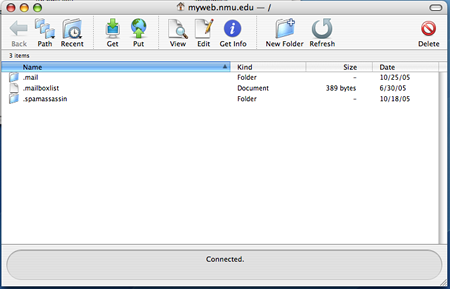
  2. Once connected, you will be able to browse directories on the remote server and your computer. Fetch supports a couple of methods to copy files:

    • The simplest method is just to drag files from your computer into the Fetch window (upload) or drag files from the Fetch window to your computer (download).
    • The other method is to use the "Get" (downdload) and "Put Files" (upload) buttons to copy files.

    Fetch can even copy entire folders, including their sub-folders, to the target location.

    For additional information on FTP file transfers, see the Fetch program's help.

Microsoft Office Suite Not Activated

Documentation

Microsoft Office is configured to activate when you first use it, however sometimes this activation can fail if your time and date are incorrect or you are not connected to an NMU Network. In order for Microsoft Office to activate you have to be connected to an NMU Network such as WiFi, Wired, or LTE. You can connect through the VPN client if you are off campus and have your own internet service provider. If you're getting messages that Office needs to be activated, follow the steps below.  
 

1. You will need to be connected to an NMU network (Wifi, Ethernet, or LTE) to activate. If you are off campus, you can also connect using the VPN client, as detailed on our Starting Windows VPN Client page


2. Once connected to an NMU network, you must first ensure that your date and time are correctly synchronized. It is possible for AM/PM to be incorrect, the date to be wrong, or even for the clock to be off by minutes or seconds.  Ensure your time is correct and change it if it isn't by following the instructions at our "Windows Date and Time Zone Settings" page. 


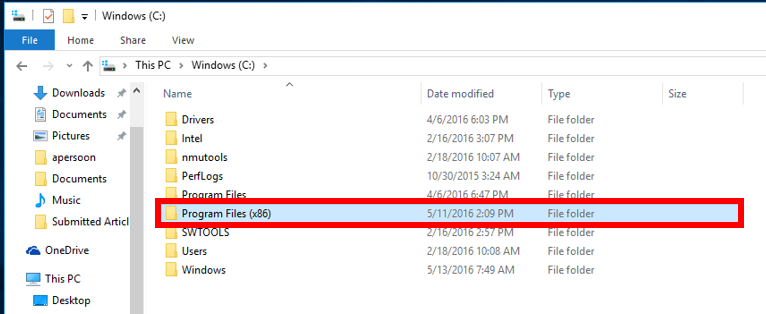
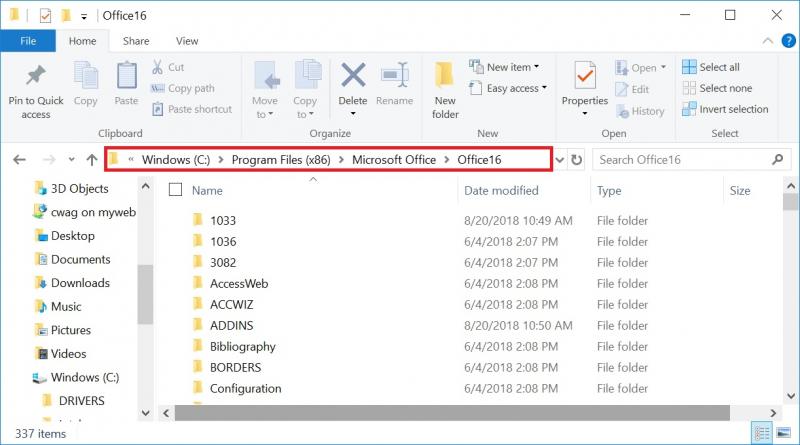
3. Open "This PC" ("My Computer" in older versions) from your desktop or select it from the navigation pane in Windows file explorer, then select the "Windows (C:)" Drive. 


4. Open "Program Files (x86)."


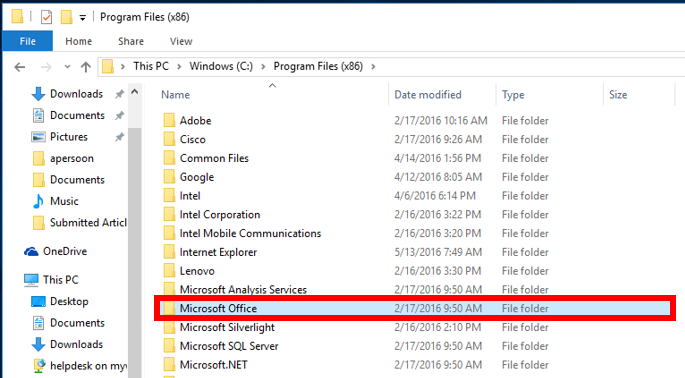
5. Open the "Microsoft Office" folder.


6. Open the folder labeled "Office16." You have to have this folder open in order for the powershell commands to work.


7. Click the "File" tab on the file explorer menu and select "Open Windows PowerShell"


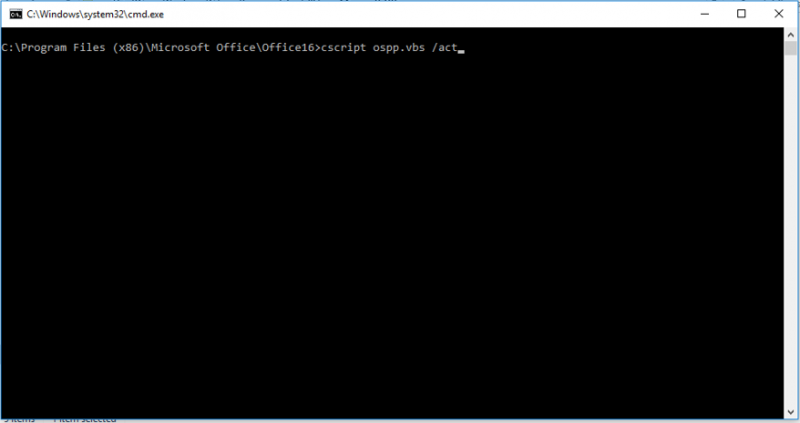
8. When the command prompt opens your cursor should be blinking inside it. Type "cscript ospp.vbs /act" exactly as shown and hit "Enter." 


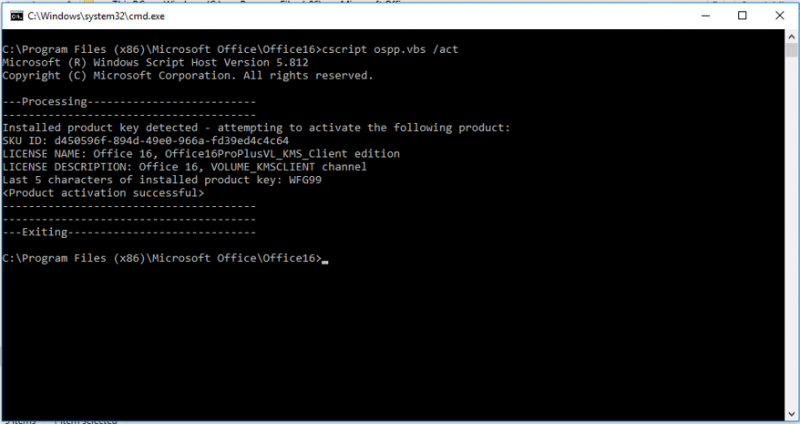
9. Text should appear and indicate that Microsoft Office is activated. If this is not the case and it still doesn't work, you may need to come to the HelpDesk for a re-install of Microsoft Office. 


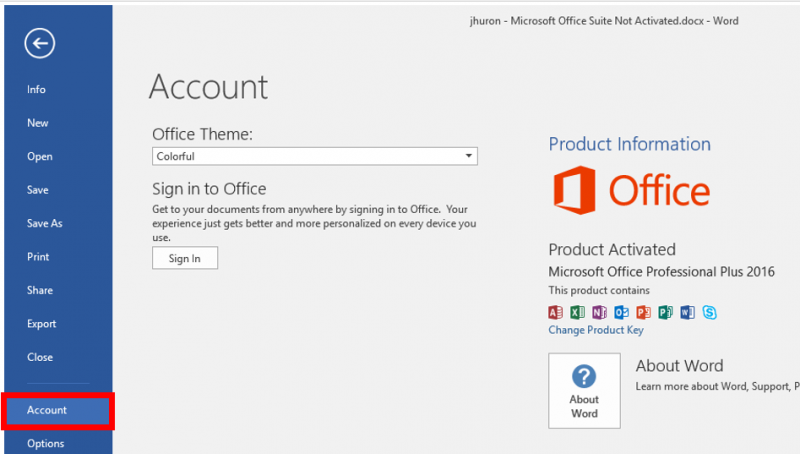
10. Besides pop-up notifications from Word, you can check if your Office suite is activated by clicking the "Account" option in the "File" menu. Ensure that this displays "Product Activated."


11. If it still will not activate after these steps, please bring your laptop in to the HelpDesk. 

Mapping a Network Drive and DepartmentShare

Documentation

Faculty, staff, and some students have access to an NMU network drive. This offers the opportunity to share files with others in the department. It is important to note that these folders are only available from an NMU network connection such as WiFi, wired or WiMAX. Some offices are required to use the VPN client in order to connect to a network drive. Mapping these drives give you easy access to network folders without having to manually connect each time. This is an excellent way for faculty to add their Departmentshare if use it regularly.

Windows
OS X

Windows

1. Open "This PC" from your desktop or from "File Explorer" in the Windows "Start" menu. 


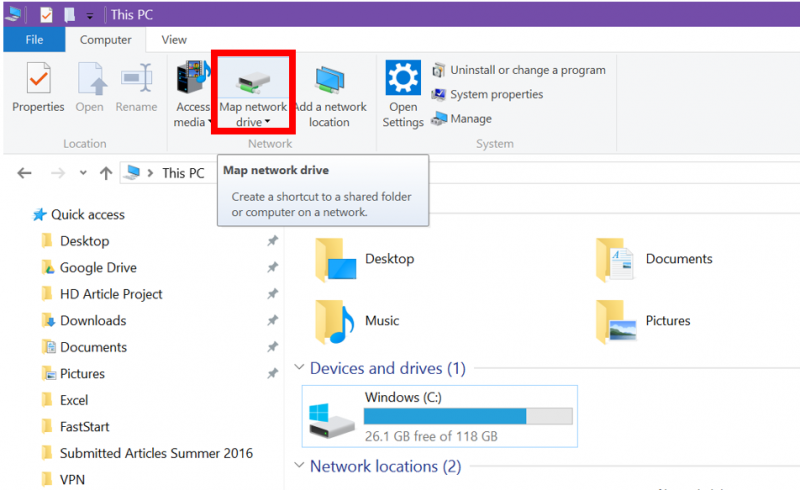
2. Click the "Computer" tab and "Map Network Drive" at the top of the window.


3. In the drive list, click a drive letter. you can choose any available letter. You'll need to be connected via VPN or Ethernet to access the drive.


4. In the "Folder" box, type the path of the folder or computer - Using Departmentshare as an example.

  • For faculty the department share you would use \\departmentshare.nmu.edu\deptname
  • If you do not have access to this, you will need to ask your Department Head or Secretary to add you.

5. To connect every time you log in, select the "Reconnect at logon" check box.


6. Click "Finish." You will be prompted to log in with your credentials. 


Your computer is now connected, or mapped, to the network drive. If you can't connect to a network drive or folder, the computer you're trying to connect to might be turned off or you might not have the correct permissions. If you can't connect, contact your network administrator. 
 

OS X

1. Minimize all open windows and single-click anywhere on the background to make sure "Finder" is the active application on the top left of the screen. 

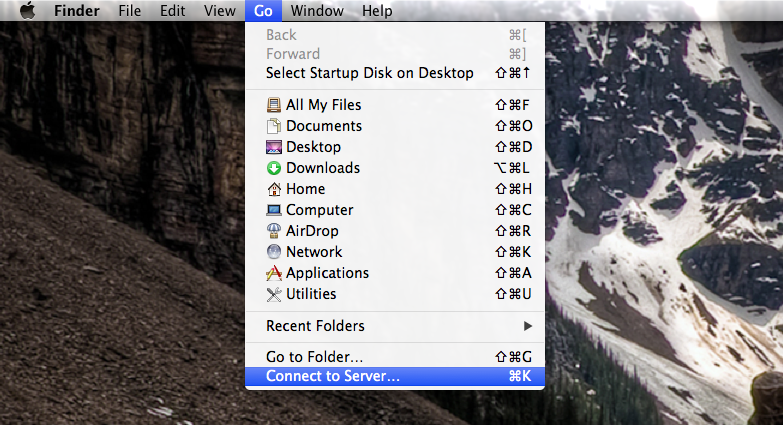
2. Once you see "Finder" in the top left corner, click the "Go" button. Scroll down and click "Connect to Server."
     

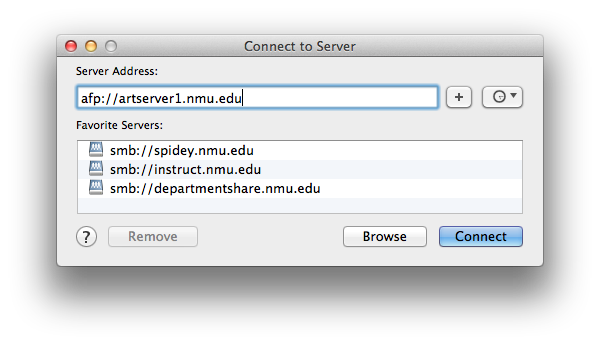
3. Type the path of the share you are trying to map. In most cases you will need to start the server address with "smb://"

For example to connect to the departmentshare you would use "smb://departmentshare.nmu.edu/deptname"

4. Once the path is entered click the "+" sign, and then click "Connect."
 

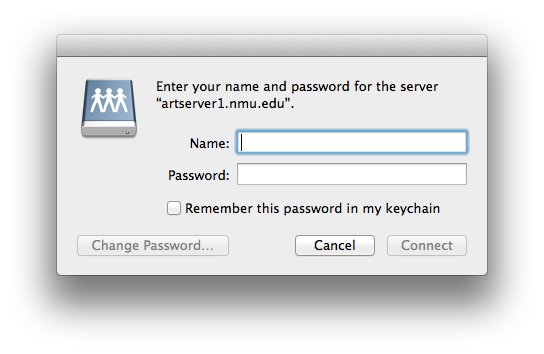
5. Type in your credentials. Check the "Remember this password in the keychain" to allow the drive to map automatically. Click "Connect."
 

6. Once you connected, your mapped network drive should appear on the upper-right hand portion of your desktop. Double clicking it will show its contents.

Make Web Notes with Microsoft Edge

Documentation

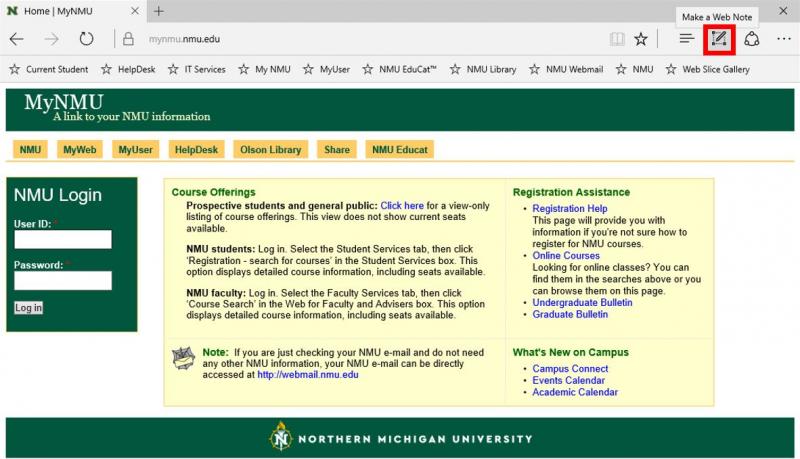
Edge lets you make notes on webpages and save them. To learn how, follow the instructions below.

1. With Edge open, click the Web Note icon. 
    

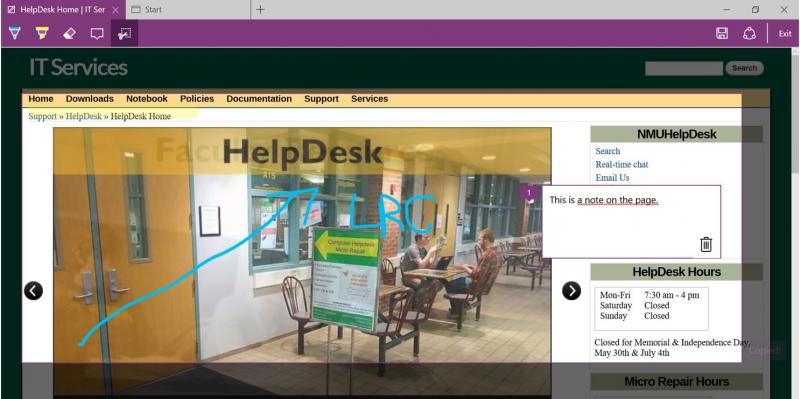
2.You can now use the tools in the upper left to draw, highlight, erase, crop, or write notes, as shown below. 
    

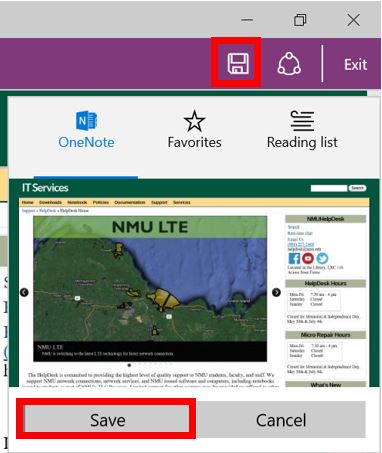
3. Choose where you'd like to save your changes and click "Save." 
    

4. Click the "Exit" button after you save your changes.

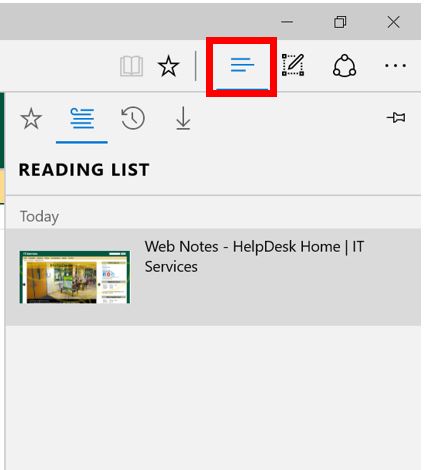
5. If you saved your changes to your "Reading List," you can click the Reading List icon to see pages you've made changes to and visit them again. 
    

Installing the Jacobetti Laser Printer

Documentation

As of 9/21/18 the Jacobetti, PEIF, and HelpDesk Laser printers use the same printer settings as the "Library Laser" printer already configured on the NMU Thinkpad and MacBook issued computers. Please use the "Library Laser" printer for the Jacobetti, PEIF, and HelpDesk Laser printers.

If you need to configure a computer to access the printers please see the instructions at the NMU Library web site https://lib.nmu.edu/print.

Installing and Using Zoom

Documentation

Camera Troubleshooting

If having issues with the camera freezing on your Thinkpad, visit Camera Freezes on Thinkpad for assistance.

Faculty Use of Zoom

Please visit this CTL document Using Zoom for information on using Zoom through Educat.


For issues signing in see Sign In issues

Joining a Zoom meeting from a hyperlink or code.

  1. Click on the hyperlink you were provided in Educat or by email. If you were only given a code go to https://zoom.us/join and enter the code.
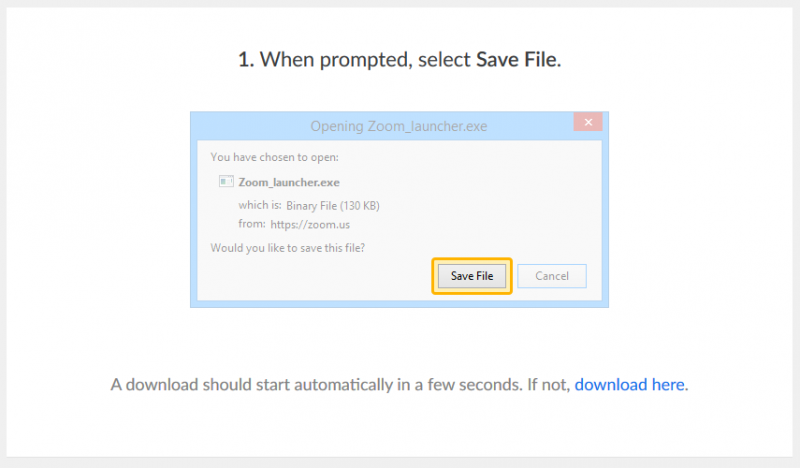
  2. Your default browser will open and prompt you to download and open a file titled “Zoom_launcher.exe”. This will only need to be completed the first time you attempt to connect to a Zoom video meeting.
  3. Follow the onscreen prompts to install the downloaded file. Each browser and operating system treats this differently. Supported browsers and system requirements can be found here: https://support.zoom.us/hc/en-us/articles/201362023-System-Requirements-for-PC-and-Mac

    You can also find instruction on using Zoom on your smarthphone (Android or iPhone).
     
  4. Once installed you will be prompted to enter your name.
  5. Next click on “Join”.
  6. The Zoom meeting interface will now open. A window will open to allow you to either “Join Audio” OR “Test Mic & Speaker”. You should select “Test Mic & Speaker” for your first Zoom video meeting.
  7. Click on “Test Speaker” button to determine that your speakers are working. You should be able to hear a chime. Once complete, click on “Test Mic”. You will notice the button changes to “Recording”. Speak in a natural voice for a few seconds. The button will then change to “Playing”. You should then hear your voice recording played back. Once you’ve successfully tested your microphone and speakers you can close this window.
  8. Now click the “Join Audio” button in the window. This will allow both your audio and video to be shared in the Zoom video meeting.
  9. If at any time you want to stop transmitting video and/or audio, you can click on the microphone or camera icon in the bottom left corner of the Zoom interface to temporarily mute either or both.

For more information or tutorials, visit the Zoom Help Center.

If still need assistance, please contact NMU Audio Visual - 906-227-2913 or the Helpdesk - 906-227-2468.

Sign in or log in issues

To sign into Zoom with your NMU account, you will need to do the following:

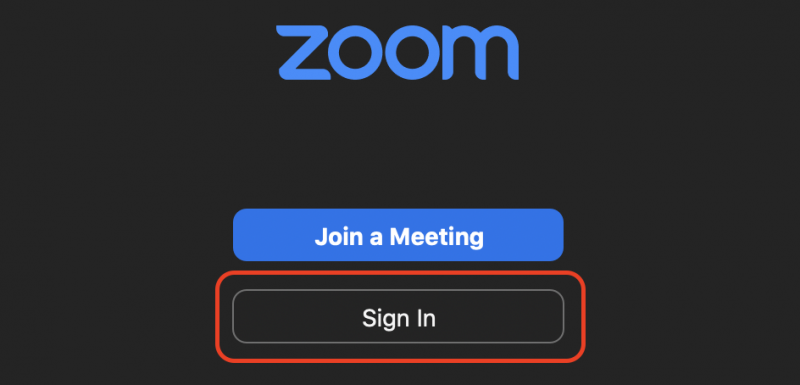
  1. Launch the Zoom application on your computer
  2. Select "Sign In"
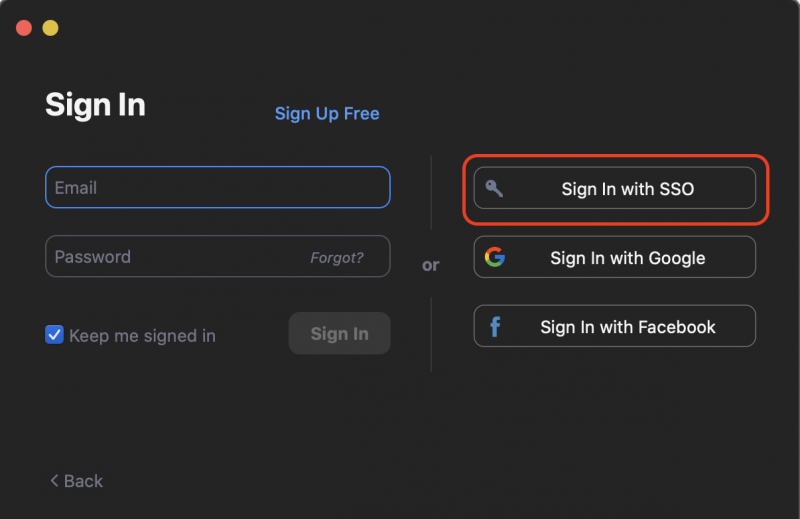
  3. Select "Sign In with SSO"
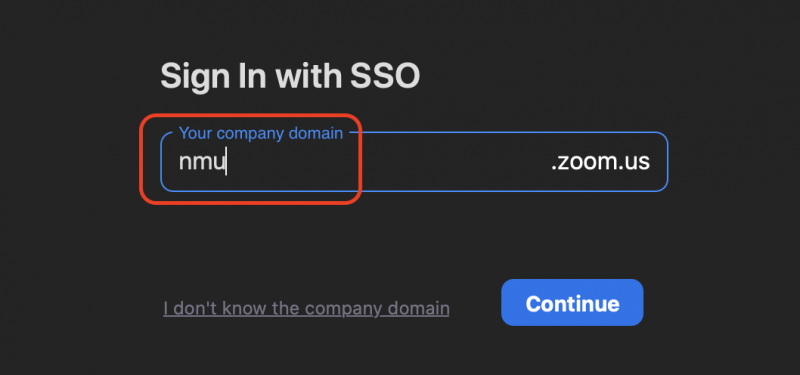
  4. When prompted for your domain, enter NMU
  5. Click Continue
  6. You will be prompted to enter your NMU credentials
Subscribe to Software