Inking Feature in Office

Documentation

In Office 2013 and 2016, you can use the Inking tool to draw on Word documents, Excel spreadsheets, and more. This is especially useful with a pen in tablet mode or however you want to use it. To learn more about the Inking tool, visit Microsoft Office's webpage. 


1. Open the Office tool you'd like to use and click the "Insert" tab. 
    

2. Click the "Start Inking" button in the upper right to begin Inking. 
    

Formatting Word Mail Merge Values in Excel

Documentation

Occasionally some numbers in Excel don't format correctly in Word when using the mail merge feature under the Mailings tab. Follow these steps to resolve this issue before your merge. 


1. First, make sure your ZIP or postal codes don't lose any zeros in the mail merge process by formatting them in your Excel file as text. 
    
2. In Word, click the "File Tab" then click "Options." 
    

3. Choose "Advanced" from the left pane and select "Confirm file format conversion on open." Click "OK." 
    

4. In the mail merge document, click the "Mailings" tab, "Select Recipients," then "Use an Existing List." 
    

5.  Browse to your spreadsheet and double-click it. 

6. Click the "Show all" button in the "Confirm Data Source" window, select "MS Excel Woorkseets via DDE (*xls)" and select "OK." 
    

7. Click "Entire Spreadsheet" then click "OK." 
    

8. Now you can continue with your mail merge

Formatting Images in Word

Documentation

Microsoft Word gives you many options when formatting a document that includes images. This tutorial will give you an overview of those options. 

  1. Once you have your picture on the document (Ctrl+V to paste it in), you can click and drag it around to the desired location.
    • You can click on the picture or select it and then choose the position options in the "Home" tab to center, left align, or right align. 

  2. Once your image is in the desired approximate location, you can select it to see multiple options for formatting the photo and wrapping the text.
    • You can change the angle of the picture by clicking on it and holding and dragging the curved arrow as shown.

      Rotated image

    • You can change the size of the image by clicking and dragging any of the boxes in the corners. 

      Image sizing

    • Clicking and dragging on the boxes in the center around the picture, as shown below, will change the shape of the picture by stretching or compressing it. 

    • Clicking the box that appears to the upper right of the picture you selected will give you many text wrapping options. You can see those options displayed below. 


Flash Fill Feature in Excel

Documentation

Excel offers many tools for you to organize your data.The Flash Fill option will help you format your data quickly.
Below is a step-by-steb guide on how to setup and use Flash Fill.
 

1. Type in the first selection of data the way you would like it to be formatted. In this case, we're concatenating two strings of text.


2. Once you start typing the second selection, Excel will detect what you're trying to do and will provide a preview for the rest of the data formattted this way. 


3. Press Enter and the rest of the data will auto-fill using the Flash Fill feature. 


4. To Accept or Undo Flash Fill actions, click on the small box that appears next to the area that was filled. 
    

Disable Random Hardware Address in Windows 10

Documentation

Some application settings or other issues might cause Windows 10 to enable randomized hardware addresses, which will cause issues with your registration to NMU's network. To disable this feature, follow the instructions below.

1. Click on the Network Settings icon and select "Network Settings." 
    

2. In the "WiFi" tab, select "Advanced Options."
    

3. Select "Off" under "Random Hardware Address." 
    

4. In the "WiFi" tab, select "Manage WiFi Settings."
    

5. Select "Off" under "Random Hardware Address." 
    

6. Restart your computer. 

Windows Update

Documentation

NMU issued desktops and ThinkPad notebooks are configured with Automatic Updates, which means that each computer regularly communicates with a local Automatic Updates server. The server tells the computer what updates are available, and the computer tells you they are ready to be installed. Windows updates are available typically the second Tuesday of each month after 6:00 pm but critical updates might be available more often. It is best to routinely install the updates at a time that is convenient to you since the computer will install them automatically install the next time you restart or turn your computer off and on.


Never turn your computer off when it is installing updates and ensure that it is plugged in if the power is low. If the computer is shut down when installing updates your system will become corrupted. It is important to keep windows up to date to eliminate any software bugs and protect your computer from malicious software. To learn more reasons why you should update, click here

To manually check for and install updates, follow the steps below. Though the screenshots show Windows 10, the steps are similar for earlier versions of windows. 

1. Save and close all open work and windows.

2. In the Windows Start Menu type in and click the "Check for Updates" option in the new window.

3. Click the "Check for Updates" button in the new window and wait while Windows searches Microsoft's update server for available updates.

3. If any are available, they will automatically start to download. 

4. Once the updates are finished downloading you will be prompted to install them. You can either click "Install now" in the open "Update & Security" window, or you can click on the notification in the action center in the charms bar. 


NOTE: Downloading and Installing are two different steps in their own. You download the updates from the Microsoft server, but will have to actually Install them to the computer in order to take advantage of the new features. The newly downloaded updates will not be fully installed to the computer until the computer has been restarted. We recommend restarting the computer as soon as the updates are installed so the installation doesn't happen at a time that is inconvenient for you such as the start of class or when attempting to take an online exam.


5. Once you select the restart option in the prompt, the computer will restart and install the updates. Some updates, large ones or if you haven't updated in a while, will take a fair amount of time. You'll know once the update is completed, when your computer returns you to the login screen. 
 

Common Windows file extensions

Documentation

Windows file names have two parts; the file's name, then a period followed by the extension (suffix). The extension is a three- or four-letter abbreviation that signifies the file type. For example, in letter.docx the filename is letter and the extension is docx. Extensions are important because they tell your computer what icon to use for the file, and what application can open the file. For example, the doc extension tells your computer that the file is a Microsoft Word file.

If you want to open a MAC OS X file in Windows, you may need to add the extension to a MAC OS X file name so Windows can recognize it. For example, if you have a Word 6 MAC OS X document named letter that you want to open in Windows, you need to rename the file letter.docx so that Word in Windows will recognize and open the file.

List of File Extensions
Showing File Extensions
Searching File Extensions

Note: This list is by no means a complete and exhaustive list of file extensions. If the file extension you are using is not listed below, you may find the information by looking in the software manual or software application's Web site.

Note: If none of your file names have extensions, file extensions are hidden. See Showing File Extensions

File ExtensionFile Type
.AIFF or .AIFAudio Interchange File Format
.AUBasic Audio
.AVIMultimedia Audio/Video
.BATPC batch file
.BMPWindows BitMap
.CLASS or .JAVAJava files
.CSVComma separated, variable length file (Open in Excel)
.CVSCanvas
.DBFdbase II, III, IV data
.DIFData Interchange format
.DOC or .DOCXMicrosoft Word for Windows/Word97
.EPSEncapsulated PostScript
.EXEPC Application
.FM3Filemaker Pro databases (the numbers following represent the version #)
.GIFGraphics Interchange Format
.HQXMacintosh BinHex
.HTM or .HTMLWeb page source text
.JPG or JPEGJPEG graphic
.MACMacPaint
.MAPWeb page imagemap
.MDBMS Access database
.MID or .MIDIMIDI sound
.MOV or .QTQuickTime Audio/Video
.MTB or .MTWMiniTab
.PDFAcrobat -Portable document format
.P65
.T65
PageMaker (the numbers following represent the version #) P=publication, T=template
.PNGPortable Network Graphics
.PPT or .PPTXPowerPoint
.PSDAdobe PhotoShop
.PSPPaintShop Pro
.QXDQuarkXPress
.RARealAudio
.RTFRich Text Format
.SITStuffit Compressed Archive
.TARUNIX TAR Compressed Archive
.TIFTIFF graphic
.TXTASCII text (Mac text does not contain line feeds--use DOS Washer Utility to fix)
.WAVWindows sound
.WK3Lotus 1-2-3 (the numbers following represent the version #)
.WKSMS Works
WPD or .WP5WordPerfect (the numbers following represent the version #)
.XLS or .XLSXExcel spreadsheet
.ZIPPC Zip Compressed Archive

Showing File Extensions

If none of your file names have extensions, file extensions are hidden. To show file extensions:

1. In the File Explorer, click the "View" tab and select the check box next to "File name extensions." 


You can also follow these instructions, which will work for older versions of Windows. 
 

1. Click on the start menu and type "Show hidden files and folders," then press the enter key or select that option from the list of results.


2. In the "View" tab, make uncheck the option "Hide extensions for known file types." 


3. Click "Apply" then "OK".


Searching File Extensions

Sometimes you may want to search for all files of a certain type. For example, you may want to find a .pst file or a .mp3 file on your computer. Follow these steps to search for a file extension. 


1. Click on the Start menu or search bar and type "*" followed by the file extension you wish to search (ex. *.jpg) and hit the "Enter" key. 
    

2. Windows will now search for files ending in thte specified extension. 

Classroom Resources

Documentation

Classrooms at NMU have technology available in them, and these technologies vary by building and room. The Jamrich building is teeming with technological resources. This page will provide a brief summation of available technologies. Assistance with these technologies can be received from IDT by phone at (906) 227-2290.

Detailed information on the active learning technology can be found here

Connecting to Projectors Wirelessly

Classrooms in Jamrich are equipped with displays and projectors with WePresent. WePresent is a professional presentation device, allowing up to 64 users to give presentations from a Windows or Mac computer, tablet, or smartphone. WePresent also works with touch screens and interactive white boards.

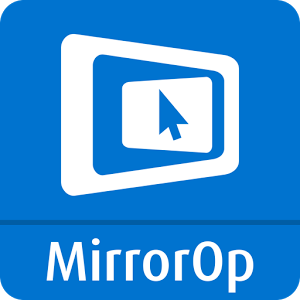
MirrorOp software is now used to connect your device to the projection system in NMU classrooms.

Connecting a Projector Wirelessly Using MirrorOP

Displays

Jamrich building displays can be found at each end of the building on the ground floor and at the elevators in the upper floors in Jamrich. These displays show a map, faculty office locations, and an updated room schedule which will include available class cancelation information.

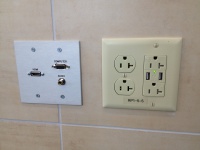
There are also displays in the lounge areas typically displaying campus announcements but can be used by students. On/off buttons are on the back side of the display in the bottom right corner. HDMI and VGA ports on the walls will also be available for use with displays. The displays will automatically switch to the HDMI or VGA source from the computer when connected. These displays do not have a WePresent attached to them. 

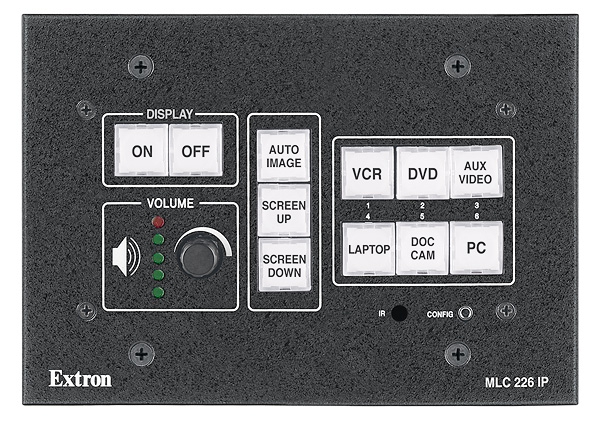
Since the classrooms in Jamrich will not be locked, students can also utilize the available equipment. Equipment available in classrooms includes displays, projectors, Blu-ray players, and WePresents.

Projectors

Projectors in Jamrich have WePresent attached so a computer can connect wirelessly as well as via VGA, Mini DisplayPort, RCA, and Headphone at instructor stations.

Blu-Ray Players

Blu-Ray players are available in some Jamrich classrooms, and they can be used to play Blu-ray media and movies. More information on Blu-ray can be found here

Document Cameras

Document Cameras, available in classrooms across campus, allow you to display books, documents, and other objects to the entire classroom. 

Smartboards

​Available in classrooms around campus, Smartboards are 'touch' screen LCD screens that require the Smartboard software and special 'markers' and 'erasers'. The Windows software can be downloaded here, and the Mac here

Network

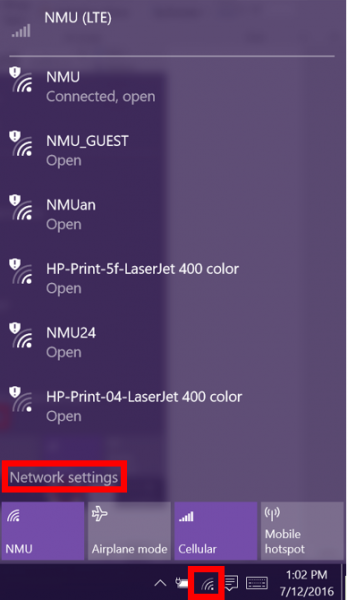
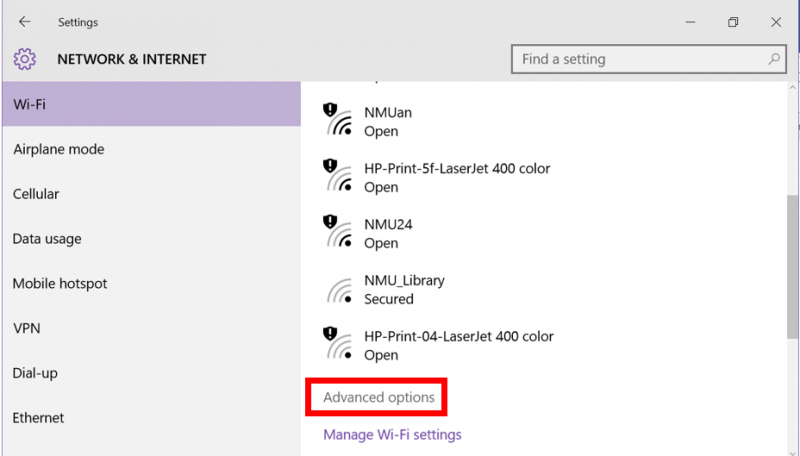
Many classrooms on campus have network access via wireless (LTE or WiFi) and wired (Ethernet). Some areas on campus, such as Jamrich, Cohodas, LRC, UC, Hedgcock, Berry, Dome, and Presque Isle Commons (Temaki and Tea and Smoothie King) will have NMU_GUEST WiFi access. Information on connecting to the network can be found here. If you are having trouble connecting, please call the HelpDesk at (906) 227-2468.

USB Power Connections

Some Jamrich lounge areas offer USB power connections. HDMI and VGA ports will also be available for use with displays. 

Changing the Windows Sound Theme

Documentation

The sounds that Windows makes on Startup, when a program is closed, or during other program events can be changed. The following steps outline this process.

1. Right click on any empty space on the desktop and select "Personalize" from the drop-down menu.


2. In the "Themes" tab of the Personalization window, select "Advanced Sound Settings" under "Related Settings." 
    

3. A new window will appear. From the "Sound Scheme" dropdown menu, you can select a premade sound scheme. 


  • To hear the sounds, select an item from "Program Events" and click the "Test" button with the green arrow to hear it.

4. Select "Apply" and "OK" when you have selected the desired scheme. 

Subscribe to Software