NMU password recovery

Documentation

  1. Go to https://myuser.nmu.edu/recover and enter your NMU email
  2. Choose which recovery option you would like
    You can Proceed with Challenge Question Recovery, you can chose Send a recovery password to your email, or you can Use a Mobile Authentication app recovery.

Challenge Question Recovery Option
 

  1. Enter your information to acquire your challenge question:
    First Name:_______________
    Last Name:_______________
    IN or SSN(no hyphens):____________________
    BirthDate:__  mm/dd/yyyy           

     
  2. Enter the Challenge Answer in the box provided (answers are case sensitive)>>Then click Submit.
     
  3. If you put in the correct answer, you will then receive a temporary password.
     
  4. Copy the password and then continue to the Log In step below to finish changing your password.

Email Recovery Option
 

  1. After you choose to be emailed a temporary password, an email will be sent to your password recovery email address. The screen will tell you what your recovery email ends in (ie. yahoo.com or gmail.com etc.)

     
  2. Go to your email in a different tab/window and recover the "NMU Password Recover Results" message.

    You new, temporary password will be contained in this message. You will need to copy it for the Log In step below.

Mobile Authentication (Two factor) recovery option

  1. After selecting this method, you will need to open your 2fa app on your smartphone.
  2. Get a code from the app for your NMU account.
  3. Enter that code in the box on the NMU recovery page.
  4. You will receive temporary password, copy that for the next step of logging in below.


Log in to myuser to finish changing your password.

  1. Go to myuser. Click on Manage Your User Account or the Login button in top right.
  2. Use your nmu username/email and enter your new, temporary password into the box for the password.
  3. If success, on the next page it will say your account is locked due to recovery. Click Continue.
  4. Next it should take you to the change password screen. Here you will use the temporary password again, as your Current password.
    Then enter a new password for your permanent password in the box next to New Password. Make sure to follow the prompts to make a strong password and only use the symbols listed. (some symbols will throw an error)

    NOTE: Your NMU ID and Password allows access to financial data, grades, courses, e-mail, and many other NMU functions. It is important that you choose a good password and not give that password to anyone
    Re-enter that same password in the box next to Confirm New Password.
  5. Click Submit.
     
  6. If your password was reset successfully you should see something similar to this page.
  7. You have successfully reset your password. There are a couple options you may want/need to do at this point, see 8 and 9. Otherwise you are finished and will need to use the new password you made for all of your NMU accounts (You most likely will need to edit autosaved passwords).
  8. If you did not know all your recovery info, click on the Security tab and then Display Options under Account Recovery Options. Change/correct information as needed.
  9. If you had to reset your password due to losing your 2fa codes, you need to click on the Security tab as well but then click on the Display Options under 2-Step Verification. There you can remove any 2fa options, add a new phone/app, print more backup codes, etc.

macOS Recovery

Documentation

macOS Recovery should only be used when you are instructed to do so. This is typically used when you purchase your MacBook. You should make sure you have a known good and verified backup before proceeding, this method will erase your data.

How to start up from macOS Recovery

  1. To start up from macOS Recovery, turn on your Mac and immediately press and hold one of the following combinations on your keyboard. Release the keys when you see an Apple logo

    Command (⌘)-R

    Option-⌘-R

    Shift-Option-⌘-R

    Reinstall the latest macOS that was installed on your Mac (recommended). Upgrade to the latest macOS that is compatible with your Mac. Reinstall the macOS that came with your Mac, or the closest version still available.
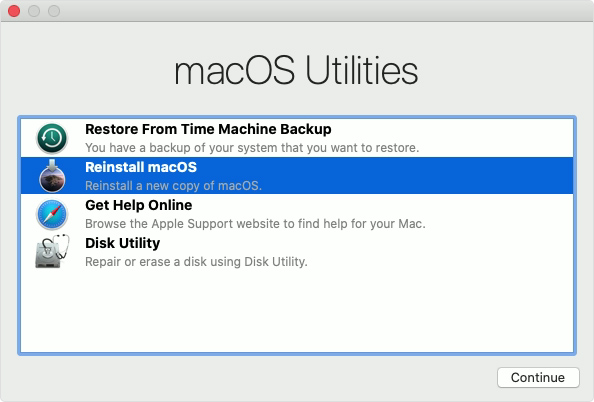
  2. When you see the utilities window, you have started up from macOS Recovery.
    macOS Utilities window
  3. Select Disk Utility from the Utilities window and click Continue.
  4. Choose View > Show All Devices from the menu bar in Disk Utility. The sidebar now shows your disks (devices) and any containers and volumes within them. The disk your Mac started up from is at the top of the list. In this example, Apple SSD is the startup disk:
    Erasing a disk and choosing a scheme in Disk Utility
  5. Select the disk that you want to erase.
  6. Click Erase, then complete these items:
    • Name: Type the name that you want the disk to have after you erase it.
    • Format: Choose APFS or Mac OS Extended.
    • Scheme: Choose GUID Partition Map.
  7. Click Erase to begin erasing your disk and every container and volume within it. You might be asked to enter your Apple ID.
  8. When done, quit Disk Utility.
  9. Reinstall macOS from the Utilities window. Then click Continue and follow the onscreen instructions. You will be asked to choose a disk on which to install.
  10. Please allow installation to complete without putting your Mac to sleep or closing its lid. During installation, your Mac might restart and show a progress bar several times, and the screen might be empty for minutes at a time.

macOS Recovery exceptions

The version of macOS offered by macOS Recovery might differ in certain circumstances:

  • If macOS Sierra 10.12.4 or later has never been installed on this Mac, Option-Command-R installs the macOS that came with your Mac, or the closest version still available. And Shift-Option-Command-R isn't available.
  • If you erased your entire disk instead of just the startup volume on that disk, macOS Recovery might offer only the macOS that came with your Mac, or the closest version still available. You can upgrade to a later version afterward.
  • If your Mac has the Apple T2 Security Chip and you never installed a macOS update, Option-Command-R installs the latest macOS that was installed on your Mac.
  • If you just had your Mac logic board replaced during a repair, macOS Recovery might offer only the latest macOS that is compatible with your Mac.

If you can't get macOS Recovery to offer the installer you want, please contact the TSS Help Center at (906) 227-2468

Subscribe to recovery