Reasons for Updating Our Computers

Documentation

  1. Updates fix problems and help make your computer run better.
  2. Some updates are scheduled to be available at routine intervals. For instance Windows updates typically come out the second Tuesday of the month. Windows computers are configured to automatically download the updates but not install them until the next time the computer is restarted. For this reason you will want to install the updates at a time that is convenient for you rather than have them automatically install at a critical time when you need your computer such as when finishing a paper, studying for an exam, or when you need to take an online exam.
  3. Your computer connects to the NMU network, and unless it has the latest updates, it can create a weak spot on the network. In other words, an non-updated computer can be taken over by someone else, via the network, and used to attack the network itself and other Web sites.
  4. You are responsible for any actions taken through your computer, even if you are not doing them. If your computer is found to be attacking other sites and/or distributing illegal material, your NMU account may be locked out and any computers registered under your account will not be allowed to access the campus network.
  5. Fortunately, updating is easy. Visit our Windows Update page or Apple's Mac Update page to learn how.

Starting Cisco AnyConnect VPN Client [Windows]

Documentation

Some programs and services, such as Ultratime, are only available when on a campus connection. The VPN client, when connected using your NMU login credentials, simulates an on campus network connection. 
 

1. In the Start menu, search for and click "Cisco AnyConnect Secure Mobility Client."

2. Click the "Connect" button. The software may install brief updates. 

3. An SSO web page should pop up. Enter your NMU ID and password and click "OK."

4. Once connected the VPN Client icon, a yellow locked padlock will be in the system tray in the bottom right side of the screen. Restarting or right clicking the icon will allow you to disconnect. You can also click the "Disconnect" button. 
    

Useful Keyboard Shortcuts

Documentation

Keyboard shortcuts are combinations of keystrokes that allow you to quickly perform an action. They are useful and often great time-savers. This page includes a guide to a few useful combinations that will help you complete tasks more quickly. 

Windows
Mac OSX
Where can I find these keys on my keyboard?

Windows

The list displays key combinations that are intended to be pressed and held until all are completed. For example, to copy text (Ctrl + "C"), you would highlight the text and press and hold the "Ctrl" (or control) key on your keyboard, then tap the "C" key before releasing both keys. 

  • Open a recently closed tab in your internet broswer: Ctrl + Shift "T"
  • Switch between open windows: Alt + Tab
  • Minimize everything and show desktop: (or between the desktop and Start screen in Windows 8.1): Windows Key + "D" 
  • Minimize window: Windows Key + Down Arrow
  • Maximize window: Windows Key + Up Arrow
  • Bold: Ctrl + "B"
  • Paste selected Item: Ctrl + "V"
  • Copy selected Item: Ctrl + "C"
  • Cut selected Item: Ctrl + "X" 
  • Underline: Ctrl + "U"
  • Italicize: Ctrl + "I" 
  • Undo an action: Ctrl + "Z"
  • Print: Ctrl + "P"
  • Select all: Ctrl + "A"
  • Take screenshot: PrtScr
  • Take screenshot of active screen: Ctrl + Alt + PrtScr
  • Delete permanently: Shift + Delete
  • Open properties for selected item: Alt + Enter
  • Close current window: Alt + F4
  • Open the Start Menu: Ctrl + Esc
  • Flip screen rotation: Ctrl + Alt + any arrow key
  • Open Task Manager: Ctrl + Shift + Esc
  • Lock your PC or switch users: Windows Key + "L"
  • Choose a presentation display mode: Windows Key + "P"
  • Zoom in and out: Windows Key and plus or minus sign
  • Search for files and folders: Windows Key + "F"
  • Help: Windows Key + "F1"
  • Quick system access menu: Windows Key + "X"

View more shortcuts on Microsoft's Page
 

Mac OSX

  • Eject disk: Command + "E"
  • Get information:  Command + "I"
  • Add to dock: Command + Shift + Control + "T"
  • Minimize all windows: Command + Option + "M"
  • Minimize front window: Command + "M"
  • Swich applications: Command + Tab
  • Take screenshot: Command + Shift + "3"
  • Quit application: Command + "Q"
  • Force quit application: Command + Shift + Option + Esc
  • New folder: Command + Shift + "N"
  • Log out: Command + Shift + "Q"
  • Paste selected item: Command + "V"
  • Cut selected item: Command + "X"
  • Copy selected item: Command + "C"
  • Close all windows: Command + Option + "W"
  • Select all items: Command + "A" 
  • Take screenshot: Command + Shift + "3" 
  • Find: Command + "F"
  • Print: Command + "P"
  • Save: Command + "S"
  • Move to trash: Command + Delete
  • Undo/redo: Command + "Z"
  • Show desktop: Command + F3
  • Hide or display dashboard: F12
  • Choose a presentation display mode: Command + F1

View more shortcuts on Apple's page
 

Where can I find these keys on my keyboard?

Windows (Scroll over for a larger image)

MacBook 


Windows Activation

Documentation

Occasionally the Windows software on NMU issued machines may state that it is not activated or genuine (especially if you haven't connected to an on-campus network recently). You may see prompts stating "The activation period has expired," "You may be a victim of software counterfeiting," or "Windows is not genuine." Follow these intstructions to verify and/or troubleshoot Windows activation. 


Activate Windows

1. You will need to be connected to an NMU network (Wifi, Ethernet, or LTE) to activate. If you are off campus, you can also connect using the VPN client.


2. Once connected to an NMU network, you must first ensure that your date and time are correctly synchronized. It is possible for AM/PM to be incorrect, the date to be wrong, or even for the clock to be off by minutes or seconds.  Ensure your time is correct and change it if it isn't by following the instructions at our "Windows Date and Time Zone Settings" page. 

To check activation status in Windows 11, select the Start button, and then select Settings > System and then select Activation .  Your activation status will be listed next to Activation.

Check  activation status in Settings

You'll see one of these activation status messages on the Activation page:

Activation statusDescription
Windows is activated
Windows is activated with a digital license
Windows is activated with a digital license linked to your Microsoft account
  • You are activated.
  • Your Microsoft account is already linked to your digital license.
Windows is not activated
  • You are not activated.
  • You will see an error message explaining the failure.
  • You might need to purchase Windows 11 to activate.


How to set Track Changes in Microsoft Word

Documentation

Track Changes is a built in feature in Microsoft Word which allows you to see the changes that were made to the document.
To view changes, or to edit a document with them, follow the instructions below. To learn how to use the comment feature, click here.
 

1. In Word, press the “Review” tab and select “Track Changes” to highlight it and turn it on.
    

2. Begin typing anywhere in the document, making changes, deleting items, or adding parts. Word will track changes to text and formatting. 
 

3. To display comments changes, click the red line to the left of the document. The changes will appear in red. Click again on the line (now grey) to hide the comments.            


4. To keep changes, make sure you save the document. Saving under a different name than the original will help eliminate confusion.

Drag and Drop Back Up Method

Documentation

Drag and Drop Back Up Method

There are many ways to back up your computer. The drag-and-drop method is a common one. It is recommended that you do a back-up at least once a month, That way if something were to happen with your computer, you would have most of your files. We recommend using an external USB drive with sufficient space available to store all of your files.


1. Plug in the device you'd like to back up your files to. In our example. It is a Kinston drive with the drive letter of D: Your name and drive letter may be different, depending on what drive you use.


2. Type File Explorer click File Explorer and open a new window.


3. Right-click the File Explorer icon and click "File Explorer" to open a second window.     


4. Drag and resize the second window to the right so it displays on the second half of the screen, next to the previous one. 


5. Navigate in one window to your external device, then in the other window navigate to the locations you would like to copy files from. In this case, click and drag the files from your PC to the external drive. In our example, the target drive is KINGSTON (D): Your external drive may have a different name and drive letter. Repeat the procedure until you've backed up all the desired files. 


We recommend backing up the following folders. You may have others that contain data important to you.

Music

Pictures

Desktop

Documents

Downloads

Favorites

Videos

Backup using File History

  • File History is a handy feature in Windows that helps you protect your personal files and folders from accidental loss or damage. Think of it as a backup system that automatically saves copies of your files, so you can easily restore them if something goes wrong. Whether you accidentally delete a file, make unwanted changes, or experience a technical issue, File History can come to your rescue by allowing you to recover previous versions of your files and folders.
  • One of the great things about File History is that it automatically backs up all your libraries. This includes default libraries like Documents, Pictures, Videos, and Music, as well as any custom libraries you have created. If you have folders elsewhere that you want to back up, you can add them to an existing library or create a new library for them.
  • Setting up File History is straightforward. Once enabled, it continuously monitors your files and folders, making regular backups to an external drive or network location. This means you don't have to worry about manually saving copies of your important documents, photos, videos, or entire folders. If you ever need to recover a file or folder, you can browse through the different versions saved by File History and restore the one you need. It's a simple yet powerful tool that provides peace of mind by ensuring your valuable data is always protected. 
  • Configure File History

  • Here are the steps to configure File History:

  • Connect an external drive or a network location: ensure you have an external drive connected to your computer or a network location configured where you want to save your backups
  • From the Control Panel, under System and Security, select Save backup copies of your files with File History
  • Select Turn on to enable File History


Customizing the Windows Notification Area

Documentation

You can choose what displays on the notification area of the taskbar.


1. Right-click on the date and time display on the taskbar and select "Customize notification icons." 
    

2. There are a few options for customizing your notification icons. You can click "Turn system icons on or off" to see more options or you can turn certian notifications on or off fomr this window. 
    

Windows Update

Documentation

NMU issued desktops and ThinkPad notebooks are configured with Automatic Updates, which means that each computer regularly communicates with a local Automatic Updates server. The server tells the computer what updates are available, and the computer tells you they are ready to be installed. Windows updates are available typically the second Tuesday of each month after 6:00 pm but critical updates might be available more often. It is best to routinely install the updates at a time that is convenient to you since the computer will install them automatically install the next time you restart or turn your computer off and on.


Never turn your computer off when it is installing updates and ensure that it is plugged in if the power is low. If the computer is shut down when installing updates your system will become corrupted. It is important to keep windows up to date to eliminate any software bugs and protect your computer from malicious software. To learn more reasons why you should update, click here

To manually check for and install updates, follow the steps below. Though the screenshots show Windows 10, the steps are similar for earlier versions of windows. 

1. Save and close all open work and windows.

2. In the Windows Start Menu type in and click the "Check for Updates" option in the new window.

3. Click the "Check for Updates" button in the new window and wait while Windows searches Microsoft's update server for available updates.

3. If any are available, they will automatically start to download. 

4. Once the updates are finished downloading you will be prompted to install them. You can either click "Install now" in the open "Update & Security" window, or you can click on the notification in the action center in the charms bar. 


NOTE: Downloading and Installing are two different steps in their own. You download the updates from the Microsoft server, but will have to actually Install them to the computer in order to take advantage of the new features. The newly downloaded updates will not be fully installed to the computer until the computer has been restarted. We recommend restarting the computer as soon as the updates are installed so the installation doesn't happen at a time that is inconvenient for you such as the start of class or when attempting to take an online exam.


5. Once you select the restart option in the prompt, the computer will restart and install the updates. Some updates, large ones or if you haven't updated in a while, will take a fair amount of time. You'll know once the update is completed, when your computer returns you to the login screen. 
 

Common Windows file extensions

Documentation

Windows file names have two parts; the file's name, then a period followed by the extension (suffix). The extension is a three- or four-letter abbreviation that signifies the file type. For example, in letter.docx the filename is letter and the extension is docx. Extensions are important because they tell your computer what icon to use for the file, and what application can open the file. For example, the doc extension tells your computer that the file is a Microsoft Word file.

If you want to open a MAC OS X file in Windows, you may need to add the extension to a MAC OS X file name so Windows can recognize it. For example, if you have a Word 6 MAC OS X document named letter that you want to open in Windows, you need to rename the file letter.docx so that Word in Windows will recognize and open the file.

List of File Extensions
Showing File Extensions
Searching File Extensions

Note: This list is by no means a complete and exhaustive list of file extensions. If the file extension you are using is not listed below, you may find the information by looking in the software manual or software application's Web site.

Note: If none of your file names have extensions, file extensions are hidden. See Showing File Extensions

File ExtensionFile Type
.AIFF or .AIFAudio Interchange File Format
.AUBasic Audio
.AVIMultimedia Audio/Video
.BATPC batch file
.BMPWindows BitMap
.CLASS or .JAVAJava files
.CSVComma separated, variable length file (Open in Excel)
.CVSCanvas
.DBFdbase II, III, IV data
.DIFData Interchange format
.DOC or .DOCXMicrosoft Word for Windows/Word97
.EPSEncapsulated PostScript
.EXEPC Application
.FM3Filemaker Pro databases (the numbers following represent the version #)
.GIFGraphics Interchange Format
.HQXMacintosh BinHex
.HTM or .HTMLWeb page source text
.JPG or JPEGJPEG graphic
.MACMacPaint
.MAPWeb page imagemap
.MDBMS Access database
.MID or .MIDIMIDI sound
.MOV or .QTQuickTime Audio/Video
.MTB or .MTWMiniTab
.PDFAcrobat -Portable document format
.P65
.T65
PageMaker (the numbers following represent the version #) P=publication, T=template
.PNGPortable Network Graphics
.PPT or .PPTXPowerPoint
.PSDAdobe PhotoShop
.PSPPaintShop Pro
.QXDQuarkXPress
.RARealAudio
.RTFRich Text Format
.SITStuffit Compressed Archive
.TARUNIX TAR Compressed Archive
.TIFTIFF graphic
.TXTASCII text (Mac text does not contain line feeds--use DOS Washer Utility to fix)
.WAVWindows sound
.WK3Lotus 1-2-3 (the numbers following represent the version #)
.WKSMS Works
WPD or .WP5WordPerfect (the numbers following represent the version #)
.XLS or .XLSXExcel spreadsheet
.ZIPPC Zip Compressed Archive

Showing File Extensions

If none of your file names have extensions, file extensions are hidden. To show file extensions:

1. In the File Explorer, click the "View" tab and select the check box next to "File name extensions." 


You can also follow these instructions, which will work for older versions of Windows. 
 

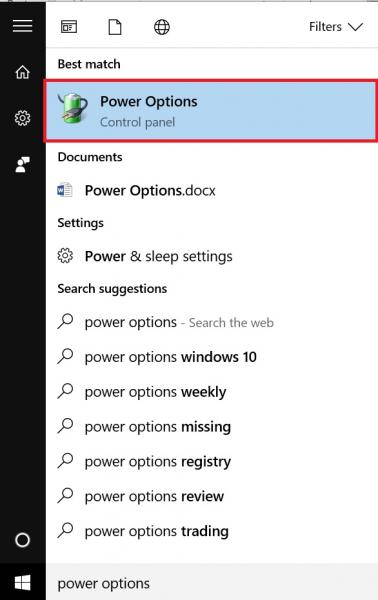
1. Click on the start menu and type "Show hidden files and folders," then press the enter key or select that option from the list of results.


2. In the "View" tab, make uncheck the option "Hide extensions for known file types." 


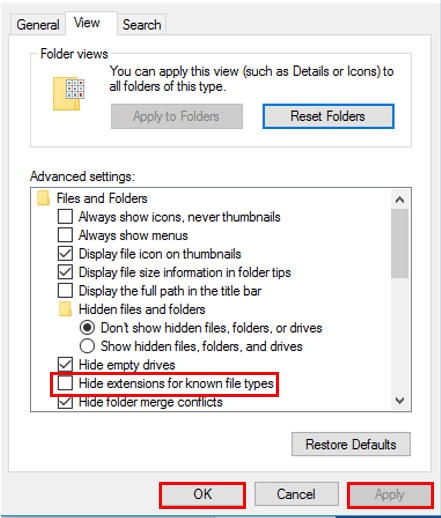
3. Click "Apply" then "OK".


Searching File Extensions

Sometimes you may want to search for all files of a certain type. For example, you may want to find a .pst file or a .mp3 file on your computer. Follow these steps to search for a file extension. 


1. Click on the Start menu or search bar and type "*" followed by the file extension you wish to search (ex. *.jpg) and hit the "Enter" key. 
    

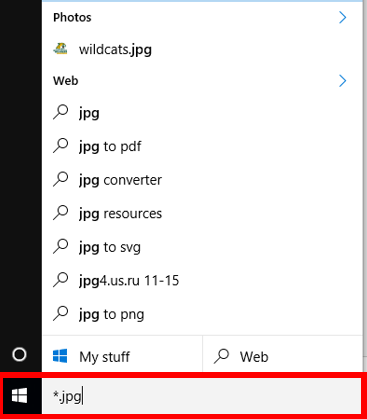
2. Windows will now search for files ending in thte specified extension. 

Changing Your Computer's Power Options

Documentation

There are times when you may want to change your computer’s power options to increase performance, decrease energy consumption, or assure the computer does not go into sleep in the middle of a key process such as uploading or downloading large files, giving a presentation, or watching a long video.
 

1. In the Windows Start menu, type in “power options” to find and click on the “Power Options” control panel settings.
    Power Options Control panel
2. Click the “Change plan settings” link for the currently selected plan.
    Click the “Change plan settings” link for the currently selected plan.
3. Modify the settings as needed and click the “Save Settings” button.
    Modify the settings as needed and click the “Save Settings” button.

Subscribe to windows