Paste Options in Microsoft Office Word

Documentation

↵Office offers multiple different pasting options within a document for both words and images. This article will cover the different paste features. 

  1. Open Word with your image or text copied (right click and select copy, or use the key combination Ctrl + "C").
  2. The next step involves pasting. There are multiple ways to paste, and you can choose the one that best fits your needs.
    • Use the key combination Ctrl + "V"
    • Right click empty space on the document and select "Paste."
    • Under the "Home" tab, select the "Paste" button to see the different paste options.

      Paste Options

  3. When you paste text into the document, "Paste Options" will appear and allow you to select different options depending on the type of content you're pasting. 
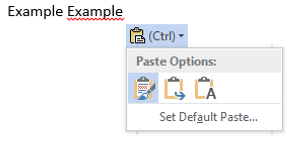
    Paste options for text

    • Keep source Formatting: This option preserves the look of the original text.
    • Merge Formatting: This option changes the formatting so that it matches the text that surrounds it. 
    • Keep Text Only: This option removes all the original formatting from the text.
  4. When you paste pictures into a document, the paste options will look a bit different. 

    Paste options for images

    • Keep Source Formatting: This option preserves the look of the original selection
    • Picture: This option inserts as an image


There are several other paste options that are offered by Microsoft Office 2010, 2013, and 2016.
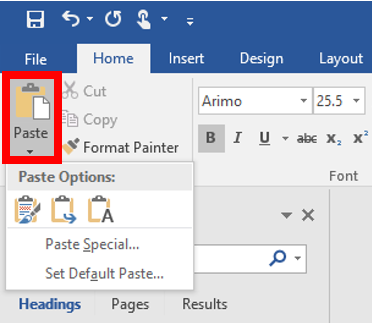
Photo Editing in Word

Documentation

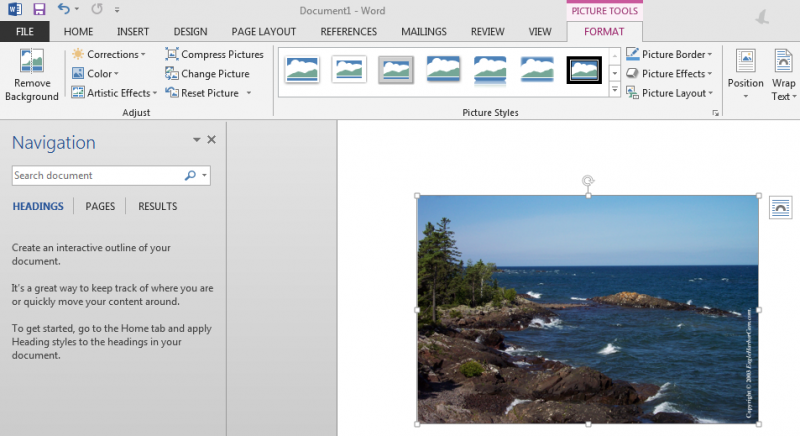
Microsoft Office has enhanced photo editing features to help when adding pictures in your documents.  You can adjust the picture brightness or contrast, remove the background, use artist affects, add a border, rotate, crop or resize a picture. A preview of most of these features can be seen by hovering over the menu choice before you actually click on the menu choice.


1. Double-click on the image you have inserted into the Word document

2. Use the tools on the "Format" ribbon menu to make the alterations you desire

-The "Format" ribbon menu may look different depending on how large your Microsoft Word window is. All options are presented at all sizes, however some may be hidden in drop-down menu. 

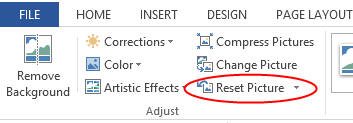
3. If you have made alterations that you do not like and want to reset the image, a simple way to do so it to use the "Reset Picture" option in the "Format" ribbon menu.

4. Explore the different options/effects and have fun making your document look good! 

- Many changes can be previewed by simply hovering the mouse cursor over an option
- Not every type of editing option is available in Microsoft Word
- More advanced photo editing is best left to software designed for photo editing like Adobe Photoshop, GNU GIMP, Paint.NET, etc.

PowerPoint is Blocking Videos

Documentation

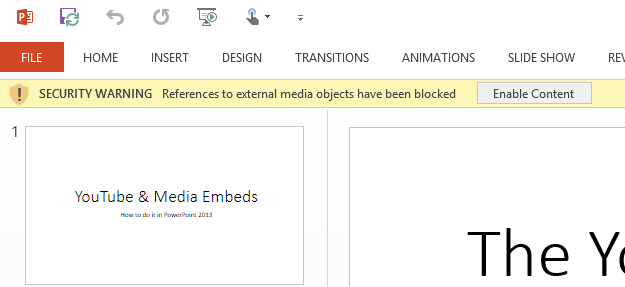
​Occasionally, PowerPoint may present the error, "SECURITY WARNING References to external media objects have been blocked" or will not play a video. These instructions will help you to play videos without blocking them. 
 

1. Exit and reopen PowerPoint with the presentation that is having video playback issues.


2. A yellow bar at the top should present itself, stating "SECURITY WARNING References to external media objects have been blocked." Click "Enable Content."
   

3. The video should now play normally in presentation mode.
 

If the video does not play normally, or if the prompt above does not appear, follow the instructions below to prevent the video from being blocked. 


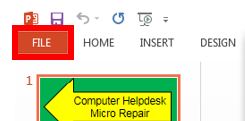
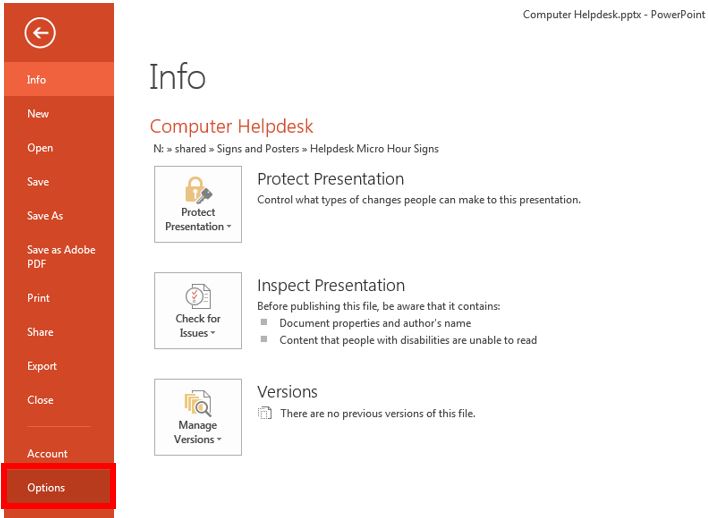
1. Click on the "File" tab in the upper left corner of PowerPoint. 
    

2. Select "Options" from the menu that opens to the left. 
    

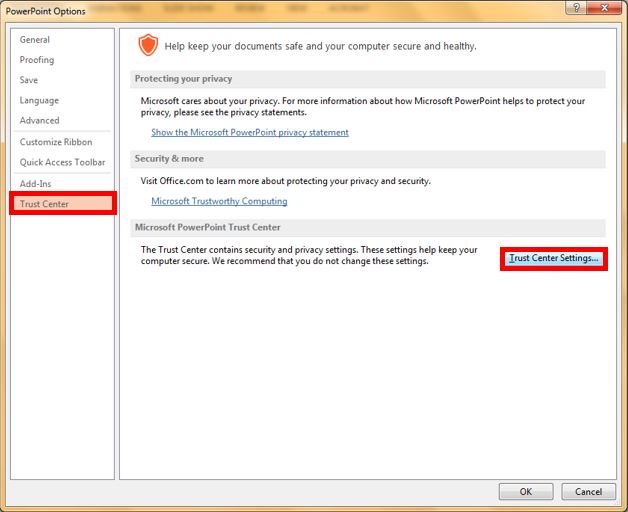
3. In the new window that opens, choose "Trust Center" from the left menu and select the "Trust Center Settings" button. 
    

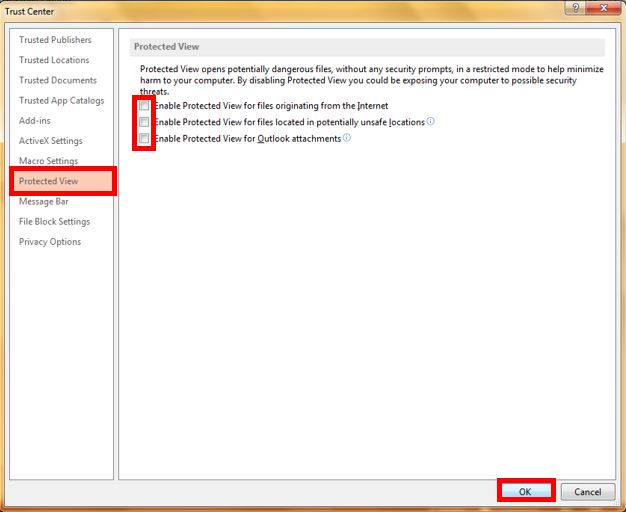
4. Choose the "Protected View" item from the left menu and uncheck all three boxes. Click the "OK" button. 
    

5. Close PowerPoint and all boxes, then reopen the desired PowerPoint document. 

6. Repeat steps two and three from part one of these instructions

Quick Analysis Feature in Excel

Documentation

Excel offers many tools for you to organize your data. The Quick Analysis tool will quickly analyze and visualize data for you.
Below is a step-by-step instruction on how to use it:
 

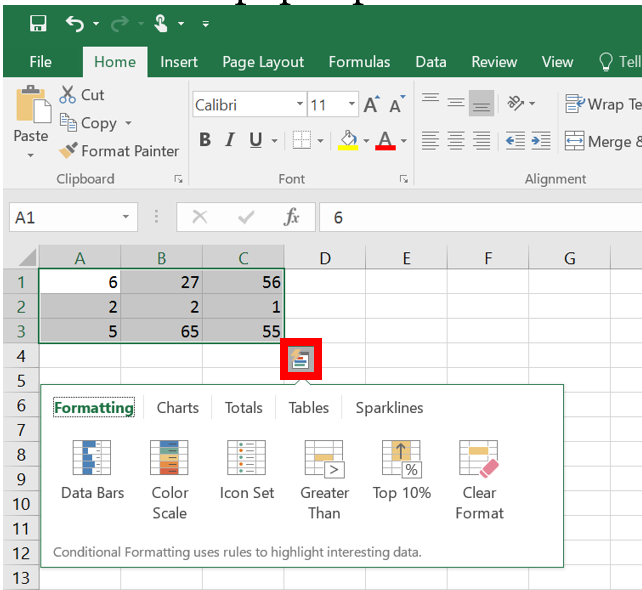
1. With your data selected, open the Quick Analysis tool by pressing Ctrl + "Q."


2. Select the tab you would like to use (sparklines, formatting, tables, etc.) and hover over the options to see a preview. Note that these methods will be different depending on the nature of the data you've selected. 


3. Click on your choice to create a visualization in a new worksheet. 

Read Mode Word

Documentation

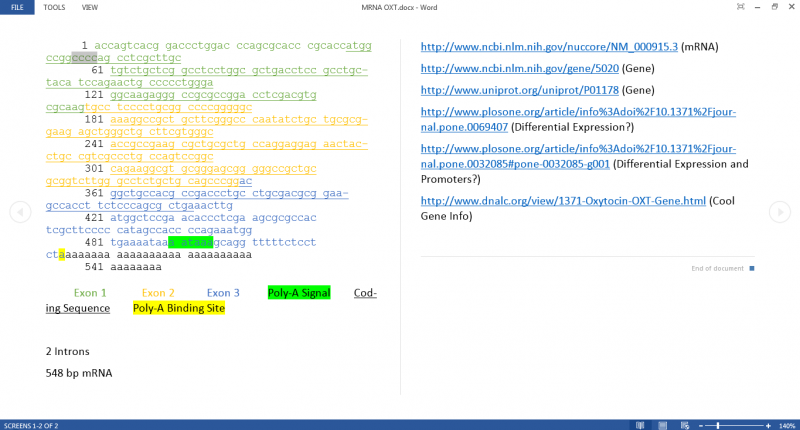
Microsoft Office offers several different views for documents, and one of them is read mode. Read Mode was designed to eliminate distractions while reading and for making small changes and comments to a document. This tutorial will cover several features of Read Mode. 

View Read Mode (This is an example of a document shown in read mode)

To access Read Mode: Select the Read Mode icon from the lower right corner of Word, near the zoom function. 

Read mode Icon


Using the Comment Feature in Read Mode

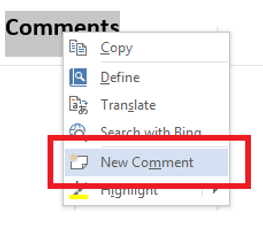
  1. To create a comment, right click the area where you would like it, or on the desired selected text, and select "New Comment" from the drop-down menu. 

    Right click new comment

  2. A new window will appear that looks similar to the one below. Start typing in the box to create a comment. 

    Typing a comment

  3. To delete a comment, select the comment icon first to expand it, if it isn't already.

    Edit a comment

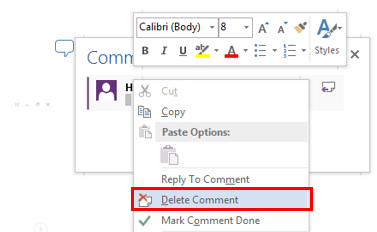
  4. Right click on the coment and select "Delete Comment."

    Right click to delete comment

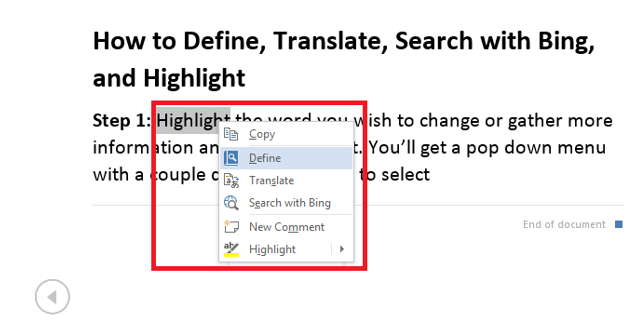
Access Aditional Options (Define, Translate, Search, and Highlight)

  1. Use these aditional options by right clicking on selected text and choosing from the drop-down menu. 

    Right click options

Rehearsing timings in PowerPoint

Documentation

You can rehearse your presentation to make sure that it fits within a certain time frame. While you rehearse, use the Rehearse Timings feature to record the time that you need to present each slide, and then use the recorded times to advance the slides automatically when you give your presentation to your actual audience.

Be prepared to start delivering your presentation immediately after you complete step 1.


1. Select the "Slideshow" tab, click "Rehearse Timings"

- The "Rehearsal" toolbar appears, and the "Slide Time" box begins timing the presentation.


1. Next (advance to the next slide)
2. Pause
3. Slide Time
4. Repeat
5. Total time for presentation 
 

2. While you time your presentation, do one or more of the following on the "Rehearsal" toolbar:

  • To move to the next slide, click "Next"
  • To temporarily stop recording the time, click "Pause"
  • To restart recording the time after pausing, click "Pause"
  • To restart recording the time for the current slide, click "Repeat"

3. After you set the time for the last, a message box displays the total time for the presentation and prompts you to do one of the following:

  • To keep the recorded slide timings, click "Yes"
  • To discard the recorded slide timings, click "No"

Slide Sorter view appears and displays the time of each slide in your presentation.


Turn the recorded slide timings off before you give a presentation

If you do not want the slides in your presentation to advance automatically by using the slide timings that you recorded, do the following to turn the slide timings off:

  • On the "Slide Show" tab on the ribbon menu, clear the "Use Timings" check box. 

Saving and Exporting a Word document as a PDF file

Documentation

With Microsoft Office, you are able to save and export regular word documents as PDF files. 


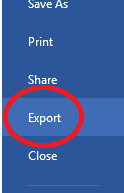
1. With the document that you want to export/save as a PDF open, select "File" from the ribbon in the top left corner

2. Select "Export" option that appears along the left-hand side

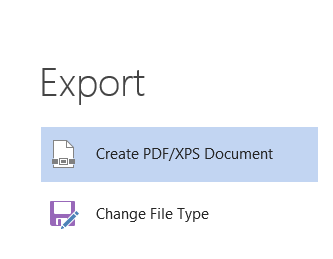
3. Then select "Create PDF/XPS Document" in the center of the screen

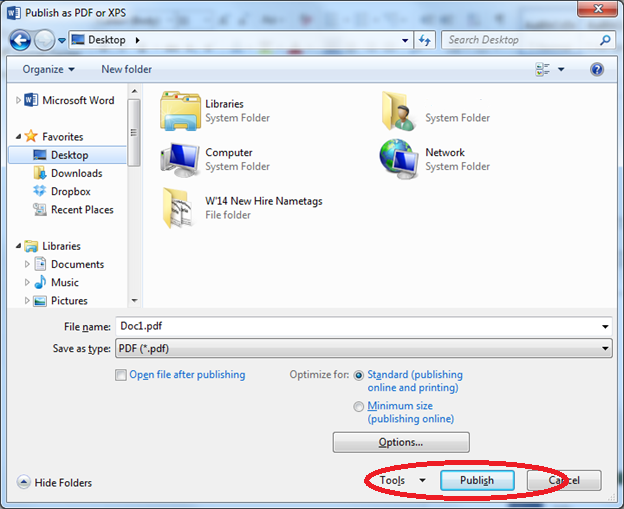
4. Choose a folder to export the PDF 
5. Type a name for the document and select "Publish"


Now you can navigate to the folder where you saved the PDF document will open as a PDF file, instead of a regular Word document. 

Saving a PowerPoint as a Video

Documentation

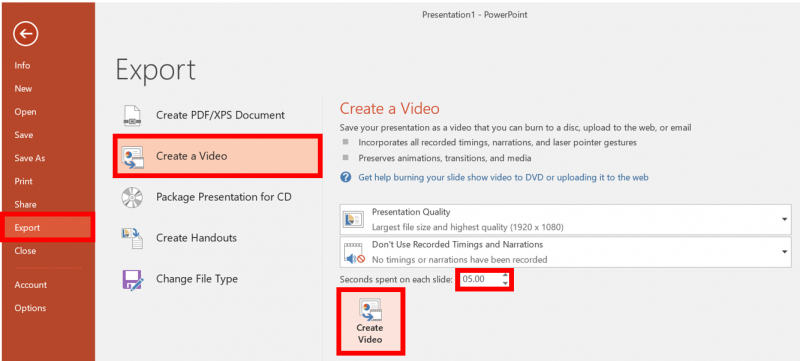
If you'd like to save and play a PowerPoint on a video, create or open your powerpoint and follow these steps.
 

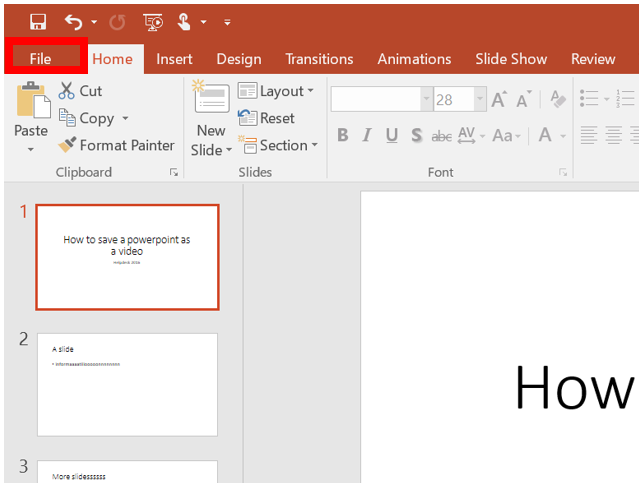
1. With your PowerPoint open, click the "File" tab on the ribbon menu. 
    

2. Click the "Export" tab and click "Create a Video."
    

3. Choose the amount of time you'd like to display each slide and click "Create Video." 

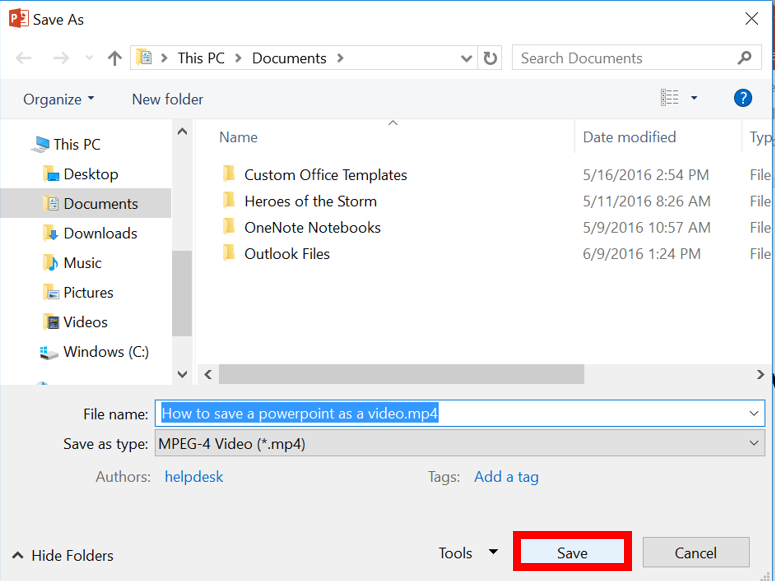
4. Browse to the location where you'd like to save the file and click "Save." 
     

Outline Tools in Word

Documentation

There are many Outline tools provided in Word. This article will cover a few of them. Though these screenshots are in 2016, they should be similar or identical to the steps in earlier versions.  
 

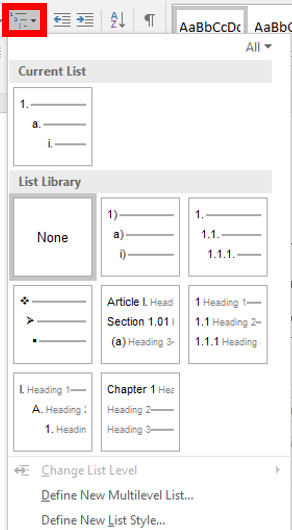
1. To create a new outline, click the "Home" tab, and then click on the arrow next to "Multilevel List" under the "Paragraph" section. 


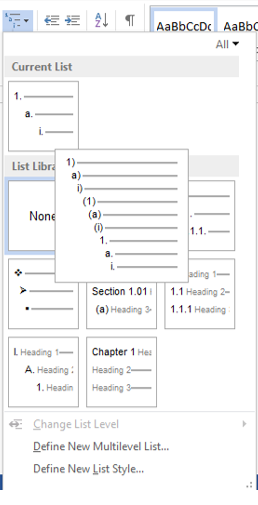
2. From the drop down menu, select any of the layouts from the List Library (hovering over the examples will show a preview).


3. After selecting the appropriate list, you can start typing. Push enter when you wish to start a new line. 

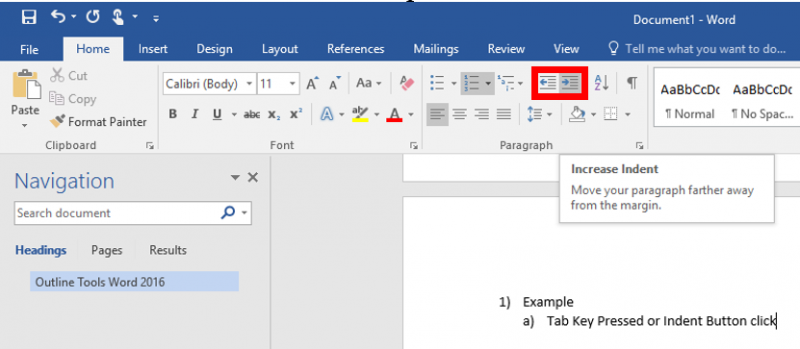
4. If you want to create a new sublist, press the "Tab" key after you enter a new line, or click the "Increase Indent" button. 


5. Once tabbed in on a new bullet point, you can press "Enter" twice or click the "Decrease Indent" button to return to the previous level.

Online Videos in Word

Documentation

You can embed a video from online into a Word document, either with the embed code or by seariching online, making the video visible within the Word document. This article details that process. 

Insert a video with the embed code

  1. Click on the "Insert" Tab on the ribbon menu (at the top left of word).
  2. In the center of the ribbon menu, under the "Media" category, choose "Online Video" Online Video Icon.
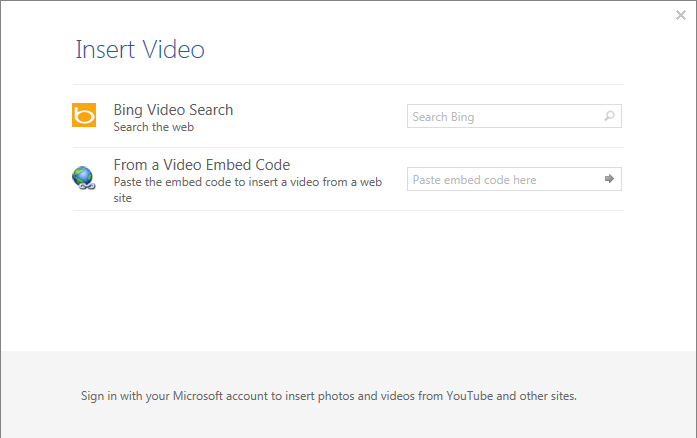
  3. This will open up a window to the right like the one below. 

    Insert Video Page

  4. Pasting the video embed code in the "Paste embed code here" field and pressing the arrow to the right of the code will put the video in the document.
  5. ​You can use the points around the video to resize it, the arrow to rotate it, or the box in the upper right to choose how the text surrounds the video.

    Paste Embed Code

  6. Clicking on the play arrow on the video will expand the video on the screen and play it. 

    Video Embeded

Search the web for a video to embed

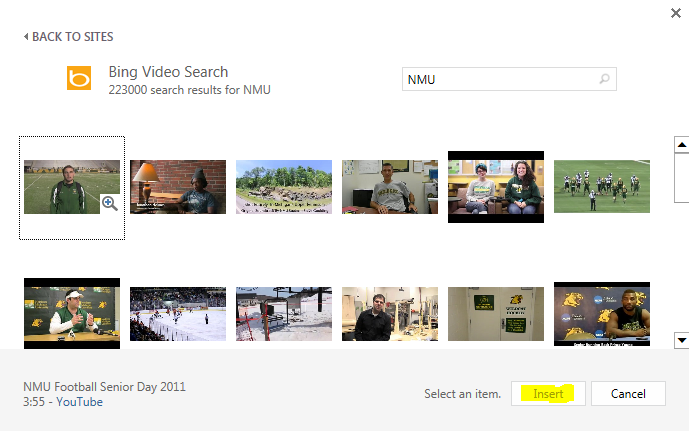
  1. Use the "Bing Video Search" box (or log into Microsoft for other searches) to directly search for a video to embed. 

    Bing Video Search

  2. Search for the desired video, select it, and select "Insert" to put it on the document. 
  3. Clicking on the video will allow you to expand and watch it within the document.

    Embedded Video

  4. You can use the points around the video to resize it, the arrow to rotate it, or the box in the upper right to choose how the text surrounds the video.
  5. Clicking on the play arrow on the video will expand the video in the screen and play it. 
Subscribe to Microsoft