Printing to the On-campus Printers

Documentation

NMU public network printers are located in the NMU Library, Jacobetti Center, and PEIF. For your convenience these printers are already set up on your NMU issued ThinkPad or MacBook.

Using the printers requires you to pay for each printed page using CatCash on your NMU ID (Wildcat Express Card). See the Library's Printing page for help on setting up for their printers or adding funds to your CatCash.

Registering a Computer on NMU's Network

Documentation

Computers must be connected to the network to be registered. Registering your computer or device allows you to access the internet without restricitons to nmu.edu pages. You must have an active NMU account to register your device. 

  1. Make sure you are connected to the NMU campus network using the computer you wish to register with the type of connection you are registering.
  2. Open Internet Explorer (or any web browser) and go to http://www-register.nmu.edu to open the registration page (clicking this link will open the page in a new window so you can still follow these directions).
    Note: If the page does not display NOT REGISTERED under "Machine Status:" then your computer is already registered with this connection on the campus network and you do not need to continue any further.
  3. If NOT REGISTERED is displayed enter your NMU User ID (i.e. jsmith without the @nmu.edu) and password. Then click Sign In.

     
  4. Using the scroll bar at the right, read NMU's Computer Network Acceptable Use Policy and then click I Have Read the NMU Acceptable Use Policy button at the bottom.

     
  5. You now must answer a short test about NMU's Computer Network Acceptable Use Policy that you just read in the previous step. Answer the quesitons by clicking the buttons corresponding to the correct answers and then click Submit Answers at the bottom of the page.
  6. Your registration is now complete. For security, click the Logout button on the final screen or simply close your browser window.


    It will take about 10 minutes before you have full access to the campus network. Please remember to register each connection available for each computer you will be using to access the campus network. If you have any questions about registering your computer or need further assistance please contact the Help Desk at 227-2468.

Saving and Exporting a Word document as a PDF file

Documentation

With Microsoft Office, you are able to save and export regular word documents as PDF files. 


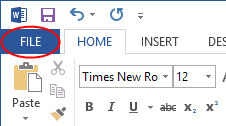
1. With the document that you want to export/save as a PDF open, select "File" from the ribbon in the top left corner

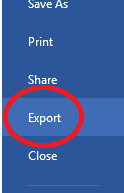
2. Select "Export" option that appears along the left-hand side

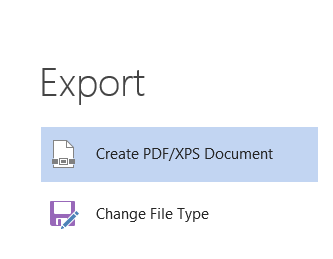
3. Then select "Create PDF/XPS Document" in the center of the screen

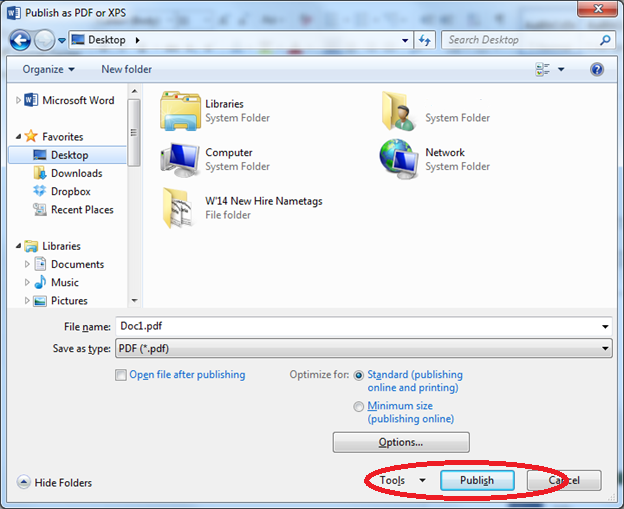
4. Choose a folder to export the PDF 
5. Type a name for the document and select "Publish"


Now you can navigate to the folder where you saved the PDF document will open as a PDF file, instead of a regular Word document. 

Using the Lenovo System Update Tool

Documentation

The Lenovo System Update tool installs unique updates to your ThinkPad computer that are not included in the Microsoft updates. We recommend you routinely run System Update on a monthly basis and install the critical, recommended, and optional updates to keep your computer software up to date.

This page has been split into 2 sections. The first section covers installing the updates related to problems with audio, video and using projectors and takes about 20 minutes to complete. The second section covers installing the full set of recommended updates and takes about an hour to complete. You can do the first section and complete the second section at some later date if you would like.

Section 1 Updates that Resolve Audio, Video, and Projector Problems

WARNING: Lenovo System Updates can contain firmware updates. It is critical that firmware updates are not interrupted. Therefore, we recommend you preform the System Updates with the computer connected to AC power and a fast Internet connection (either NMU WiFi or NMU Ethernet) at a time and place where the update will not be interrupted. If this is something you do not feel comfortable doing yourself, please visit the HelpDesk and get a request to have Micro Repair perform the updates. You should back up your files prior to coming in and Micro Repair currently anticipates a 2 hour turnaround time to have your computer ready.
 

1. Close all other programs and applications.
2. Connect to AC Power.
3. Connect to a fast Internet connection (either NMU WiFi or NMU Ethernet).
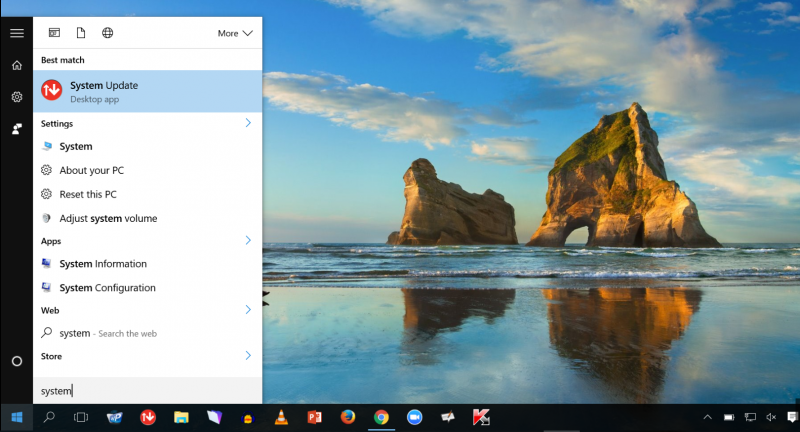
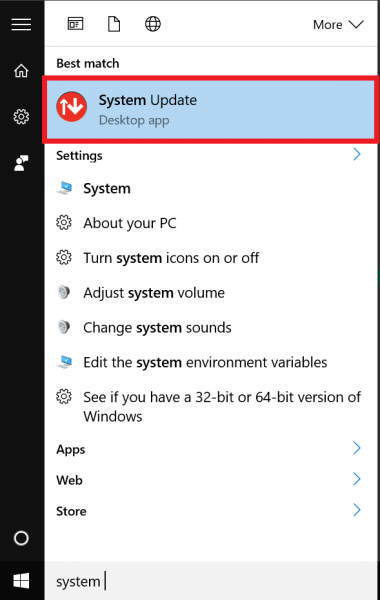
4. Run Lenovo's "System Update".  To do this, click on the Windows icon found at the bottom left corner of the desktop on the task bar.  Type "system update" and choose it from the list of choices.
   click on system update
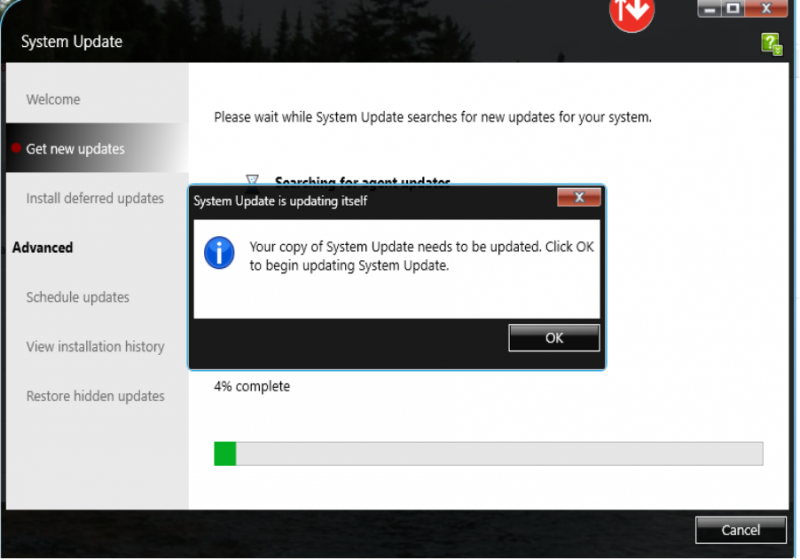
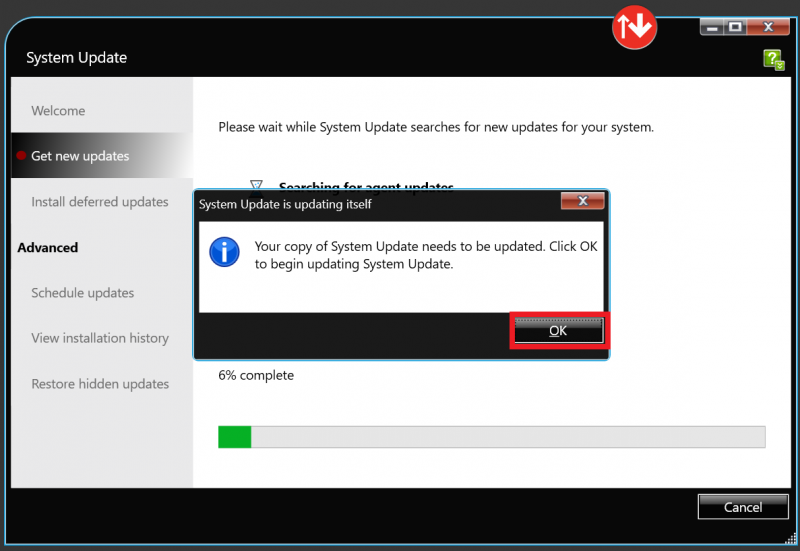
5. If this is your first time running System Update, it will need to update itself.
  
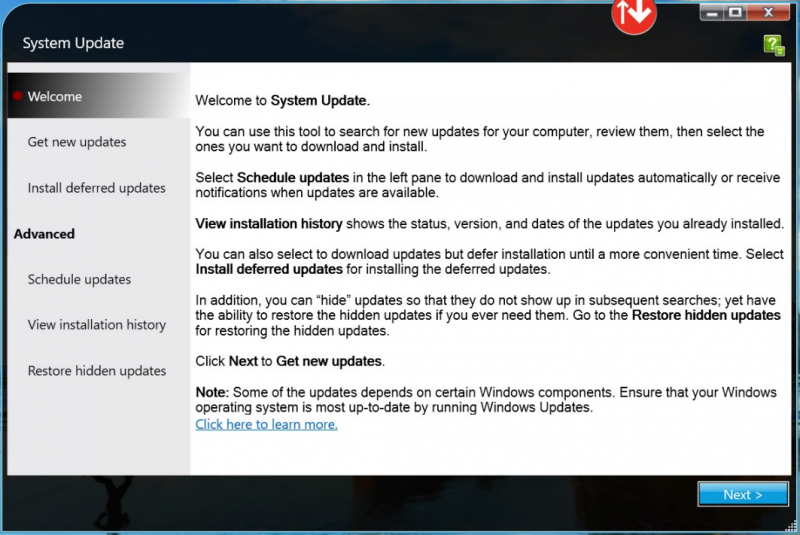
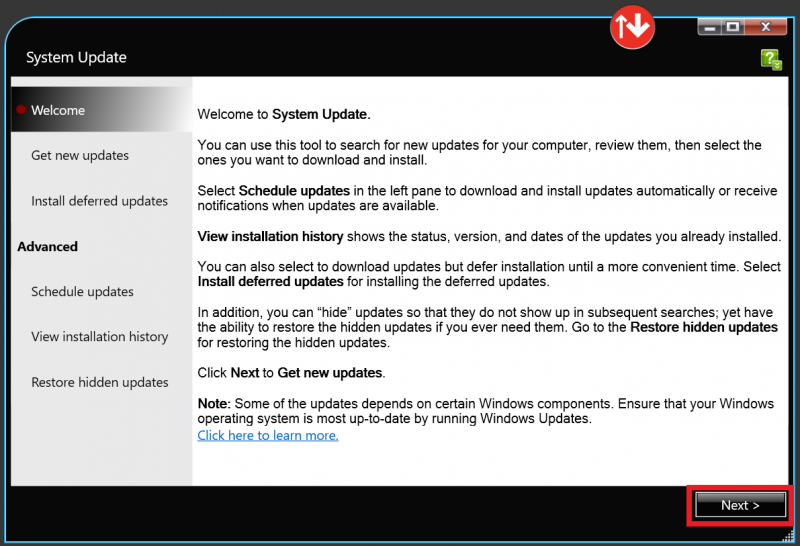
6. Once you are at the System Update home screen, it will look like this...
  
7. Click "Next" and System Updates will prepare all available updates for you to choose from.
  
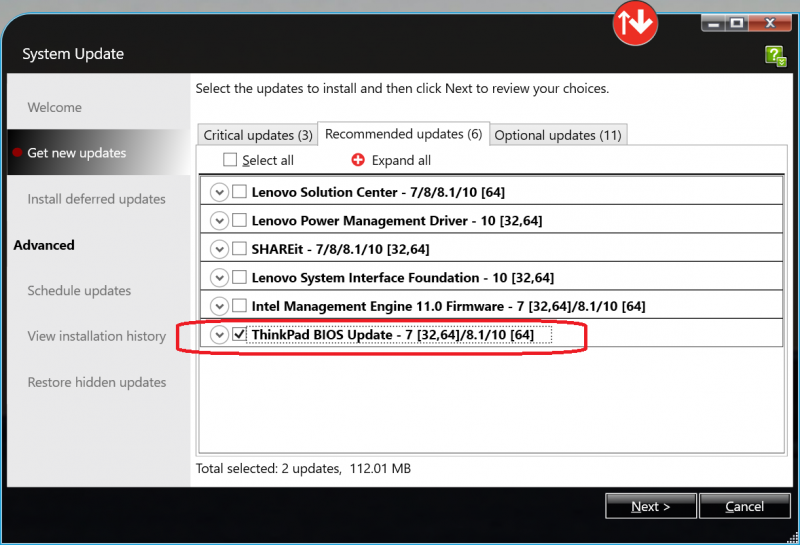
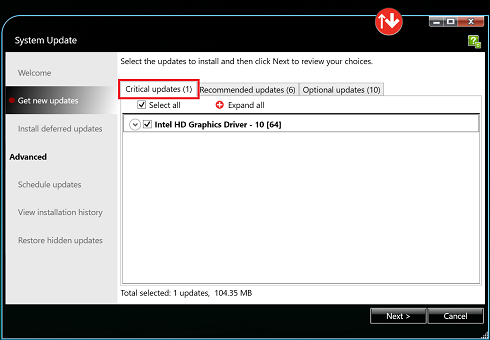
8. Once you are able to perform updates, make sure the first update you choose is JUST to update “BIOS” under "Critical Updates" or "Recommended Updates".  You will be prompted to reboot your laptop.
  
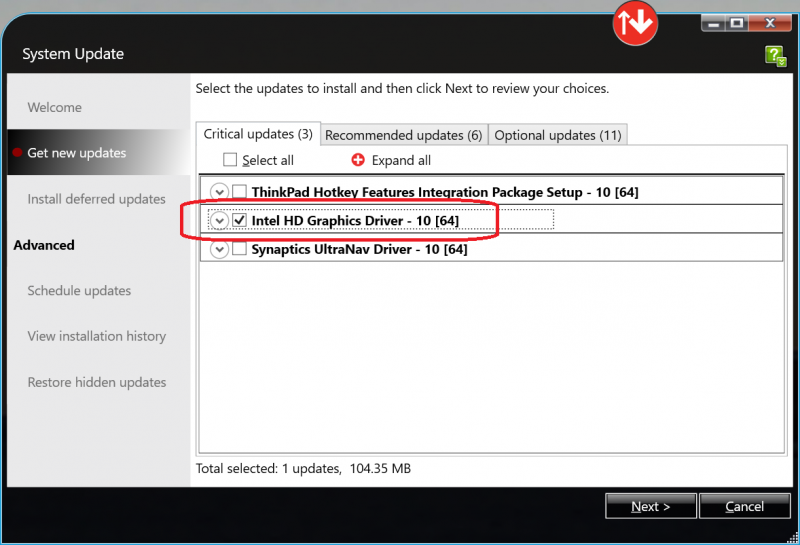
9. The second update you should choose should JUST be “Intel HD Graphics Driver” under "Critical Updates".  You will be prompted to reboot your laptop.
  
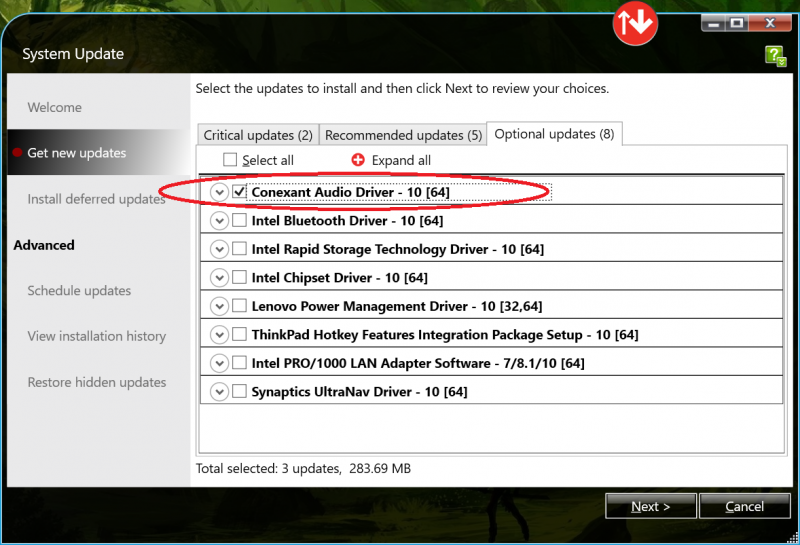
10. The third and final update you should choose should JUST be “Conexant Audio Driver” under "Optional Updates".  You will be prompted to reboot your laptop.
  
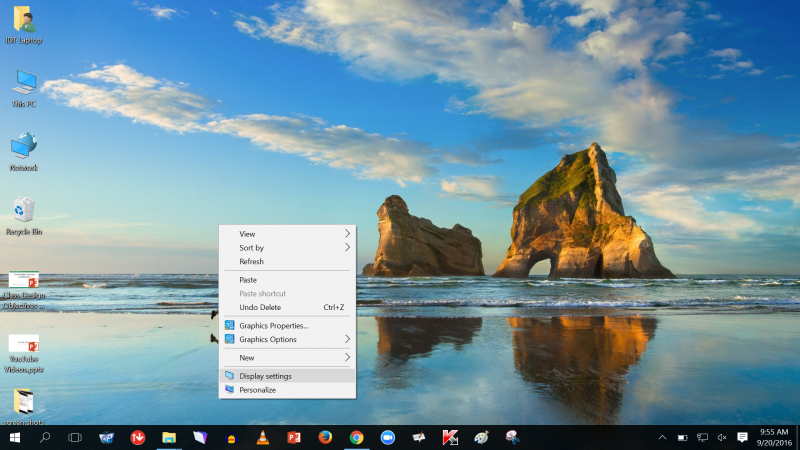
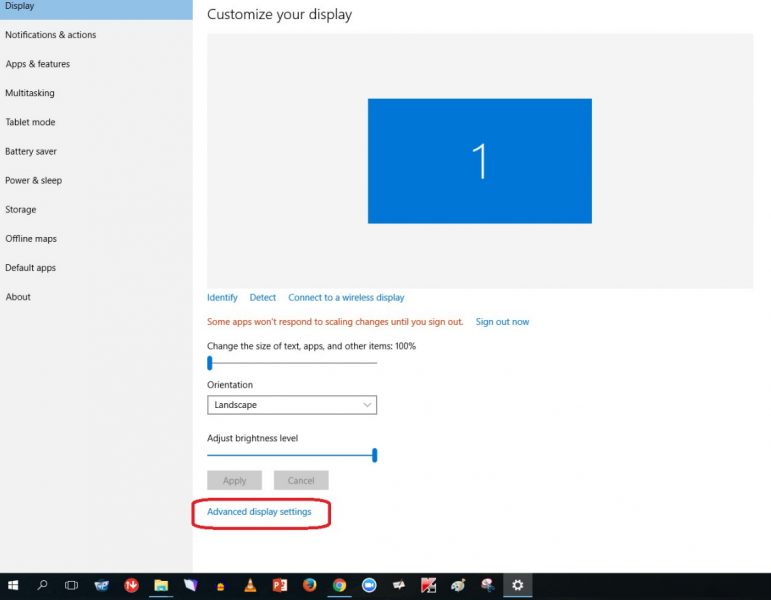
11. While connected to projector in classroom via the 15 pin VGA cable, right click on desktop and choose display settings.
  
12. You will be brought to a screen where you choose "Advanced Settings".
  
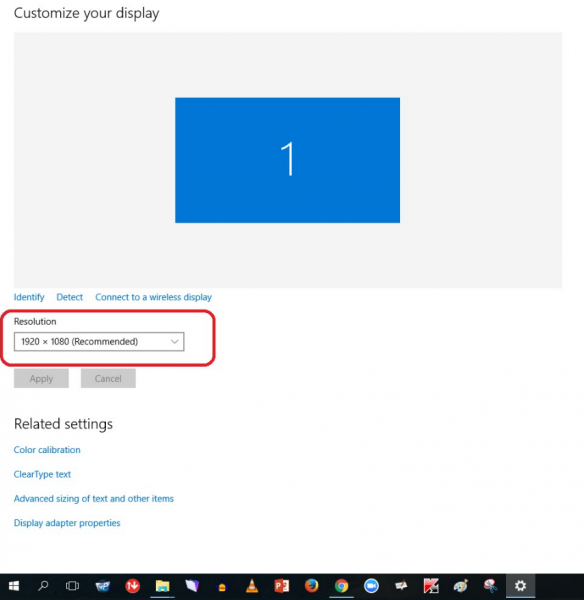
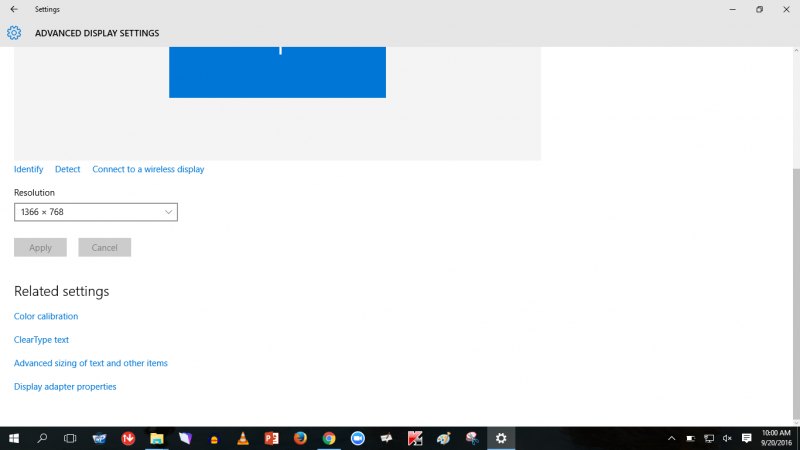
13. Then click on the recommended resolution...
  
14. Reduce it to "1366x768"


Section 2 All Recommended Updates


The Lenovo System Updates also address network connectivity issues first identified on the T460s ThinkPads in August of 2016 and are recommended for the T460s with the fall 2016 NMU software image. For the T460s ThinkPads as of August 2016 these updates take approximately 1 hour to complete. 

WARNING: Lenovo System Updates can contain firmware updates. It is critical that firmware updates are not interrupted. Therefore, we recommend you preform the System Updates with the computer connected to AC power and a fast Internet connection (either NMU WiFi or NMU Ethernet) at a time and place where the update will not be interrupted. If this is something you do not feel comfortable doing yourself, please visit the HelpDesk and get a request to have Micro Repair perform the updates. You should back up your files prior to coming in and Micro Repair currently anticipates a 2 hour turnaround time to have your computer ready.

1. Close all other programs and applications.
2. Connect to AC Power.
3. Connect to a fast Internet connection (either NMU WiFi or NMU Ethernet).
4. Go to the “Start” menu and type “system update” and select “System Update” from the list of results. The program will start.  


5. The program will start and provide a System Update Welcome screen. Click “Next”.
 

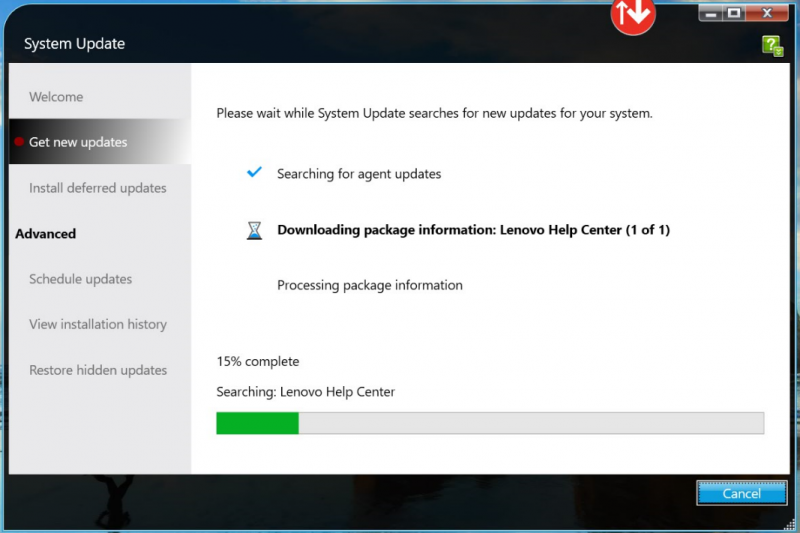
6. The program will search for and download available updates.


7. If prompted to update the System Update tool click “OK”.


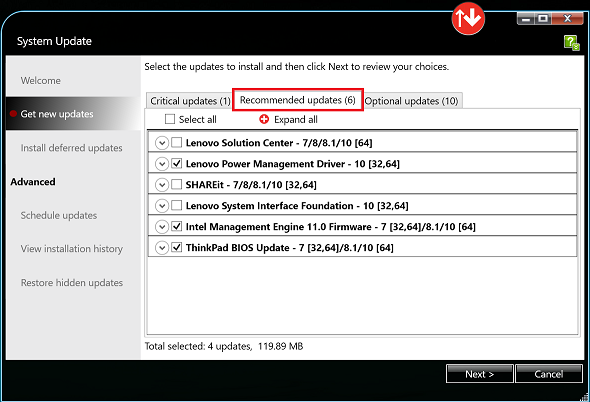
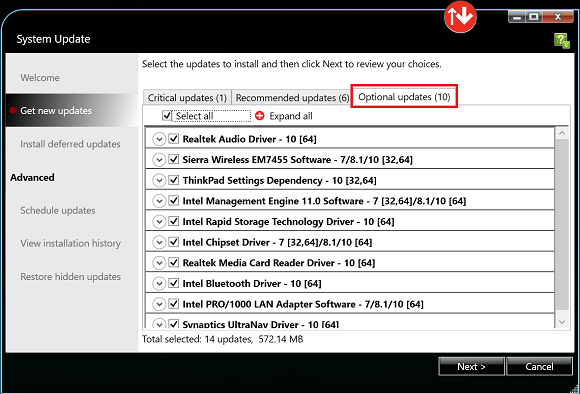
8. Lists of available critical, recommended, and optional updates will be displayed in 3 tabs. On the "Critical" and "Optional" tabs, check the “Select All” checkbox to select all the updates. On the "Recommended" tab, select the individual updates excluding "Lenovo Solution Center", "SHAREit", and "Lenovo System Interface Foundation." Click “Next” to begin the update process.


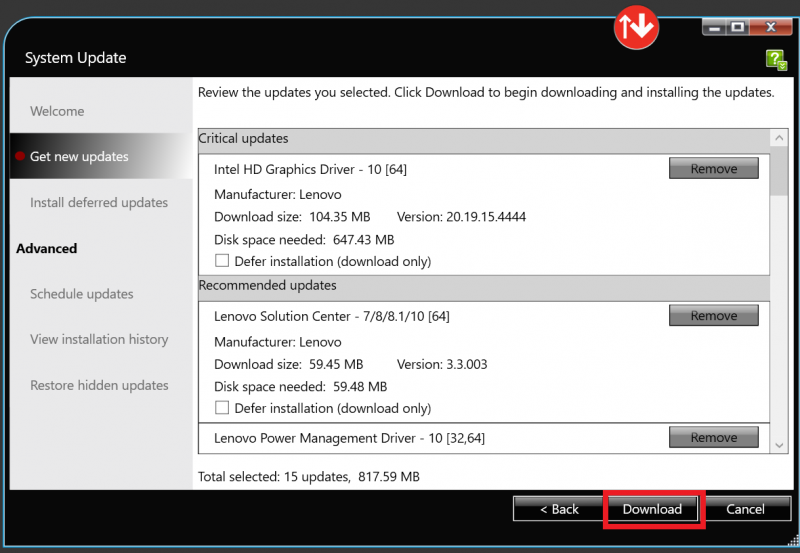
9. You may be prompted to download the updates, Click “Download.”


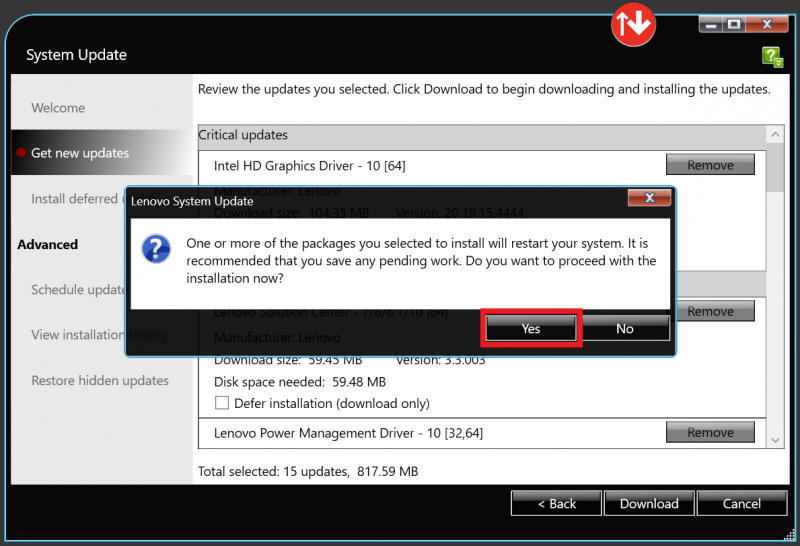
10. You may be prompted to restart your computer, click “Yes”
.

11. The updates will begin downloading.


12. Wait about an hour and expect at least one restart to complete the process.

Windows Activation

Documentation

Occasionally the Windows software on NMU issued machines may state that it is not activated or genuine (especially if you haven't connected to an on-campus network recently). You may see prompts stating "The activation period has expired," "You may be a victim of software counterfeiting," or "Windows is not genuine." Follow these intstructions to verify and/or troubleshoot Windows activation. 


Activate Windows

1. You will need to be connected to an NMU network (Wifi, Ethernet, or LTE) to activate. If you are off campus, you can also connect using the VPN client.


2. Once connected to an NMU network, you must first ensure that your date and time are correctly synchronized. It is possible for AM/PM to be incorrect, the date to be wrong, or even for the clock to be off by minutes or seconds.  Ensure your time is correct and change it if it isn't by following the instructions at our "Windows Date and Time Zone Settings" page. 

To check activation status in Windows 11, select the Start button, and then select Settings > System and then select Activation .  Your activation status will be listed next to Activation.

Check  activation status in Settings

You'll see one of these activation status messages on the Activation page:

Activation statusDescription
Windows is activated
Windows is activated with a digital license
Windows is activated with a digital license linked to your Microsoft account
  • You are activated.
  • Your Microsoft account is already linked to your digital license.
Windows is not activated
  • You are not activated.
  • You will see an error message explaining the failure.
  • You might need to purchase Windows 11 to activate.


Mapping a Network Drive and DepartmentShare

Documentation

Faculty, staff, and some students have access to an NMU network drive. This offers the opportunity to share files with others in the department. It is important to note that these folders are only available from an NMU network connection such as WiFi, wired or WiMAX. Some offices are required to use the VPN client in order to connect to a network drive. Mapping these drives give you easy access to network folders without having to manually connect each time. This is an excellent way for faculty to add their Departmentshare if use it regularly.

Windows
OS X

Windows

1. Open "This PC" from your desktop or from "File Explorer" in the Windows "Start" menu. 


2. Click the "Computer" tab and "Map Network Drive" at the top of the window.
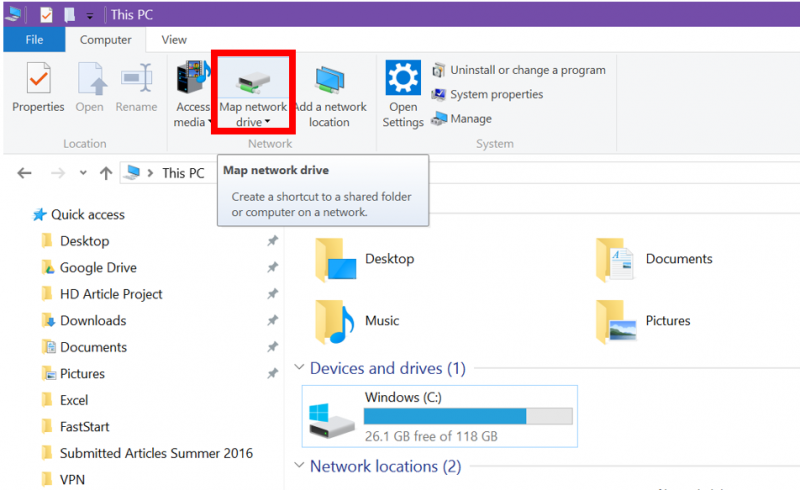


3. In the drive list, click a drive letter. you can choose any available letter. You'll need to be connected via VPN or Ethernet to access the drive.


4. In the "Folder" box, type the path of the folder or computer - Using Departmentshare as an example.

  • For faculty the department share you would use \\departmentshare.nmu.edu\deptname
  • If you do not have access to this, you will need to ask your Department Head or Secretary to add you.

5. To connect every time you log in, select the "Reconnect at logon" check box.


6. Click "Finish." You will be prompted to log in with your credentials. 


Your computer is now connected, or mapped, to the network drive. If you can't connect to a network drive or folder, the computer you're trying to connect to might be turned off or you might not have the correct permissions. If you can't connect, contact your network administrator. 
 

OS X

1. Minimize all open windows and single-click anywhere on the background to make sure "Finder" is the active application on the top left of the screen. 

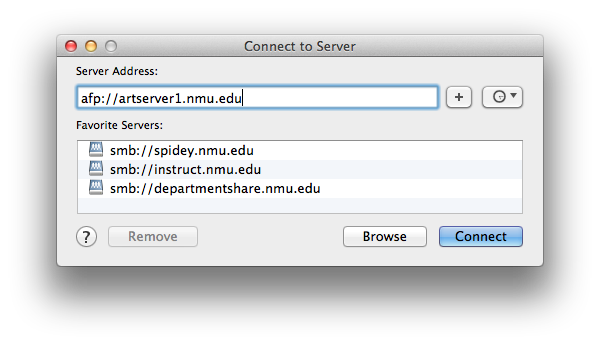
2. Once you see "Finder" in the top left corner, click the "Go" button. Scroll down and click "Connect to Server."
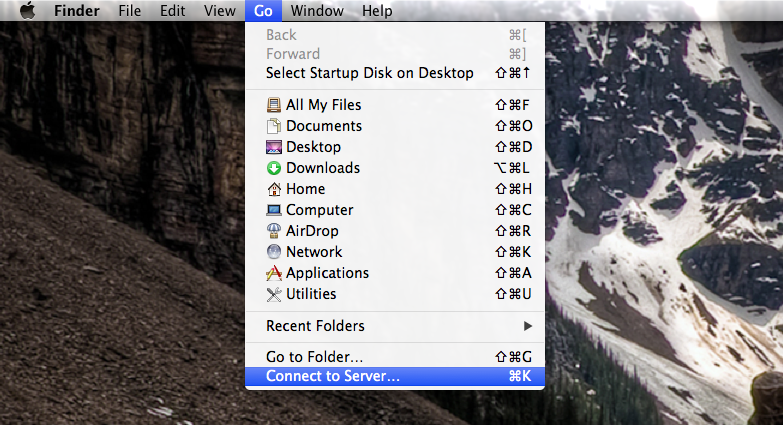
     

3. Type the path of the share you are trying to map. In most cases you will need to start the server address with "smb://"

For example to connect to the departmentshare you would use "smb://departmentshare.nmu.edu/deptname"

4. Once the path is entered click the "+" sign, and then click "Connect."
 

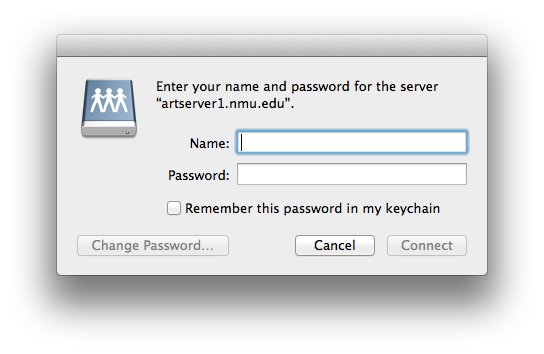
5. Type in your credentials. Check the "Remember this password in the keychain" to allow the drive to map automatically. Click "Connect."
 

6. Once you connected, your mapped network drive should appear on the upper-right hand portion of your desktop. Double clicking it will show its contents.

Guest Wireless Locations

Documentation

NMU Wireless internet is available on registered computers all over campus for students, staff, retirees, and faculty. Visitors without NMU credentials can connect using the NMU_GUEST access points after agreeing to the acceptable use policy. 

NMU_GUEST access is restricted to common protocols used for web and email access. If you are a guest and can't access what you need using the guest access, contact the department you are visiting to see if they can sponsor you as a guest on the NMU network, which should provide you with the access you need. See "Sponsoring a Guest on the NMU Network" for details.

View instructions for connecting to the NMU_GUEST access point.

View access locations during:

School Year NMU_GUEST Locations

  • Cohodas
  • Harden Hall
  • University Center
  • Hedgcock
  • Forest Roberts Theatre
  • Jacobetti Center
  • Berry Events Center
  • Superior Dome
  • Presque Isle Commons (Temaki and Tea, Smoothie King)
  • NMU Invent Building (on Presque Isle Ave)
  • Ripley Steam Plant
  • Services Building
  • NMU Golf Course Clubhouse

Summer NMU_GUEST Locations

  • Art and Design Building
  • Berry Events Center
  • Cohodas
  • Superior Dome
  • Gries Hall
  • Hedgcock
  • Jacobetti
  • Jamrich
  • Harden Hall
  • PEIF Recreation Facility
  • Ripley Heating Plant
  • Services Building
  • Northern Center
  • West Science
  • New Science
  • Whitman
  • Quad I Residence Halls (Gant and Spalding)
  • Quad II Residence Halls
  • West Hall
  • Woodland Park

Formatting Word Mail Merge Values in Excel

Documentation

Occasionally some numbers in Excel don't format correctly in Word when using the mail merge feature under the Mailings tab. Follow these steps to resolve this issue before your merge. 


1. First, make sure your ZIP or postal codes don't lose any zeros in the mail merge process by formatting them in your Excel file as text. 
    
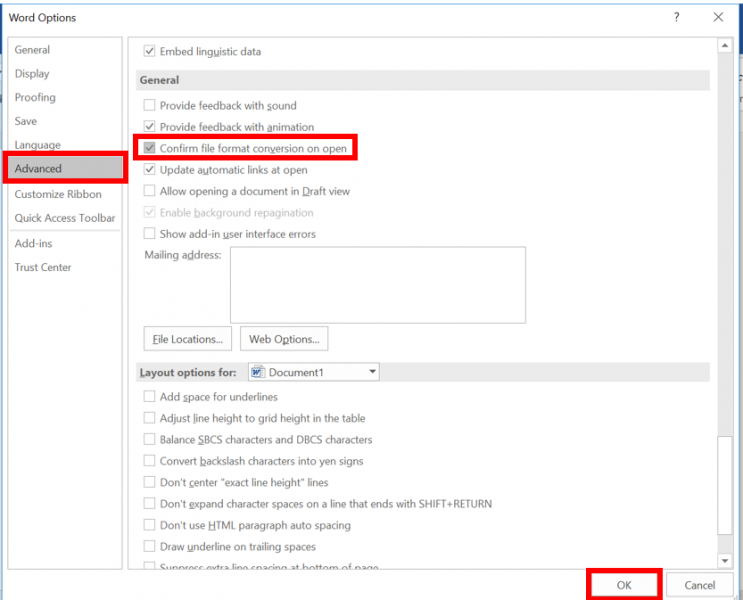
2. In Word, click the "File Tab" then click "Options." 
    

3. Choose "Advanced" from the left pane and select "Confirm file format conversion on open." Click "OK." 
    

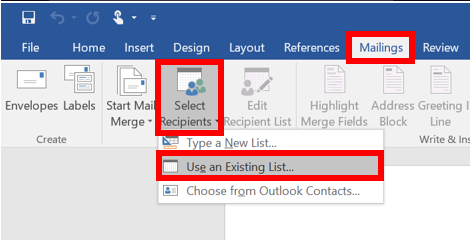
4. In the mail merge document, click the "Mailings" tab, "Select Recipients," then "Use an Existing List." 
    

5.  Browse to your spreadsheet and double-click it. 

6. Click the "Show all" button in the "Confirm Data Source" window, select "MS Excel Woorkseets via DDE (*xls)" and select "OK." 
    

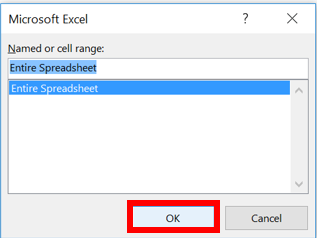
7. Click "Entire Spreadsheet" then click "OK." 
    

8. Now you can continue with your mail merge

Ethernet Connection Information

Documentation

There are more than 10,000 network ports on Northern's campus. For help connecting to one of them see:

Connecting on Campus Via a Network Port (Windows)

These instructions tell how to connect to the campus network through one of the orange network ports on campus. They assume your network settings are already configured.

  • NMU notebook computers are already configured to connect to the NMU network.
  1. Find an orange network port.
  2. Plug your network cable into the orange network port and into the network port on the side of your computer.
  3. If the connection is not established automatically, open ThinkVantage Access Connections and troubleshoot the connection from there.

Note: The first time you connect a computer to the campus network, you must register the computer's network interface(s).

Drag and Drop Back Up Method

Documentation

Drag and Drop Back Up Method

There are many ways to back up your computer. The drag-and-drop method is a common one. It is recommended that you do a back-up at least once a month, That way if something were to happen with your computer, you would have most of your files. We recommend using an external USB drive with sufficient space available to store all of your files.


1. Plug in the device you'd like to back up your files to. In our example. It is a Kinston drive with the drive letter of D: Your name and drive letter may be different, depending on what drive you use.


2. Type File Explorer click File Explorer and open a new window.


3. Right-click the File Explorer icon and click "File Explorer" to open a second window.     


4. Drag and resize the second window to the right so it displays on the second half of the screen, next to the previous one. 


5. Navigate in one window to your external device, then in the other window navigate to the locations you would like to copy files from. In this case, click and drag the files from your PC to the external drive. In our example, the target drive is KINGSTON (D): Your external drive may have a different name and drive letter. Repeat the procedure until you've backed up all the desired files. 


We recommend backing up the following folders. You may have others that contain data important to you.

Music

Pictures

Desktop

Documents

Downloads

Favorites

Videos

Backup using File History

  • File History is a handy feature in Windows that helps you protect your personal files and folders from accidental loss or damage. Think of it as a backup system that automatically saves copies of your files, so you can easily restore them if something goes wrong. Whether you accidentally delete a file, make unwanted changes, or experience a technical issue, File History can come to your rescue by allowing you to recover previous versions of your files and folders.
  • One of the great things about File History is that it automatically backs up all your libraries. This includes default libraries like Documents, Pictures, Videos, and Music, as well as any custom libraries you have created. If you have folders elsewhere that you want to back up, you can add them to an existing library or create a new library for them.
  • Setting up File History is straightforward. Once enabled, it continuously monitors your files and folders, making regular backups to an external drive or network location. This means you don't have to worry about manually saving copies of your important documents, photos, videos, or entire folders. If you ever need to recover a file or folder, you can browse through the different versions saved by File History and restore the one you need. It's a simple yet powerful tool that provides peace of mind by ensuring your valuable data is always protected. 
  • Configure File History

  • Here are the steps to configure File History:

  • Connect an external drive or a network location: ensure you have an external drive connected to your computer or a network location configured where you want to save your backups
  • From the Control Panel, under System and Security, select Save backup copies of your files with File History
  • Select Turn on to enable File History


Subscribe to Desktops