Windows Update

Documentation

NMU issued desktops and ThinkPad notebooks are configured with Automatic Updates, which means that each computer regularly communicates with a local Automatic Updates server. The server tells the computer what updates are available, and the computer tells you they are ready to be installed. Windows updates are available typically the second Tuesday of each month after 6:00 pm but critical updates might be available more often. It is best to routinely install the updates at a time that is convenient to you since the computer will install them automatically install the next time you restart or turn your computer off and on.


Never turn your computer off when it is installing updates and ensure that it is plugged in if the power is low. If the computer is shut down when installing updates your system will become corrupted. It is important to keep windows up to date to eliminate any software bugs and protect your computer from malicious software. To learn more reasons why you should update, click here

To manually check for and install updates, follow the steps below. Though the screenshots show Windows 10, the steps are similar for earlier versions of windows. 

1. Save and close all open work and windows.

2. In the Windows Start Menu type in and click the "Check for Updates" option in the new window.

3. Click the "Check for Updates" button in the new window and wait while Windows searches Microsoft's update server for available updates.

3. If any are available, they will automatically start to download. 

4. Once the updates are finished downloading you will be prompted to install them. You can either click "Install now" in the open "Update & Security" window, or you can click on the notification in the action center in the charms bar. 


NOTE: Downloading and Installing are two different steps in their own. You download the updates from the Microsoft server, but will have to actually Install them to the computer in order to take advantage of the new features. The newly downloaded updates will not be fully installed to the computer until the computer has been restarted. We recommend restarting the computer as soon as the updates are installed so the installation doesn't happen at a time that is inconvenient for you such as the start of class or when attempting to take an online exam.


5. Once you select the restart option in the prompt, the computer will restart and install the updates. Some updates, large ones or if you haven't updated in a while, will take a fair amount of time. You'll know once the update is completed, when your computer returns you to the login screen. 
 

Changing Your Computer's Power Options

Documentation

There are times when you may want to change your computer’s power options to increase performance, decrease energy consumption, or assure the computer does not go into sleep in the middle of a key process such as uploading or downloading large files, giving a presentation, or watching a long video.
 

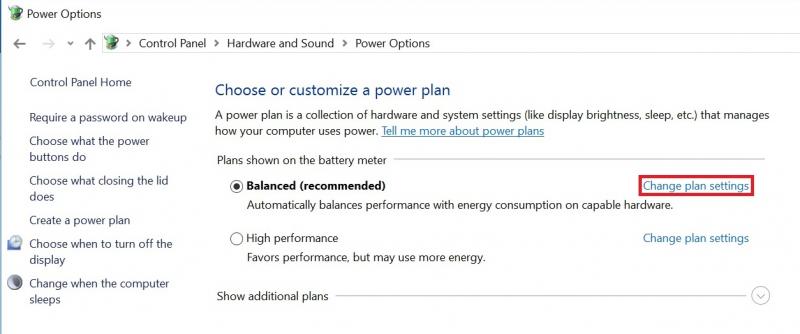
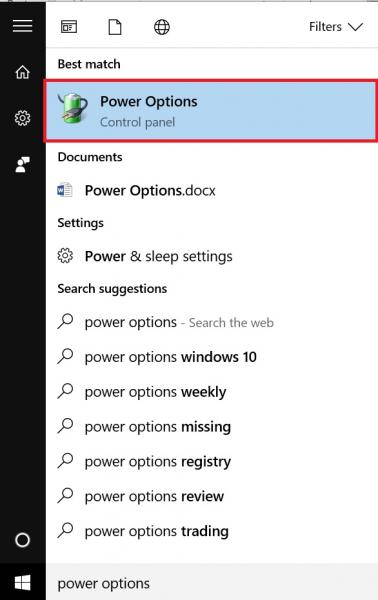
1. In the Windows Start menu, type in “power options” to find and click on the “Power Options” control panel settings.
    Power Options Control panel
2. Click the “Change plan settings” link for the currently selected plan.
    Click the “Change plan settings” link for the currently selected plan.
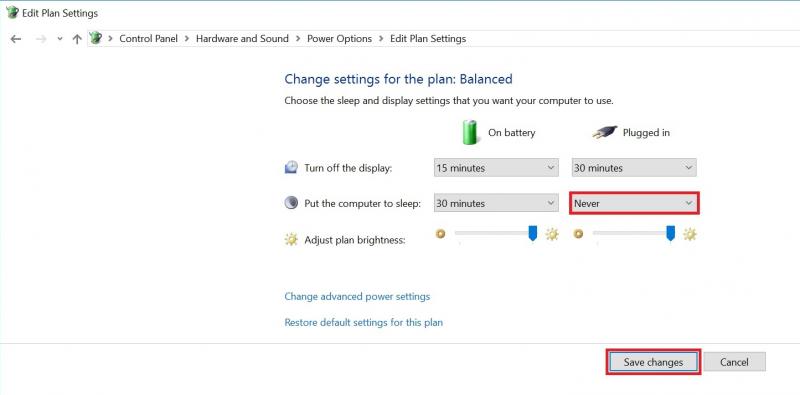
3. Modify the settings as needed and click the “Save Settings” button.
    Modify the settings as needed and click the “Save Settings” button.

Changing the Windows Sound Theme

Documentation

The sounds that Windows makes on Startup, when a program is closed, or during other program events can be changed. The following steps outline this process.

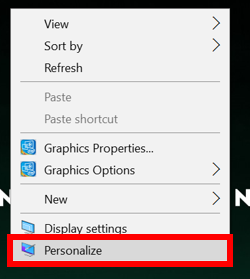
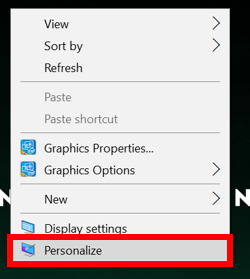
1. Right click on any empty space on the desktop and select "Personalize" from the drop-down menu.


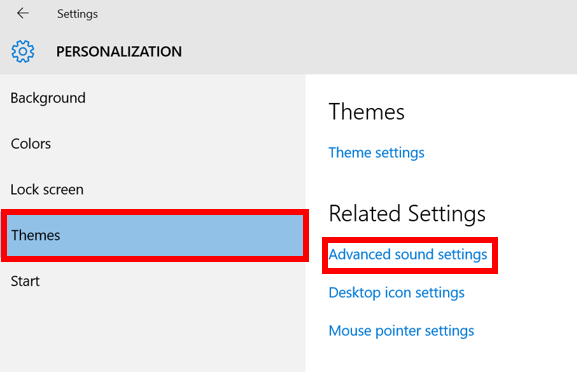
2. In the "Themes" tab of the Personalization window, select "Advanced Sound Settings" under "Related Settings." 
    

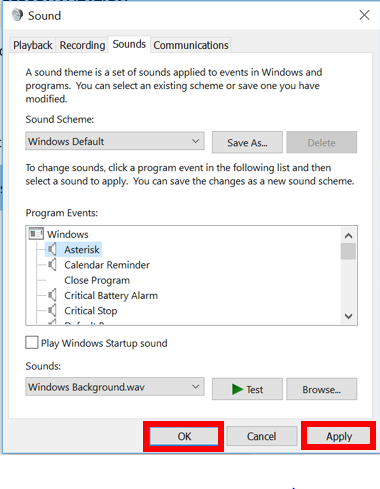
3. A new window will appear. From the "Sound Scheme" dropdown menu, you can select a premade sound scheme. 


  • To hear the sounds, select an item from "Program Events" and click the "Test" button with the green arrow to hear it.

4. Select "Apply" and "OK" when you have selected the desired scheme. 

Changing the Windows Screen Saver

Documentation

The Windows screen saver can be changed to fit your personal preferences and make your computer more secure by requiring the Windows password after a set number of minutes of inactivity. The steps below cover the process of changing the screen saver. 

1. Right click on any empty space on the desktop and select "Personalize" from the drop-down menu. 


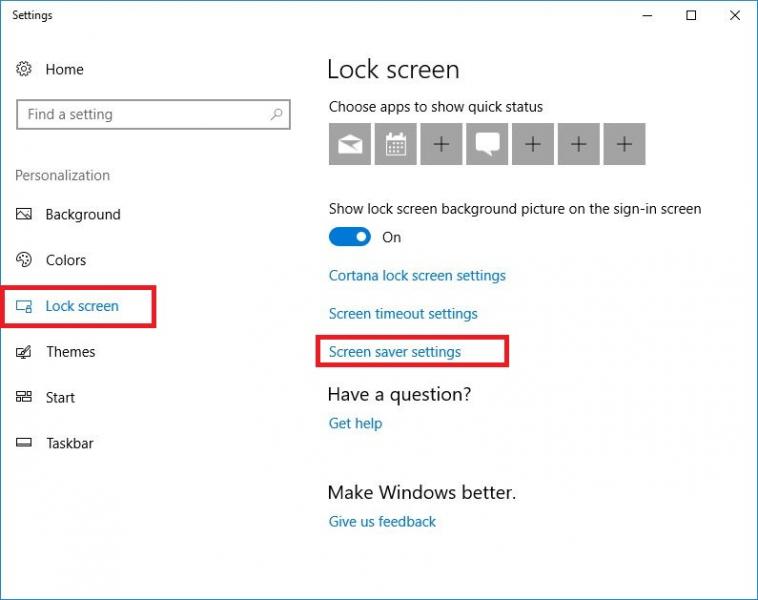
2. Click on the "Lock Screen" option on the left and scroll down the right side of the window and select "Screen saver settings".
    

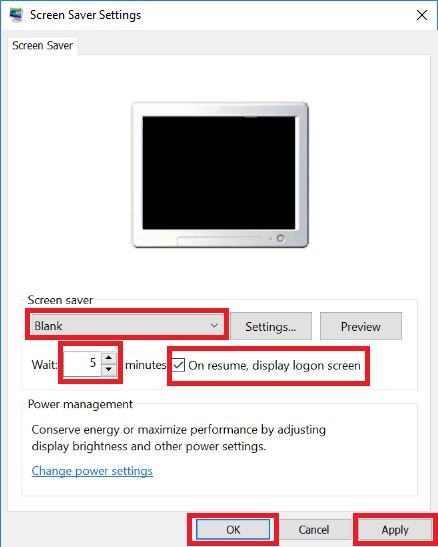
3. In the new window, select the "Screen Saver" option from the pulldown menu. Set the "Wait" time to 5 minutes and check the "On resume, desplay the logon screen" checkbox. Click "Apply" and "OK". This will automatically bring up the screen saver after 5 minutes of inactivity and you will be prompted for the Windows password to use the computer.


4. HELPFUL HINT: You don't have to wait for your screen saver to lock your computer. You can lock your Windows computer at any time by using the "Ctrl-L" key combination. The "Ctrl-L" key combination will work any time you want secure your computer. You don't have to set up the screen saver to use the "Ctrl-L" key combination.

Adding a Security Exception to Your Browser

Documentation

NMU creates its own SSL security certificates used for some network services. These certificates are already installed on NMU issued computers but you may need to install them on your personally owned device in order to access some of the NMU network services. Installing the NMU SSL certificates is the preferred solution. Instructions are available on the "Add the NMU SSL Certificate" page.

Another option is to allow an exception for the NMU network service you are trying to access. Here are instructions for doing so with popular web browsers.

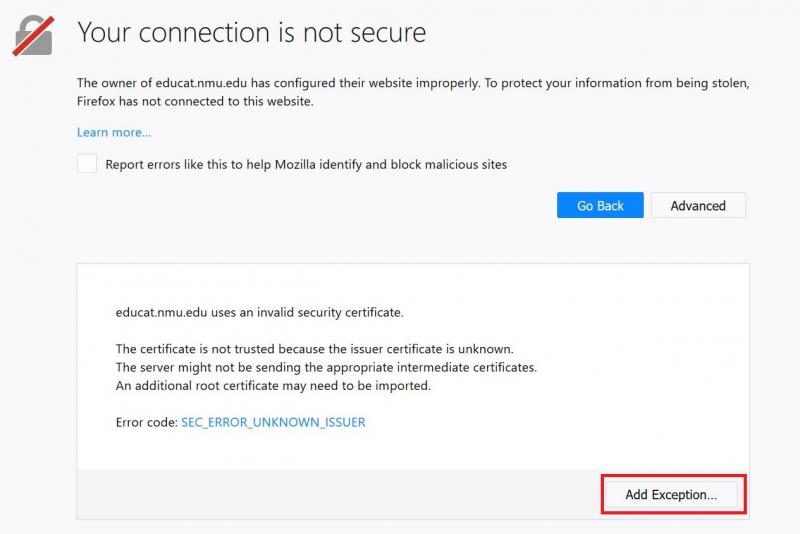
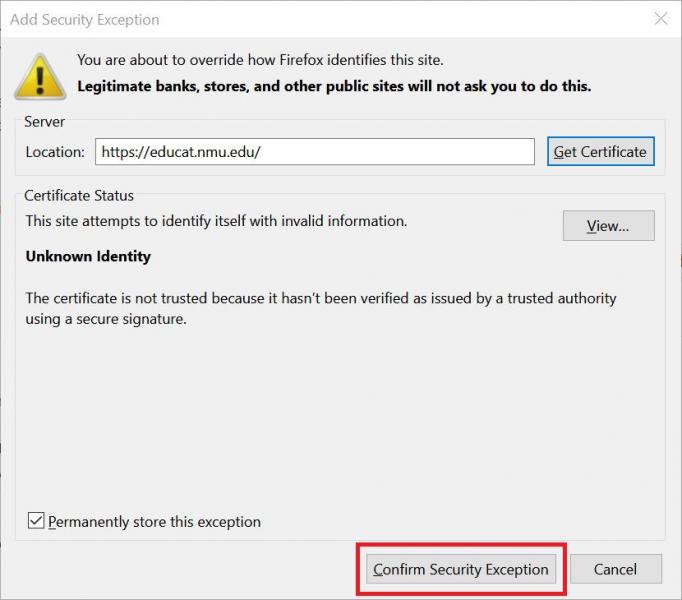
Firefox

    Click "Advanced" at the bottom of the page, click "Add Exception...", then click an “Confirm Security Exception” button at the bottom of the page and the web page will be added to an exception list. 


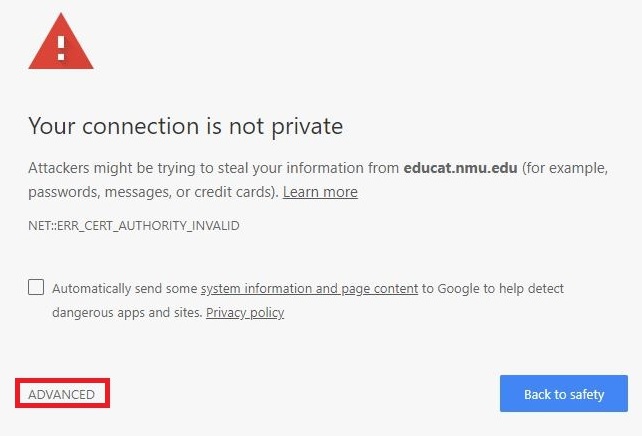
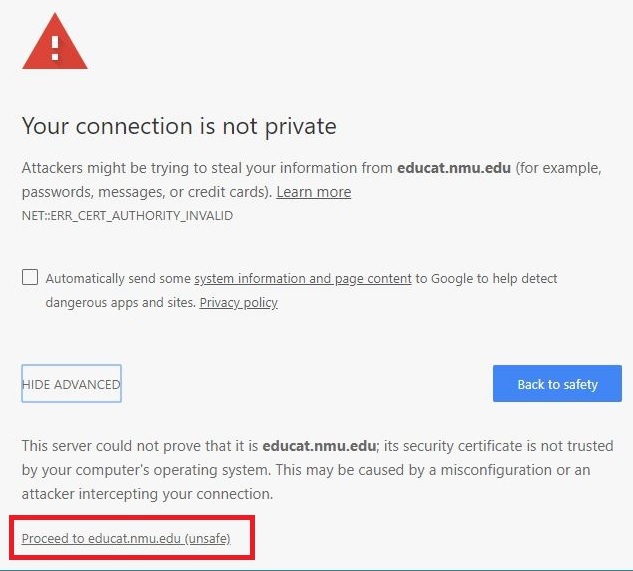
Chrome

    Click "Advanced" at the bottom of the page, then click "Proceed to address-of-the-website (unsafe)"


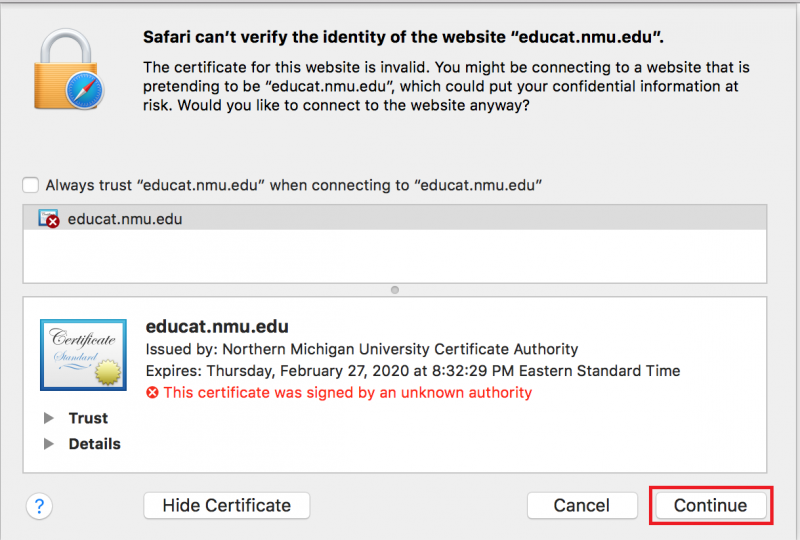
Safari

    Click "Show Certificate", review the certificate content is from NMU, then click "Continue"  to get to the website.


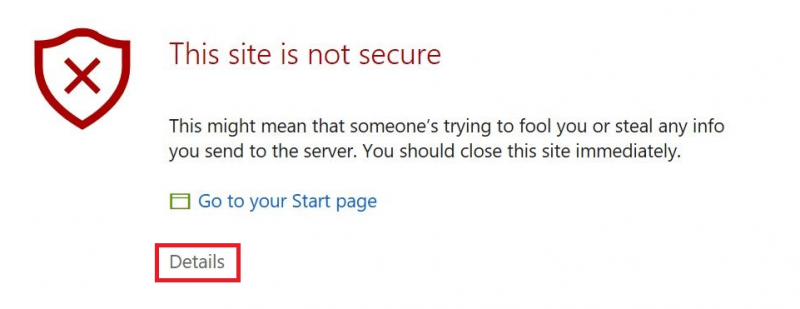
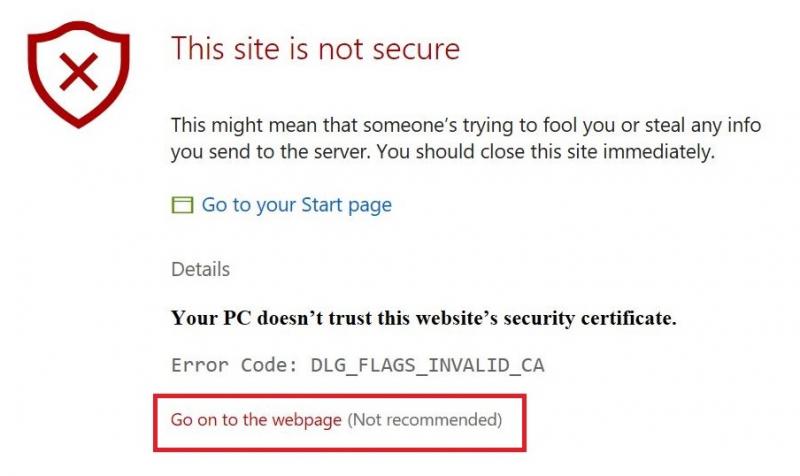
Edge

    Click "Details" and then "Go on to webpage"


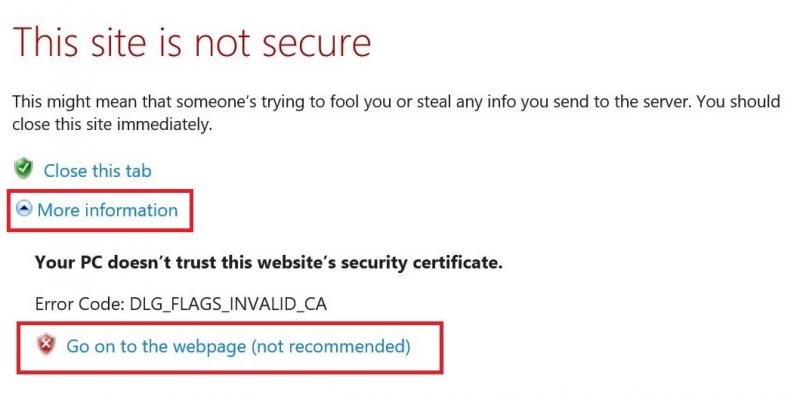
Internet Explorer

    Click "More Information” the click "Go on to webpage (not recommended)"
   

Subscribe to Desktops