Guest Wireless Locations

Documentation

NMU Wireless internet is available on registered computers all over campus for students, staff, retirees, and faculty. Visitors without NMU credentials can connect using the NMU_GUEST access points after agreeing to the acceptable use policy. 

NMU_GUEST access is restricted to common protocols used for web and email access. If you are a guest and can't access what you need using the guest access, contact the department you are visiting to see if they can sponsor you as a guest on the NMU network, which should provide you with the access you need. See "Sponsoring a Guest on the NMU Network" for details.

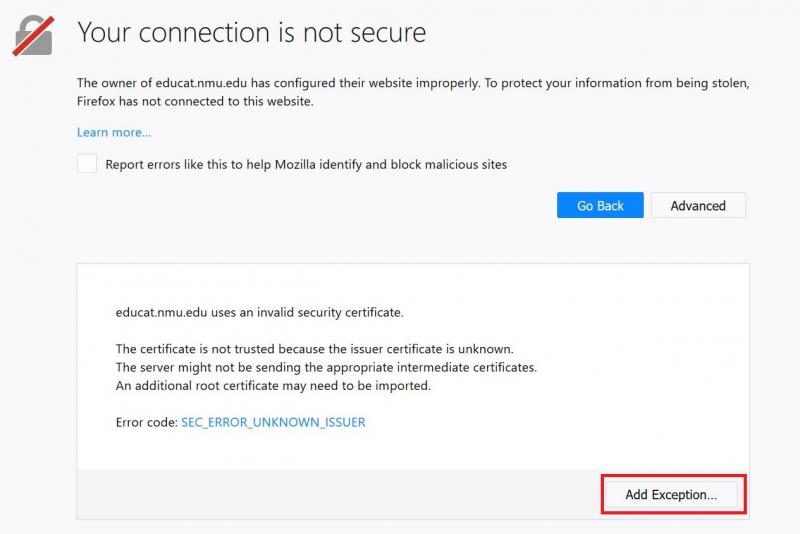
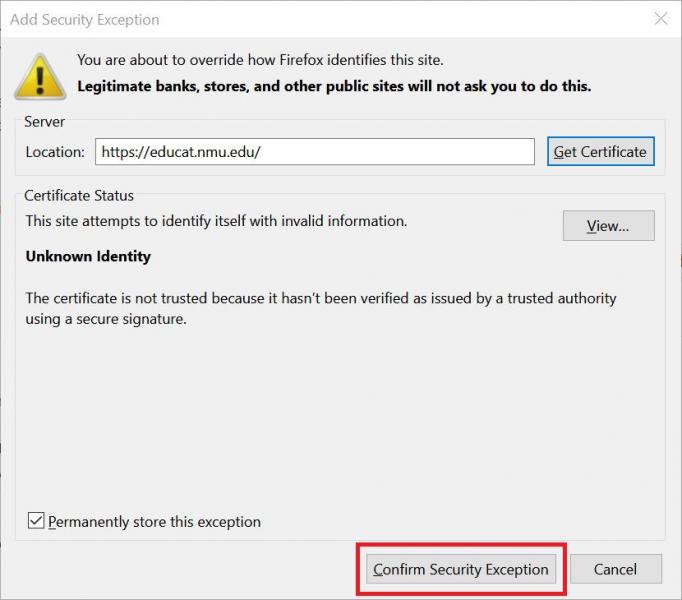
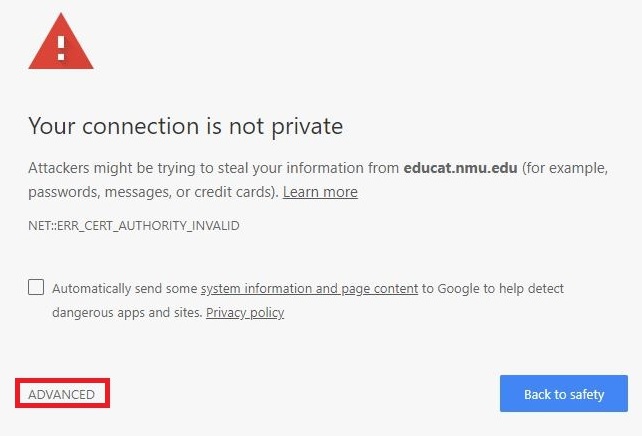
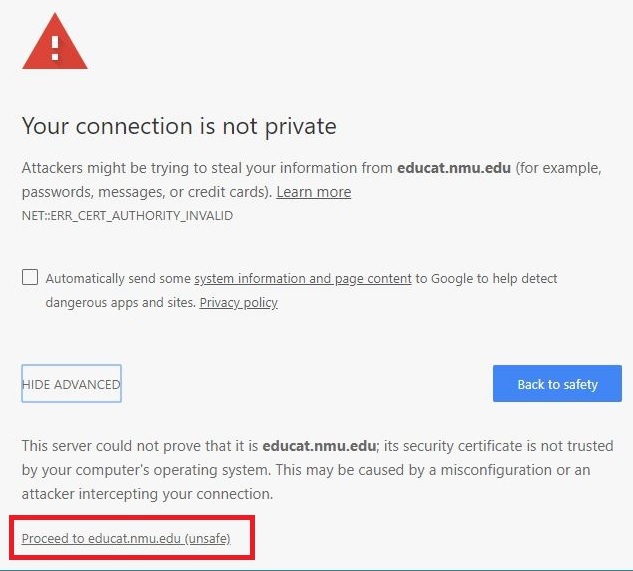
View instructions for connecting to the NMU_GUEST access point.

View access locations during:

School Year NMU_GUEST Locations

  • Cohodas
  • Harden Hall
  • University Center
  • Hedgcock
  • Forest Roberts Theatre
  • Jacobetti Center
  • Berry Events Center
  • Superior Dome
  • Presque Isle Commons (Temaki and Tea, Smoothie King)
  • NMU Invent Building (on Presque Isle Ave)
  • Ripley Steam Plant
  • Services Building
  • NMU Golf Course Clubhouse

Summer NMU_GUEST Locations

  • Art and Design Building
  • Berry Events Center
  • Cohodas
  • Superior Dome
  • Gries Hall
  • Hedgcock
  • Jacobetti
  • Jamrich
  • Harden Hall
  • PEIF Recreation Facility
  • Ripley Heating Plant
  • Services Building
  • Northern Center
  • West Science
  • New Science
  • Whitman
  • Quad I Residence Halls (Gant and Spalding)
  • Quad II Residence Halls
  • West Hall
  • Woodland Park

Formatting Word Mail Merge Values in Excel

Documentation

Occasionally some numbers in Excel don't format correctly in Word when using the mail merge feature under the Mailings tab. Follow these steps to resolve this issue before your merge. 


1. First, make sure your ZIP or postal codes don't lose any zeros in the mail merge process by formatting them in your Excel file as text. 
    
2. In Word, click the "File Tab" then click "Options." 
    

3. Choose "Advanced" from the left pane and select "Confirm file format conversion on open." Click "OK." 
    

4. In the mail merge document, click the "Mailings" tab, "Select Recipients," then "Use an Existing List." 
    

5.  Browse to your spreadsheet and double-click it. 

6. Click the "Show all" button in the "Confirm Data Source" window, select "MS Excel Woorkseets via DDE (*xls)" and select "OK." 
    

7. Click "Entire Spreadsheet" then click "OK." 
    

8. Now you can continue with your mail merge

Formatting Images in Word

Documentation

Microsoft Word gives you many options when formatting a document that includes images. This tutorial will give you an overview of those options. 

  1. Once you have your picture on the document (Ctrl+V to paste it in), you can click and drag it around to the desired location.
    • You can click on the picture or select it and then choose the position options in the "Home" tab to center, left align, or right align. 

  2. Once your image is in the desired approximate location, you can select it to see multiple options for formatting the photo and wrapping the text.
    • You can change the angle of the picture by clicking on it and holding and dragging the curved arrow as shown.

      Rotated image

    • You can change the size of the image by clicking and dragging any of the boxes in the corners. 

      Image sizing

    • Clicking and dragging on the boxes in the center around the picture, as shown below, will change the shape of the picture by stretching or compressing it. 

    • Clicking the box that appears to the upper right of the picture you selected will give you many text wrapping options. You can see those options displayed below. 


Drag and Drop Back Up Method

Documentation

Drag and Drop Back Up Method

There are many ways to back up your computer. The drag-and-drop method is a common one. It is recommended that you do a back-up at least once a month, That way if something were to happen with your computer, you would have most of your files. We recommend using an external USB drive with sufficient space available to store all of your files.


1. Plug in the device you'd like to back up your files to. In our example. It is a Kinston drive with the drive letter of D: Your name and drive letter may be different, depending on what drive you use.


2. Type File Explorer click File Explorer and open a new window.


3. Right-click the File Explorer icon and click "File Explorer" to open a second window.     


4. Drag and resize the second window to the right so it displays on the second half of the screen, next to the previous one. 


5. Navigate in one window to your external device, then in the other window navigate to the locations you would like to copy files from. In this case, click and drag the files from your PC to the external drive. In our example, the target drive is KINGSTON (D): Your external drive may have a different name and drive letter. Repeat the procedure until you've backed up all the desired files. 


We recommend backing up the following folders. You may have others that contain data important to you.

Music

Pictures

Desktop

Documents

Downloads

Favorites

Videos

Backup using File History

  • File History is a handy feature in Windows that helps you protect your personal files and folders from accidental loss or damage. Think of it as a backup system that automatically saves copies of your files, so you can easily restore them if something goes wrong. Whether you accidentally delete a file, make unwanted changes, or experience a technical issue, File History can come to your rescue by allowing you to recover previous versions of your files and folders.
  • One of the great things about File History is that it automatically backs up all your libraries. This includes default libraries like Documents, Pictures, Videos, and Music, as well as any custom libraries you have created. If you have folders elsewhere that you want to back up, you can add them to an existing library or create a new library for them.
  • Setting up File History is straightforward. Once enabled, it continuously monitors your files and folders, making regular backups to an external drive or network location. This means you don't have to worry about manually saving copies of your important documents, photos, videos, or entire folders. If you ever need to recover a file or folder, you can browse through the different versions saved by File History and restore the one you need. It's a simple yet powerful tool that provides peace of mind by ensuring your valuable data is always protected. 
  • Configure File History

  • Here are the steps to configure File History:

  • Connect an external drive or a network location: ensure you have an external drive connected to your computer or a network location configured where you want to save your backups
  • From the Control Panel, under System and Security, select Save backup copies of your files with File History
  • Select Turn on to enable File History


Windows Update

Documentation

NMU issued desktops and ThinkPad notebooks are configured with Automatic Updates, which means that each computer regularly communicates with a local Automatic Updates server. The server tells the computer what updates are available, and the computer tells you they are ready to be installed. Windows updates are available typically the second Tuesday of each month after 6:00 pm but critical updates might be available more often. It is best to routinely install the updates at a time that is convenient to you since the computer will install them automatically install the next time you restart or turn your computer off and on.


Never turn your computer off when it is installing updates and ensure that it is plugged in if the power is low. If the computer is shut down when installing updates your system will become corrupted. It is important to keep windows up to date to eliminate any software bugs and protect your computer from malicious software. To learn more reasons why you should update, click here

To manually check for and install updates, follow the steps below. Though the screenshots show Windows 10, the steps are similar for earlier versions of windows. 

1. Save and close all open work and windows.

2. In the Windows Start Menu type in and click the "Check for Updates" option in the new window.

3. Click the "Check for Updates" button in the new window and wait while Windows searches Microsoft's update server for available updates.

3. If any are available, they will automatically start to download. 

4. Once the updates are finished downloading you will be prompted to install them. You can either click "Install now" in the open "Update & Security" window, or you can click on the notification in the action center in the charms bar. 


NOTE: Downloading and Installing are two different steps in their own. You download the updates from the Microsoft server, but will have to actually Install them to the computer in order to take advantage of the new features. The newly downloaded updates will not be fully installed to the computer until the computer has been restarted. We recommend restarting the computer as soon as the updates are installed so the installation doesn't happen at a time that is inconvenient for you such as the start of class or when attempting to take an online exam.


5. Once you select the restart option in the prompt, the computer will restart and install the updates. Some updates, large ones or if you haven't updated in a while, will take a fair amount of time. You'll know once the update is completed, when your computer returns you to the login screen. 
 

Connecting a Projector Wirelessly Using MirrorOP

Documentation

The MirrorOp software provides the wireless projector connection usign the NMU WiFi access points. It does not work with the NMU_Guest WiFi access points and NMU LTE available in some locations on campus. These instructions are written for people using a Microsoft Windows computer but also includes links for installing the software on Apple Macintosh OSX computers.

Step 1: For a Windows computer download the "Application for MirrorOp Windows Sender" or the "Application for MirrorOp Mac Sender" if you have a Mac.
Step 2: Run the file you just downloaded to install MirrorOp.
Step 3: When the MirrorOp software is running, pin it to the taskbar.
Step 4: Input the IP address, be sure to include the dots ‘.’  If you don't see the full MirrorOp window with the "Input hostname or IP" at the bottom of the window disconnect any external display attached to your computer and restart MirrorOp.
            
Step 5: Input 4 digit unique code
            
Step 6: Click "play" -the screen should look like
            

Connecting to NMU LTE

Documentation

Is NMU LTE available in your area?

NMU LTE is available everywhere NMU EAN is available. Go to the Check Availabilty page and click the "Check Availabilty" button. Enter your complete address with Street Address, City, State, and Zip code to see if NMU LTE is available in your location.

If you were issued an NMU ThinkPads NMU LTE is not installed by default. You can get the NMU LTE network and SIM cards installed at no charge so the computer can access the NMU LTE network. If you have not already done so, please stop at the Helpdesk to get a work order for the LTE hardware to be installed. 

Connecting the ThinkPad to NMU (LTE)
 

1.Left click the “WiFi” or “Ethernet” icon in the system tray in the lower right corner of the Windows desktop.
  

2.Make sure an Ethernet cable is not connected,  “NMU" "WiFi” is "Off" (grayed out) and “Cellular"or "Mobile Broadband" is turned "On" (displayed in blue) and click the “NMU (LTE)” icon in the top section of the “Networks” menu.
  

3.Check the “Connect automatically” checkbox if it isn’t already checked and click the “Connect” button. The icon initially may indicate a “Limited” connection but then display “Connected”
 

4.The “LTE” icon will appear in the system tray when NMU (LTE) is in use. The number of white bars indicates the signal strength. You should now be able to access the NMU network using NMU LTE.
  

Connecting the ThinkPad to NMU WiFi (preferred if on campus)

1.Left click the “LTE” or “Ethernet” icon in the system tray in the lower right corner of the Windows desktop. 
  

2.Click the "NMU" "WiFi" to turn on (turn blue) the WiFi network adapter in the “Networks” menu.
  

3.Select the WiFi connection you want to use (Use the “NMU” WiFi connection if on campus). 
 

4.Check the “Connect automatically” checkbox if it isn’t already checked and click the “Connect” button. The icon initially may indicate a “Limited” connection but then display “Connected”.
  

 5.The “WiFi” 
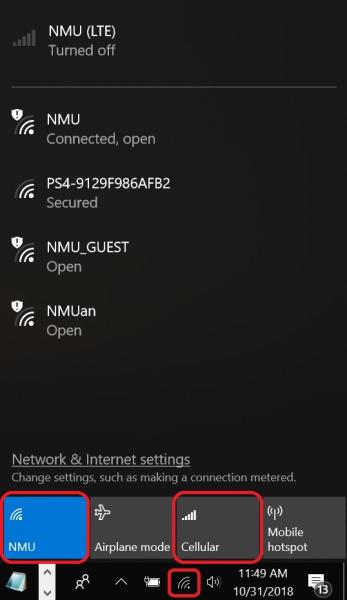
icon will appear in the system tray when WiFi is in use. The number of white bars indicates the signal strength. You should now be able to access the NMU network using NMU WiFi. NOTE: The system will use the WiFi connection by default even if the NMU (LTE) connection is on.

Changing Your Computer's Power Options

Documentation

There are times when you may want to change your computer’s power options to increase performance, decrease energy consumption, or assure the computer does not go into sleep in the middle of a key process such as uploading or downloading large files, giving a presentation, or watching a long video.
 

1. In the Windows Start menu, type in “power options” to find and click on the “Power Options” control panel settings.
    Power Options Control panel
2. Click the “Change plan settings” link for the currently selected plan.
    Click the “Change plan settings” link for the currently selected plan.
3. Modify the settings as needed and click the “Save Settings” button.
    Modify the settings as needed and click the “Save Settings” button.

Backing Up NMU G Suite

Documentation

Unless you retire as an employee at NMU, as a faculty, staff, or student your NMU G Suite account will become disabled 1 year after you leave NMU and 3 years afterward if you were a graduate student. For these reasons, or just for the piece of mind of having a backup of your NMU G Suite content for yourself, you might consider backing up your NMU G Suite content.

Backing up your content to a ZIP file

Google's Takeout application, https://takeout.google.com, can be used to create an archive and/or ZIP file of your NMU G Suite content and download it to your computer. Google Takeout will convert the Google document formats to offline formats (Google Docs -> Word format, etc.). If you have a large amount of content, such as many video files, creating a ZIP file using Google Takeout may not be a good choice. More information is available from Google at "Download your data" and a 1 minutes video at "How to Use Google Takeout - YouTube".

If you later chose to upload the content to a different G Suite account, open the Google Drive settings and choose the option to "convert files on upload" before you upload the files if you want them in the Google Docs and other formats again.

Transferring your content to another G Suite account

The same Google Takeout application offers a way to transfer the NMU G Suite content to another Google G Suite account using https://takeout.google.com/transfer. See "Copy content from your school account to another account" for details.

The Google Takeout Transfer option, https://takeout.google.com/transfer, may be a great choice especially if you have an "Email for Life" account available through the NMU Alumni office. The Alumni "Email for Life" accounts are Google G Suite accounts with an @alumni.nmu.edu email address, have unlimited space available to you, and currently, unlike your NMU G Suite account, do not expire. Visit http://nmu.edu/alumni and the "Email for Life" link to request an @alumni.nmu.edu Alumni G Suite account and see if you qualify.

Adding a Security Exception to Your Browser

Documentation

NMU creates its own SSL security certificates used for some network services. These certificates are already installed on NMU issued computers but you may need to install them on your personally owned device in order to access some of the NMU network services. Installing the NMU SSL certificates is the preferred solution. Instructions are available on the "Add the NMU SSL Certificate" page.

Another option is to allow an exception for the NMU network service you are trying to access. Here are instructions for doing so with popular web browsers.

Firefox

    Click "Advanced" at the bottom of the page, click "Add Exception...", then click an “Confirm Security Exception” button at the bottom of the page and the web page will be added to an exception list. 


Chrome

    Click "Advanced" at the bottom of the page, then click "Proceed to address-of-the-website (unsafe)"


Safari

    Click "Show Certificate", review the certificate content is from NMU, then click "Continue"  to get to the website.


Edge

    Click "Details" and then "Go on to webpage"


Internet Explorer

    Click "More Information” the click "Go on to webpage (not recommended)"
   

Subscribe to Notebooks