Setting Up 2 factor authentication

Documentation

Your password protects your account. You can also add a second layer of protection with "2 Factor Authentication" so even if somebody manages to steal your password, it is not enough to get into your account. This additional form of authentication (sometimes referred to as 2FA or TFA) is completely independent from your username and password.

How It Works

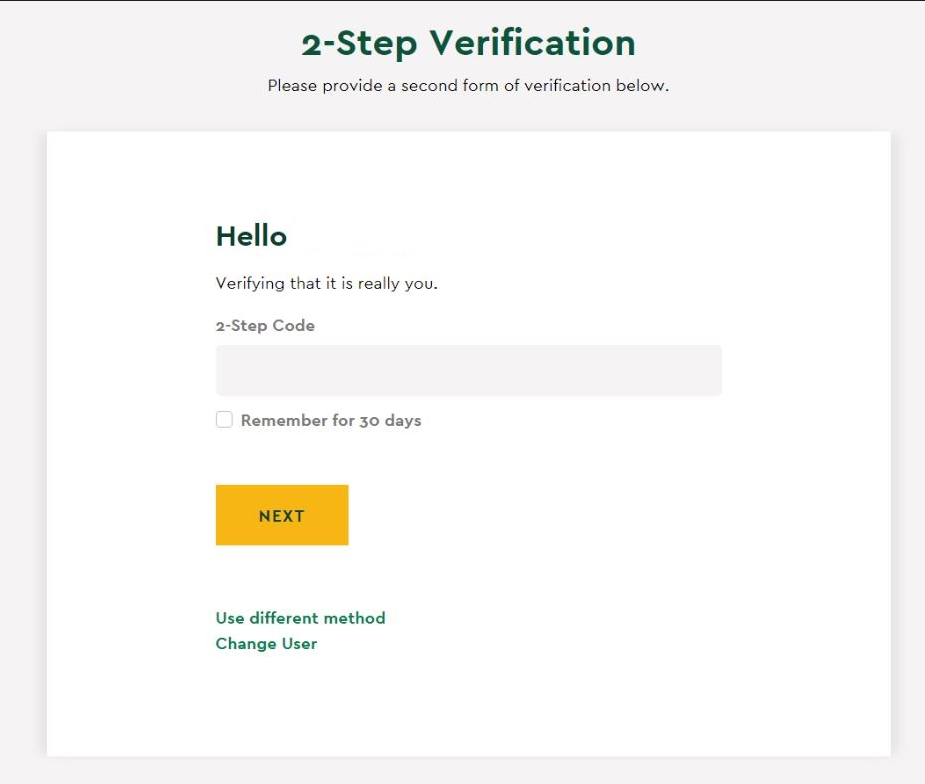
You will login as usual with your username and password, then enter an additional code from either an Authenticator App, a Security Key, or a set of Backup Codes to verify that it is in fact you. You can also click a checkbox at the login page to trust a device for 30 days so you can just use your  username and password to log in on that device.

Recommendations

  • Enable more than one 2 factor authentication method such as using both an Authenticator app and Backup Codes!
  • Remember / Trust more than one browser/device by clicking the checkbox at the bottom left corner of the login prompt before logging in. Do this on different days for each browser/device so they both don't reach the 30 day limit on the same day.


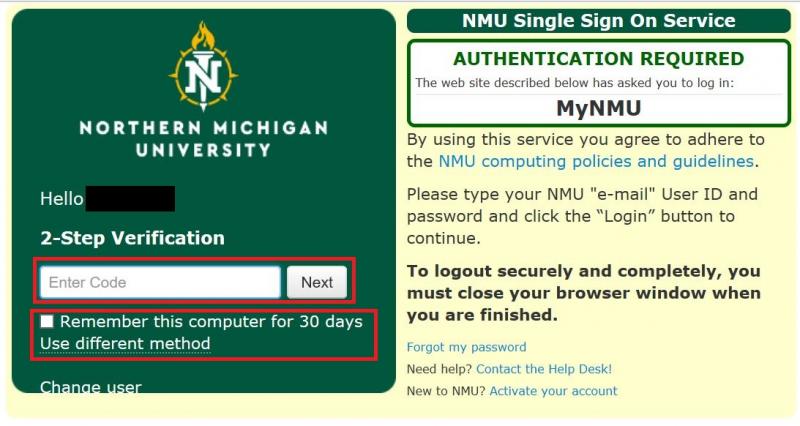
This will trust that device for 30 days and you will not be required to enter the additional 2 factor code on that device during the 30 day period. It's best if you don’t trust multiple devices on the same day so they don’t all expire at the same time. The browser/device trust is managed through the use of browser cookies, so if you clear your browser's cookies then you remove any existing 30 day trust and cause the two factor authentication prompt to occur when you next login.

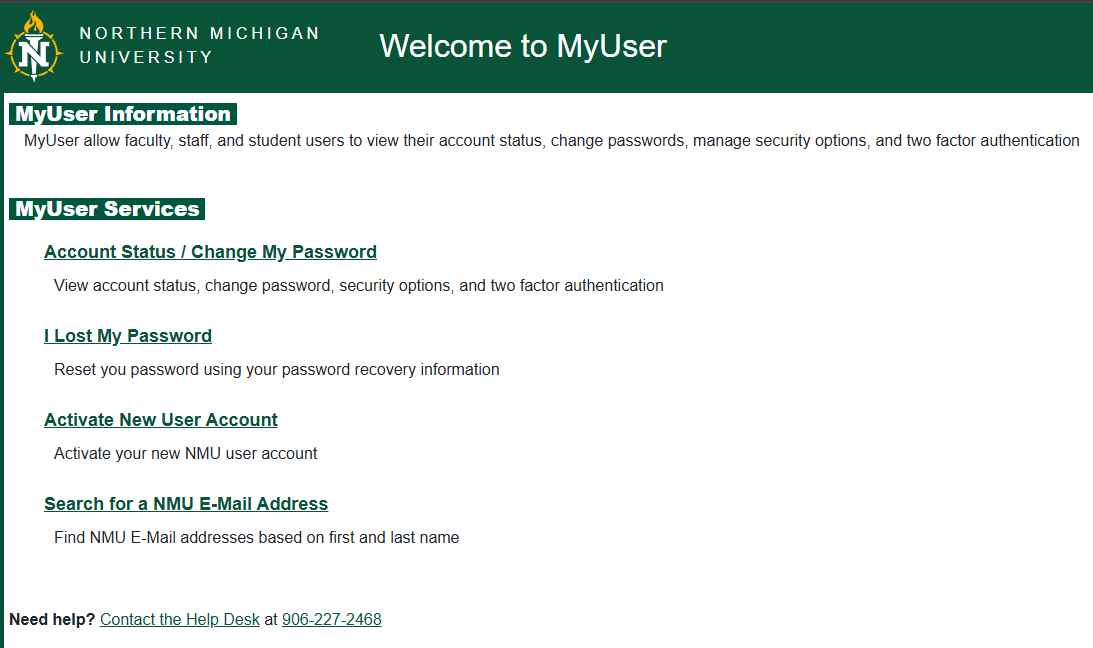
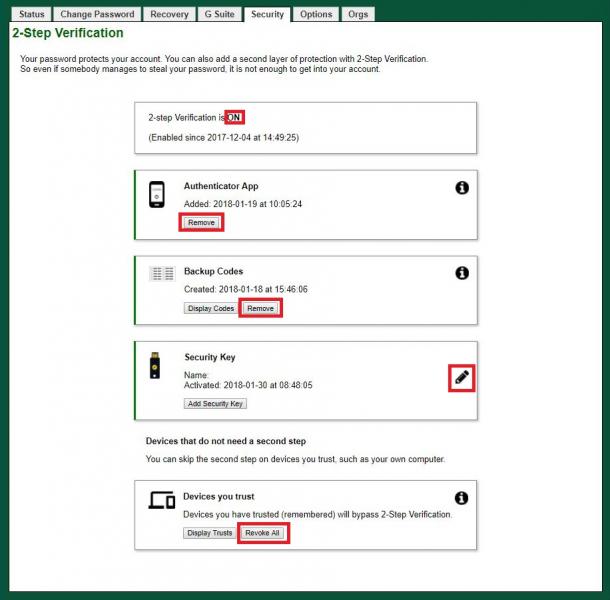
3 Options for Setting Up 2 Factor Authentication for NMU Services

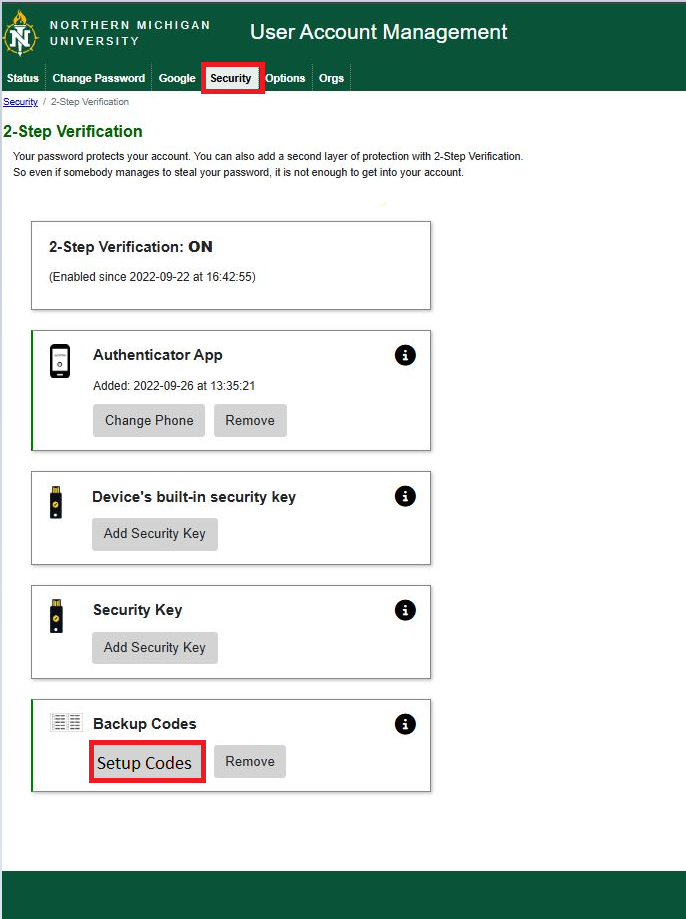
There are 3 options for setting up 2 Factor Authentication for NMU services like MyNMU and MyUser; an authenticator app, USB security key, and backup codes.

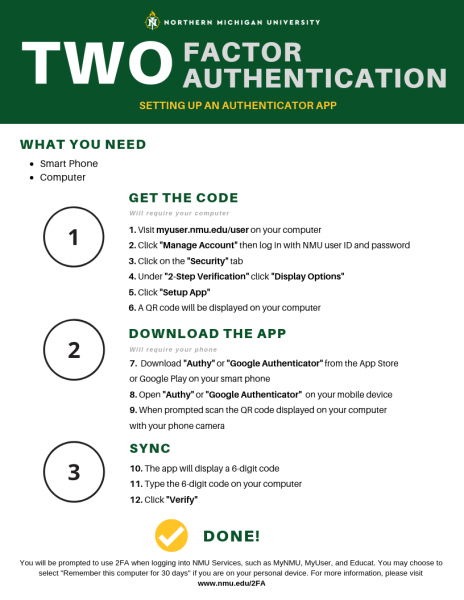
Authenticator App (Best for mobile devices - tablets or smartphones)

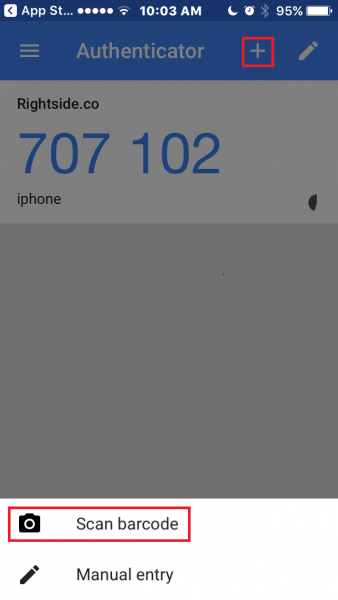
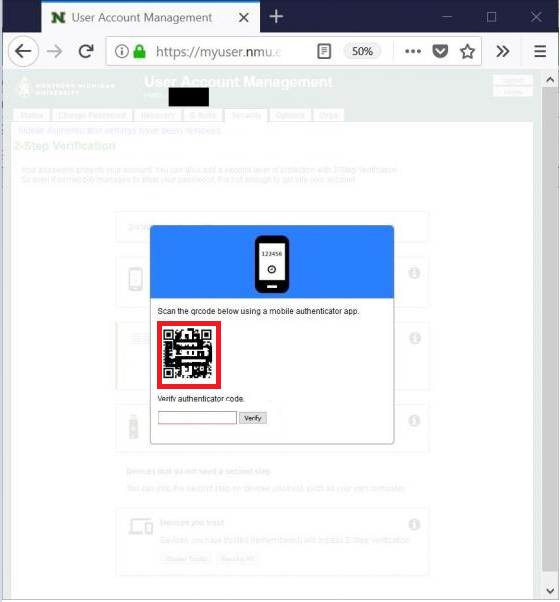
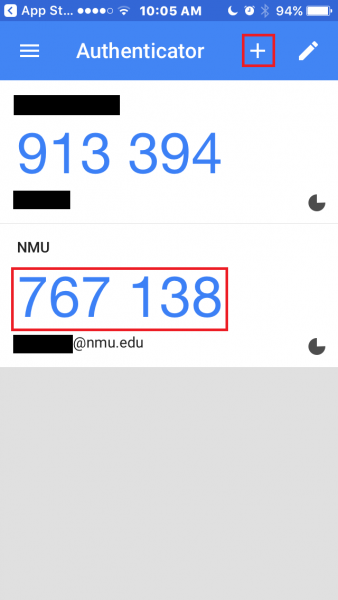
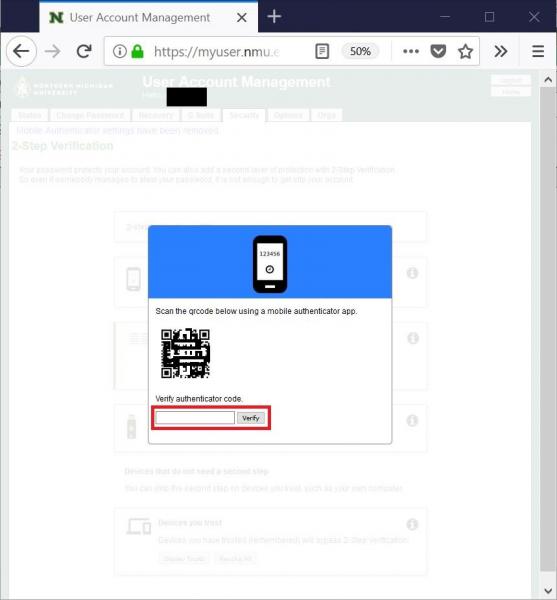
Using a mobile authenticator app on your smartphone, tablet, or computer as a second factor during login. Enabling this option will require that you enter a code generated by the authenticator app as a second factor during the login process. Google Authenticator  and Microsoft Authenticator are 2 authenticator apps that will work. Google Authenticator works on Android and Apple iOS devices. Install the authenticator app BEFORE turning on this option for NMU Services.

For quick set-up instructions see: 2FA Quick Steps 

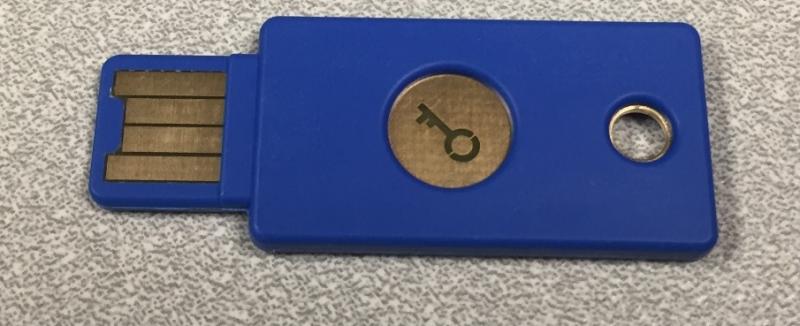
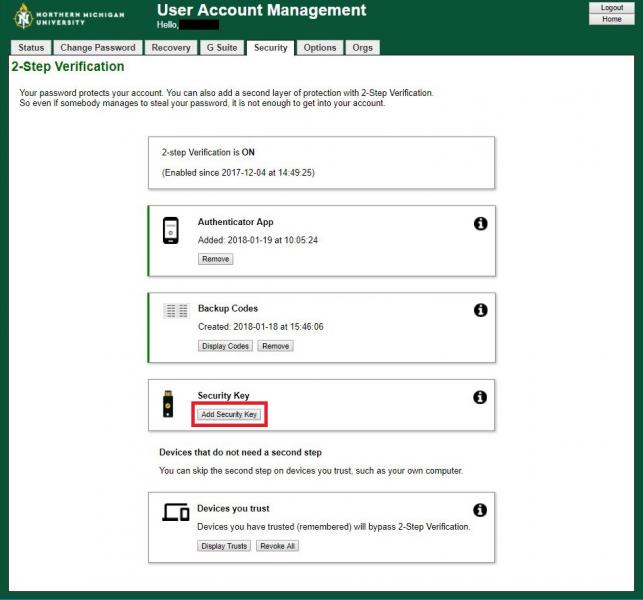
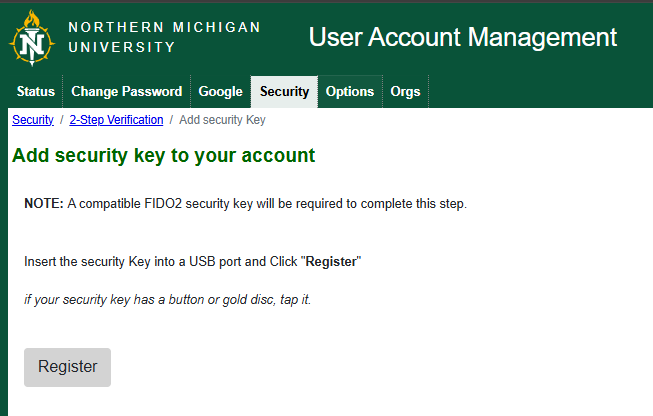
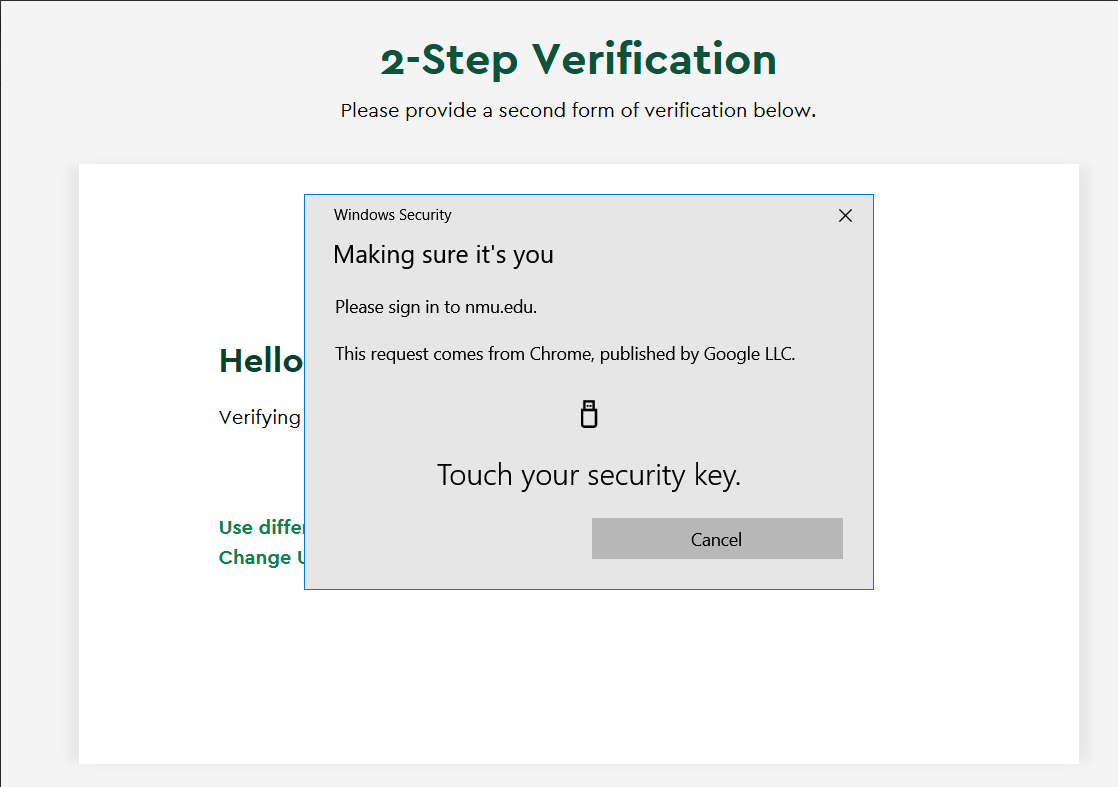
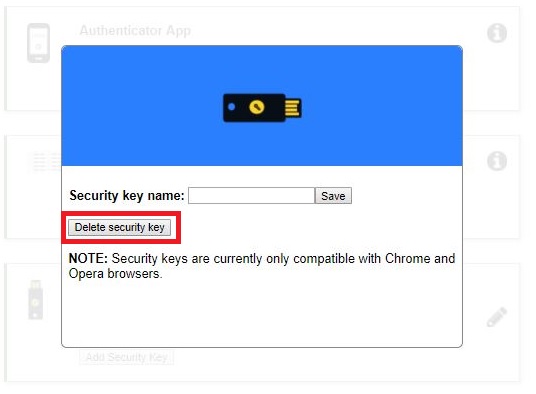
USB Security Key (Requires extra hardware)

Requires FIDO U2F Security Key device, typically a USB device, to be attached to the computer you are logging in from. NOTE: Security keys are currently only compatible with the Chrome web browser.

For step by step instructions see: Using a Security Key for 2 factor authentication

Backup Codes (Used as a backup to the other options)

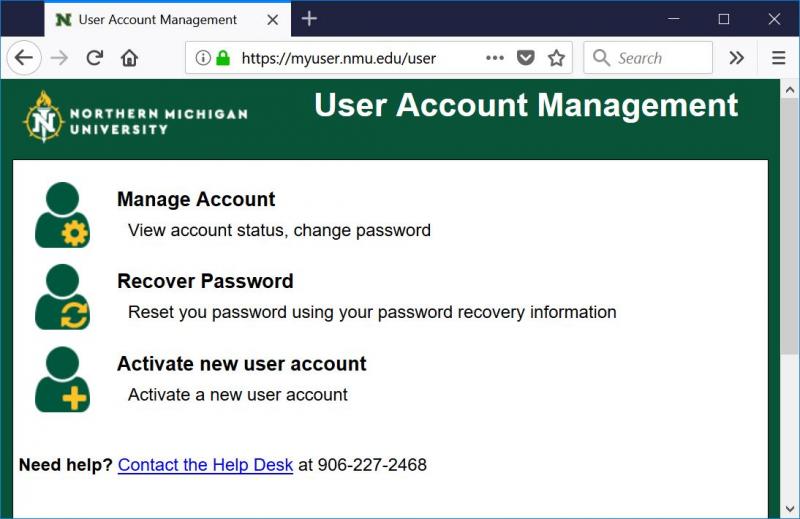
Backup codes come in sets of 10 that you generate at https://myuser.nmu.edu/user. Each of the 10 Backup Codes can only be used once. When a backup code is used it will become inactive. Typically you print them out, keep them in a secure location, and check them off as you use each one. You can generate a new set codes at any point, automatically making the old set inactive. If you use back up codes it is recommended you get a new set of 10 codes before you use the last code and run out of the current set of backup codes you are using.

For step by step instructions see: Using Backup Codes for 2 factor Authentication

     Notes:

  • Once you complete these steps, you will be required to use 2 factor to log into MyNMU, MyUser, and other NMU services that require it.
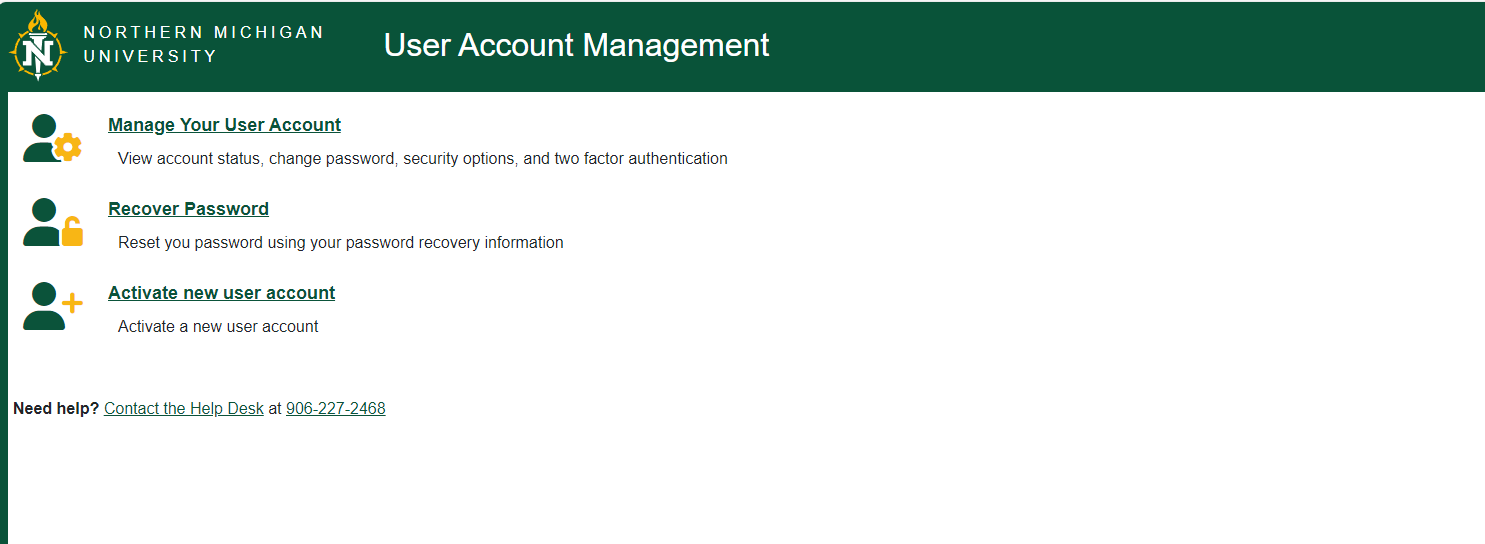
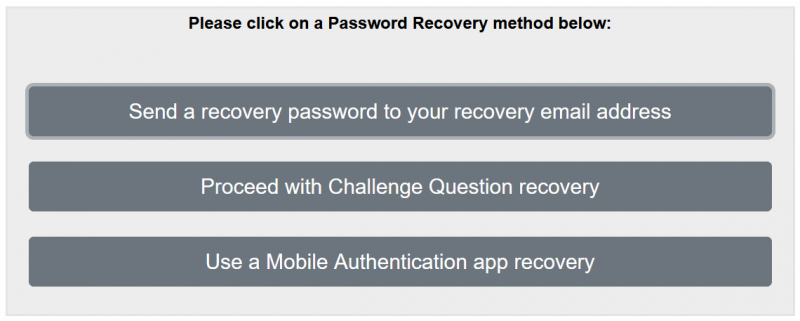
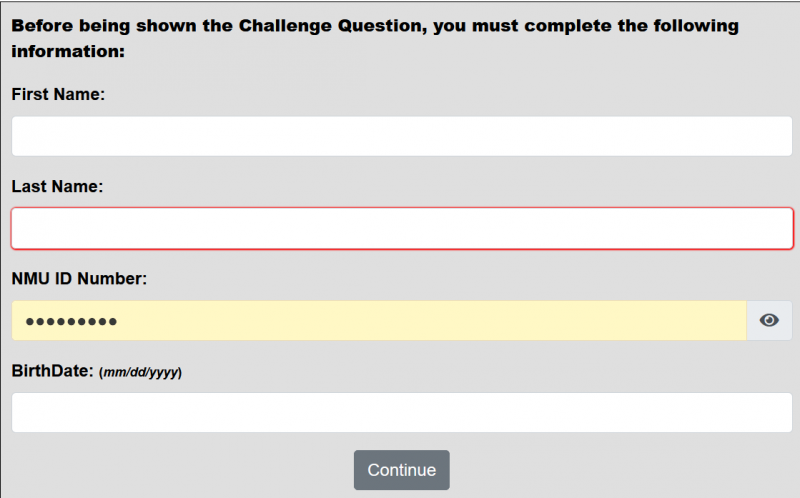
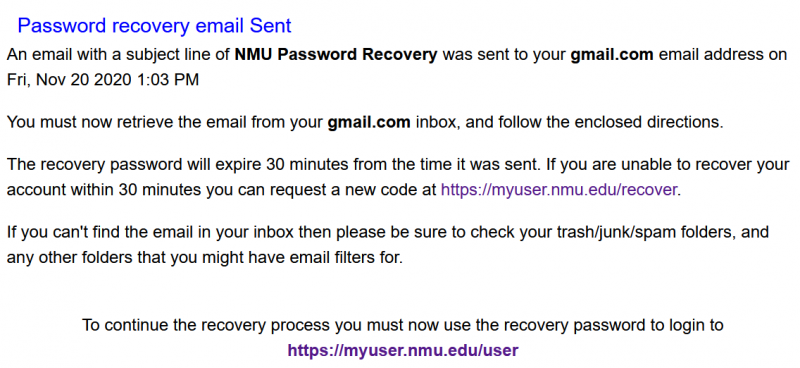
  • If 2 factor authentication is preventing you from accessing NMU Services verify the problem also occurs at https://myuser.nmu.edu/user . If it doesn't work there then use MyUser's recovery link to reset your password and change or verify your 2 factor authentication settings.

NMU G Suite Account 2 Factor Authentication

2 factor authentication on your NMU G Suite account is a separate feature unique to Google. A good overview with links to set up 2 factor authenticaton for your NMU G Suite account is available at https://www.google.com/2step.

See also: 2 Factor Authentication Frequently Asked Questions

Sponsoring a Guest on the NMU Network

Documentation

All computers that wish to use the NMU Wireless or Wired connections on campus must be registered. Current NMU Faculty, Staff, Students, and Retirees can register machines on the network. If there is a guest on campus that needs internet access, currently only Faculty and Staff can sponsor them. To sponsor a guest:

  1. Open a Web Broswer
  2. In the URL bar, go to http://register.nmu.edu and click the Need to sponsor someone, go here link. You can login with your current NMU UserID and password.
  3. Once you login, you will see a window similar to the one below. Click on "Enter Guest Sponsor Function" to continue.
  4. Fill in the top portion of the screen to add a new sponsor. Be sure to carefully type in each requested piece of information, as it may be needed later. You can choose a start date up to a month in advance. If you know a guest is arriving, and they need internet access, it is best to complete this prior to their arrival. It can take up to an hour for this part to register in our system.
  5. Click on "Submit Request" to add the sponsor request. You will notice a green bar at the top of the screen that indicates your sponsor request was successful. 
  6. It may take up to an hour for the request to be active. Once it is active, the guest should connect to the WiFi access point named "NMU", open a web browser, and navigate to "http://register.nmu.edu" on the machine that needs internet access. The guest can use their email address that was used in the request for the User ID and password fields.
  7. After clicking "Sign In", the guest will be able to register their machine. The registration will stay active for one day, so if they need to access the internet during the next day, they will need to register using "http://register.nmu.eduagain. The guest will be able to register their computer for as long as was requested when the guest sponsor entry was added. Once that time period expires, a new entry will have to be made by a current NMU Faculty or Staff member.

Using Backup Codes for 2 factor Authentication

Documentation

Setting up Backup Codes for 2 factor authentication

      1. On a computer or other device, go to https://myuser.nmu.edu/user, click “Account Status/Change my Password” and login with your NMU ID and password.


      3. Click the Security Tab, then“Setup Codes" button under “Backup Codes”.


      4. The 10 backup codes will be displayed. Record or print the 10 backup codes and keep them with you. Each backup code can be used only once. An email message summarizing the 2-factor authentication will be sent to your NMU email account.


Using Backup Codes for 2 factor Authentication

      1. When logging into an NMU service such as MyNMU after entering in your userID and password you will be prompted to enter a code for 2-step verification and a checkbox to “Remember this computer for 30 days” if this is a personal device you feel you trust will stay secure and you don’t want to be prompted for the 2-step authentication each time you access the service.


      2. Enter one of your 10 backup codes and click “Next”.

      3. Cross out the backup code you used since it can’t be used ever again.

      4. Once you have used 8 to 9 backup codes get more backup codes at https://myuser.nmu.edu/user before using the last one.

We recommend you also set up another form of 2-factor authentication such as the Google Authenticator or Authy Authenticator App so you have more than one method of 2-factor authentication.

Using Google Authenticator for 2 factor authentication

Documentation

Setting up Google Authenticator for 2 factor authentication

These instructions provide an overview of the process and the process may have changed if the authenticator app was recently updated. If you find you need more assistance than provided here please contact NMU Technology Support Services.

We recommend you set up 2-factor authentication Backup Codes first so you have more than one method of 2-factor authentication to use prior to setting up an Authenticator App.

    1. Get the “Google Authenticator” app for your iOS or Android device from the Apple App Store or Google Play.

    2. Run the “Google Authenticator”  app.


    3. On a computer or another device, go to https://myuser.nmu.edu/user, click “Manage Your User Account” and login with your NMU ID and password.

        Manage User Account

    4. Click on the “Security” tab and then the “Display options” button under “2-Step Verification”.

        2fa options

    5. Click the “Setup App” button under “Authenticator App”. A QR Code will be displayed. If the “Setup App” button isn't available but a "Remove" button is then an authenticator app has already been configured for your account. If you want to delete the current one and set up the Google Authenticator click the "Remove" button and the “Setup App” button will become available.


    6. On your iOS or Android device click the "+" (plus sign) in the upper right of the screen and then the "Scan barcode" option at the bottom.


    7. Google Authenticator may prompt for you to allow access to the Camera. Click “OK”.

    8. Scan the QR Code displayed on the computer or other device.

        QR Code

    9. Google Authenticator will display NMU, your NMU email address as your account name and your current 6 digit token number. The 6 digit token number renews every 30 seconds.


    12. Enter the current 6 digit token number into https://myuser.nmu.edu/user on your computer or another device and click the “Verify” button.


    13. The screen will indicate if the app was successfully added and then revert to the previous screen showing the time and date the app was authorized. An email message summarizing the 2-factor authentication will be sent to your NMU email account.

    14. Log out of https://myuser.nmu.edu/user.

Using Google Authenticator for 2 factor authentication

    1. When logging into an NMU service such as MyNMU after entering in your userID and password you will be prompted to enter a code for 2-step verification and a checkbox to “Remember for 30 days” if this is a personal device you trust will stay secure and you don’t want to be prompted for the 2-step authentication each time you access the service.

    2. Open your Google Authenticator app on your iOS or Android device and enter the current token displayed and click “Next”.


Using a Security Key for 2 factor authentication

Documentation

Setting up a Security Key for 2 factor authentication

A FIDO U2F Security Key is typically a USB or other device you can connect to your computer to be used as a second step in 2 factor authentication. Security keys are currently only compatible with the Chrome web browser.

We recommend you set up 2-factor authentication Backup Codes first so you have more than one method of 2-factor authentication to use prior to setting up a Security Key.

  1. Have a FIDO U2F Security Key available prior to starting this process.
  2. Use the Chrome web browser for setting up and using a FIDO security key. If you do not already have the Chrome web browser installed you can download it from https://chrome.com.
  3. Using the Chrome web browser, go to https://myuser.nmu.edu/user, click “Account Status/Change My Password” and login with your NMU ID and password.
  4. Click on the “Security” tab and then the “Add Security Key” button.

  5. The following instructions will be displayed to add the security key. Follow the instructions:
    AddKey


  6. Once you tap the button or gold disc on the security key you will briefly see the message: "Your security key has been registered." Then the web page will go back to the “2-Step Verification" screen and you will receive a confirmation via email. You can now remove the FIDO security key.
  7. Log out of https://myuser.nmu.edu/user.

Using a Security Key for 2 factor authentication

  1. The Chrome web browser is required for using a FIDO security key. If you want to use the Firefox web browser it will have to be configured to allow using the USB security key.
  2. When logging into an NMU service such as MyNMU after entering in your userID and password you will be prompted to insert your security key. You can also check the “Remember this computer for 30 days” check box if you want to trust this computer. Addkey2
  3. Insert the FIDO security key.
  4. Press the gold disk or button on the key and the 2 factor authentication will be accepted and you will be logged in.
  5. You can remove the FIDO Key and store it in a safe place.

Verify Your NMU Account Status and Password

Documentation

 If you are having trouble logging into your account on any NMU sites, first navigate to http://myuser.nmu.edu/user and try to log in with your NMU UserID and password. 

   Secure web service that enables students, faculty, and staff to check the status of their NMU user account. You can use MyUser to:

  • Check you account status
  • Change your NMU account password
  • Recover from a lost password
  • Set an email forwarding address
  • Set up email folder cleanup
  • Set an email vacation message
  • Configure SPAM filtering
  • Put your personal Web page in the directory

Service Link: 

MyUser

NMU password recovery

Documentation

  1. Go to https://myuser.nmu.edu/recover and enter your NMU email
  2. Choose which recovery option you would like
    You can Proceed with Challenge Question Recovery, you can chose Send a recovery password to your email, or you can Use a Mobile Authentication app recovery.

Challenge Question Recovery Option
 

  1. Enter your information to acquire your challenge question:
    First Name:_______________
    Last Name:_______________
    IN or SSN(no hyphens):____________________
    BirthDate:__  mm/dd/yyyy           

     
  2. Enter the Challenge Answer in the box provided (answers are case sensitive)>>Then click Submit.
     
  3. If you put in the correct answer, you will then receive a temporary password.
     
  4. Copy the password and then continue to the Log In step below to finish changing your password.

Email Recovery Option
 

  1. After you choose to be emailed a temporary password, an email will be sent to your password recovery email address. The screen will tell you what your recovery email ends in (ie. yahoo.com or gmail.com etc.)

     
  2. Go to your email in a different tab/window and recover the "NMU Password Recover Results" message.

    You new, temporary password will be contained in this message. You will need to copy it for the Log In step below.

Mobile Authentication (Two factor) recovery option

  1. After selecting this method, you will need to open your 2fa app on your smartphone.
  2. Get a code from the app for your NMU account.
  3. Enter that code in the box on the NMU recovery page.
  4. You will receive temporary password, copy that for the next step of logging in below.


Log in to myuser to finish changing your password.

  1. Go to myuser. Click on Manage Your User Account or the Login button in top right.
  2. Use your nmu username/email and enter your new, temporary password into the box for the password.
  3. If success, on the next page it will say your account is locked due to recovery. Click Continue.
  4. Next it should take you to the change password screen. Here you will use the temporary password again, as your Current password.
    Then enter a new password for your permanent password in the box next to New Password. Make sure to follow the prompts to make a strong password and only use the symbols listed. (some symbols will throw an error)

    NOTE: Your NMU ID and Password allows access to financial data, grades, courses, e-mail, and many other NMU functions. It is important that you choose a good password and not give that password to anyone
    Re-enter that same password in the box next to Confirm New Password.
  5. Click Submit.
     
  6. If your password was reset successfully you should see something similar to this page.
  7. You have successfully reset your password. There are a couple options you may want/need to do at this point, see 8 and 9. Otherwise you are finished and will need to use the new password you made for all of your NMU accounts (You most likely will need to edit autosaved passwords).
  8. If you did not know all your recovery info, click on the Security tab and then Display Options under Account Recovery Options. Change/correct information as needed.
  9. If you had to reset your password due to losing your 2fa codes, you need to click on the Security tab as well but then click on the Display Options under 2-Step Verification. There you can remove any 2fa options, add a new phone/app, print more backup codes, etc.

Information for Graduates and Former Students

Documentation

This page provides key IT related information for NMU graduates and former students.

Notebook computer returns and purchase options

  • The immediate return of the NMU notebook is required when any of the following occurs:

    • Complete withdrawal from NMU or graduation from NMU

    • Non-payment of required fees

    • Notification by NMU for the notebook computer's return

  • We prefer you return the notebook to the Micro Repair office in LRC 114 when it is open. NMU Public Safety will accept notebook computer returns 24/7. Make sure the following components are returned with the notebook computer: AC power adapter and cord, LTE MyFi hotspot (if issued), and USB DVD Player (if issued). See the Notebook Computer Return Procedure for details.

What happens to my NMU account after leaving NMU?

  • Access to MyNMU account will continue for 1 year after leaving NMU if you are an undergraduate or 3 years if you are a graduate student regardless of whether you did or didn't graduate. After the 1 or 3 years has passed, your account will be disabled and no longer receive or send new messages.

  • Shortly after leaving NMU your NMU network access, including access to NMU LTE, will be disabled. If you would like to continue NMU LTE access you might consider switching to NMU EAN. See www.nmu.edu/ean for details. NMU EAN doesn’t require an alumni email account but offers discounts to NMU Alumni with "Free E-mail for Life" (G Suite) accounts. See the NMU Alumni Association for details. 

We highly recommend:

  • Saving or printing an unofficial copy of your transcript available in the "Student Services" tab on MyNMU before your account is disabled.

  • Updating your email address and recovery accounts saved on Facebook, airline reservation systems, and similar services. This is especially true for those systems using your NMU email account for resetting an account password such as Facebook or Snapchat. You should update any references to your NMU email account to another accounts you have. The settings are usually available in your ‘My Account’ or ‘Profile’  options for the service.

  • Archiving your messages if you do not plan to use your NMU email account after graduating or leaving NMU. We highly recommend saving any of the messages you want to keep to an email account you will be using and delete them from your NMU email account. Otherwise the stored messages could become an unmonitored repository of data for hackers and identity thieves. If you are on the older NMU email system it might be easiest to forward the messages you want to keep to another account and delete them and the rest of your messaages from your NMU email account. If you are on the new NMU G Suite gmail system the Backing Up NMU G Suite instructions cover how to make a copy of your NMU G Suite content into files you can take with you or restore to another account at a later time. You may want to  apply for a "Free E-mail for Life" (NMU Alumni G Suite) account to use from the NMU Alumni office before you leave NMU. See the NMU Alumni Association for details. Once you have an NMU Alumni account, G Suite makes it easy to transfer all your NMU G Suite content to your NMU Alumni G Suite account. See Backing Up NMU G Suite for instructions.

I can't log in

Documentation

If you don't know your password or can't log into NMU services such as Email, MyNMU, or Educat, or your NMU G Suite account:

  1. If you are new to NMU and have not set up your @nmu.edu account go to the MyUser "New User Page", https://myuser.nmu.edu/newuser. If you are a new user and can't log into MyUser "New User Page" contact the HelpDesk.

  2. If you have already set up your @nmu.edu account and can't log into any NMU services such as Email, MyNMU, or Educat, or your NMU G Suite account go to the MyUser "View account status" page, https://myuser.nmu.edu/user, and use the "Login" button in the upper right corner of the page to login. You can log into the MyUser "View account status" page when your account will not work anywhere else to verify your account status and identify any problems and solutions for your account.

  3. If you have already set up your @nmu.edu account and can't log into the MyUser "View account status" page  go to the MyUser "I lost my Password " page, https://myuser.nmu.edu/recover, and enter the required information to recover access to your account. If you can't log in there contact the HelpDesk.

Disabling 2 factor authentication

Documentation

NMU 2 factor authentication can be set up using Authenticator Apps, Backup Codes, or Security Keys. These instructions cover how to disable each of those options individually. You can disable one or more of them. NMU recommends you always have more than one 2 factor authentication method enabled.

  1. On a computer or other device, go to https://myuser.nmu.edu/user, click “Manage Account” and login with your NMU ID and password.


  2. Click on the “Security” tab and then the “Display TFA” button under “2-Step Verification”. The following page will be displayed.


  3. To disable the current Authenticator App click the "Remove" button in the "Authenticator App" box.
  4. To disable the current Backup Codes click the "Remove" button in the "Backup Codes" box.


  5. To disable a Security Key click the "Pencil" icon in the "Security Key" box, then click the "Delete Security Key" button.


  6. To revoke all trusted devices click the "Revoke All' button in the "Devices you trust" box.
  7. If all 2 factor authenthication methods are disabled the "2-step Verificaton" box at the top of the page should show it is "OFF".


    Note:

    • 2 factor authentication on your NMU G Suite account is a separate feature unique to Google. A good overview with links to configure 2 factor authenticaton for your NMU G Suite account is avalable at https://www.google.com/2step.
Subscribe to MyUser