Photo Editing in Word

Documentation

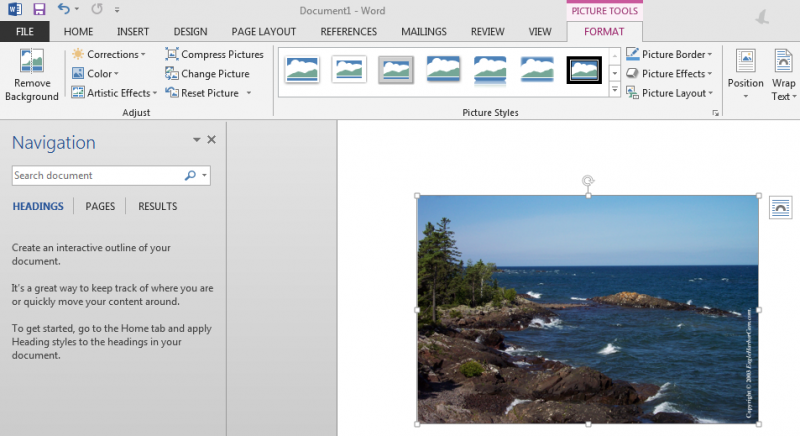
Microsoft Office has enhanced photo editing features to help when adding pictures in your documents.  You can adjust the picture brightness or contrast, remove the background, use artist affects, add a border, rotate, crop or resize a picture. A preview of most of these features can be seen by hovering over the menu choice before you actually click on the menu choice.


1. Double-click on the image you have inserted into the Word document

2. Use the tools on the "Format" ribbon menu to make the alterations you desire

-The "Format" ribbon menu may look different depending on how large your Microsoft Word window is. All options are presented at all sizes, however some may be hidden in drop-down menu. 

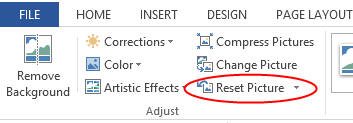
3. If you have made alterations that you do not like and want to reset the image, a simple way to do so it to use the "Reset Picture" option in the "Format" ribbon menu.

4. Explore the different options/effects and have fun making your document look good! 

- Many changes can be previewed by simply hovering the mouse cursor over an option
- Not every type of editing option is available in Microsoft Word
- More advanced photo editing is best left to software designed for photo editing like Adobe Photoshop, GNU GIMP, Paint.NET, etc.

Printing to the On-campus Printers

Documentation

NMU public network printers are located in the NMU Library, Jacobetti Center, and PEIF. For your convenience these printers are already set up on your NMU issued ThinkPad or MacBook.

Using the printers requires you to pay for each printed page using CatCash on your NMU ID (Wildcat Express Card). See the Library's Printing page for help on setting up for their printers or adding funds to your CatCash.

Rehearsing timings in PowerPoint

Documentation

You can rehearse your presentation to make sure that it fits within a certain time frame. While you rehearse, use the Rehearse Timings feature to record the time that you need to present each slide, and then use the recorded times to advance the slides automatically when you give your presentation to your actual audience.

Be prepared to start delivering your presentation immediately after you complete step 1.


1. Select the "Slideshow" tab, click "Rehearse Timings"

- The "Rehearsal" toolbar appears, and the "Slide Time" box begins timing the presentation.


1. Next (advance to the next slide)
2. Pause
3. Slide Time
4. Repeat
5. Total time for presentation 
 

2. While you time your presentation, do one or more of the following on the "Rehearsal" toolbar:

  • To move to the next slide, click "Next"
  • To temporarily stop recording the time, click "Pause"
  • To restart recording the time after pausing, click "Pause"
  • To restart recording the time for the current slide, click "Repeat"

3. After you set the time for the last, a message box displays the total time for the presentation and prompts you to do one of the following:

  • To keep the recorded slide timings, click "Yes"
  • To discard the recorded slide timings, click "No"

Slide Sorter view appears and displays the time of each slide in your presentation.


Turn the recorded slide timings off before you give a presentation

If you do not want the slides in your presentation to advance automatically by using the slide timings that you recorded, do the following to turn the slide timings off:

  • On the "Slide Show" tab on the ribbon menu, clear the "Use Timings" check box. 

Reimage

Documentation

The NMU MacBooks and ThinkPads are already pre-imaged wth the NMU software image when it is issued to you. If your comptuer needs the NMU software image restored or updated you will need to bring it the HelpDesk.

Since the involves erasing your hard disk please make sure to backup all critical files first. USB flash drives are available for check out from the NMU library circulation desk with a NMU Wildcat ID card. The HelpDesk can assist you with backing up your files if you need help.

Saving and Exporting a Word document as a PDF file

Documentation

With Microsoft Office, you are able to save and export regular word documents as PDF files. 


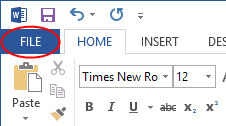
1. With the document that you want to export/save as a PDF open, select "File" from the ribbon in the top left corner

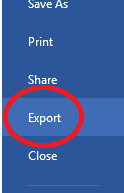
2. Select "Export" option that appears along the left-hand side

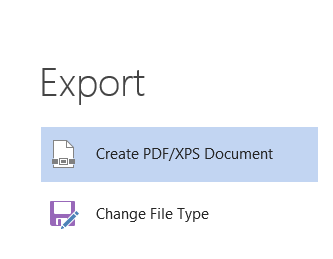
3. Then select "Create PDF/XPS Document" in the center of the screen

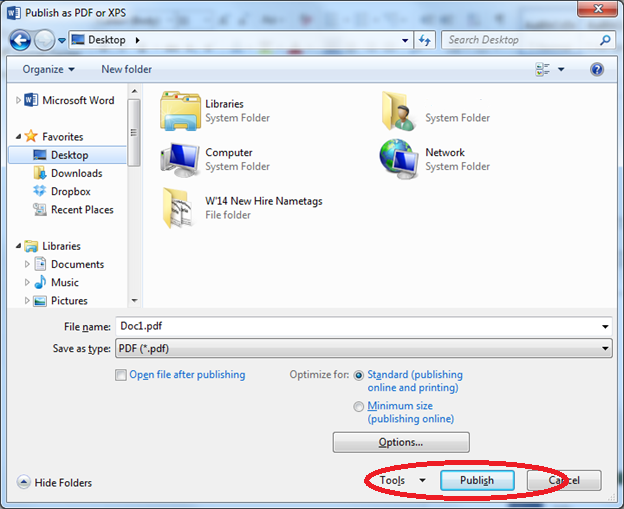
4. Choose a folder to export the PDF 
5. Type a name for the document and select "Publish"


Now you can navigate to the folder where you saved the PDF document will open as a PDF file, instead of a regular Word document. 

Taking a Respondus Lockdown Browser Quiz on Educat

Documentation

  1. Make sure your computer is connected to the Internet in the location where you will be taking the quiz.
  2. Log into your class on Educat in Chrome or Firefox.
  3. Click on the quiz you need to take. If Lockdown Browser is required, it will now launch.
  4. If prompted to close a blocked program (e.g. screen capture, instant messaging) choose "Yes" when prompted. This may occur several times until everything needed to be quit is closed. -- OR -- , close LockDown Browser and then close the blocked program(s) before restarting.
  5. Once a quiz has been started with LockDown Browser, you cannot exit until the "Submit all and finish" button is clicked.

TIPS

  • Prior to your first assessment, complete the practice quiz available in most courses using the LockDown Browser to make sure it works correctly.
  • If a LockDown Browser update is available the program will take time to install it when the Lockdown Browser is a opened. Something you might check for before the day of a major exam.
  • For Windows computers, routinely install Windows updates (due on the second Tuesday of the month after 6 pm) so you don't have to wait for them to install if you have to restart your computer just before the exam.

ThinkPad Model identification

Documentation

System Information

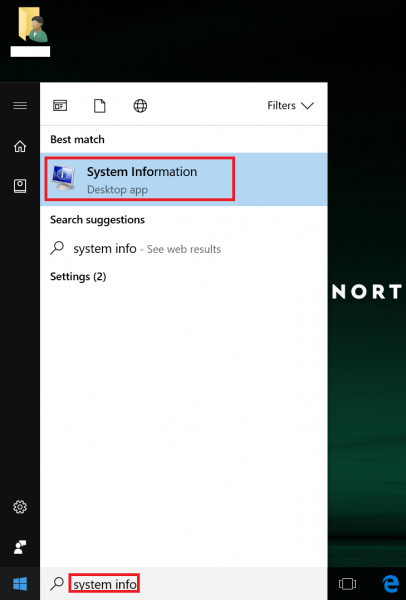
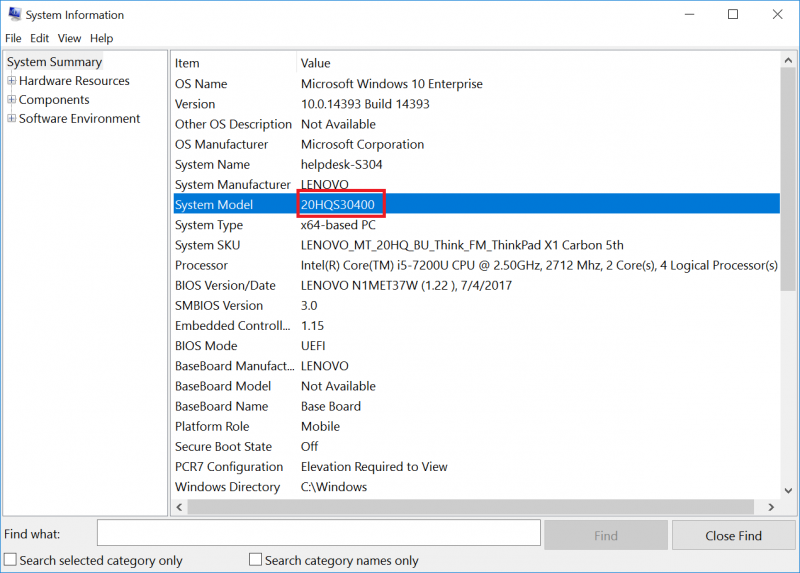
     1. In the Start menu type "System Information" and select that option from the results.


     2. A window will appear, showing your computer's information. The computer model number as the 7th item from the top.


Machine info

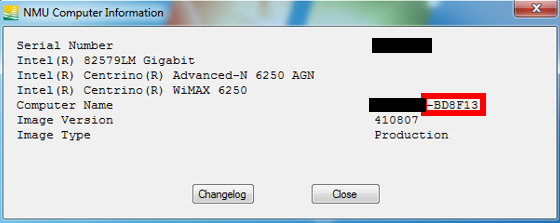
The Machine Info application can be used to find the following information.

  • Machine serial number
  • MAC Address
  • Host Name

The host name of your machine will contain three pieces of information, your NMU userid, the machine type, and image version. 

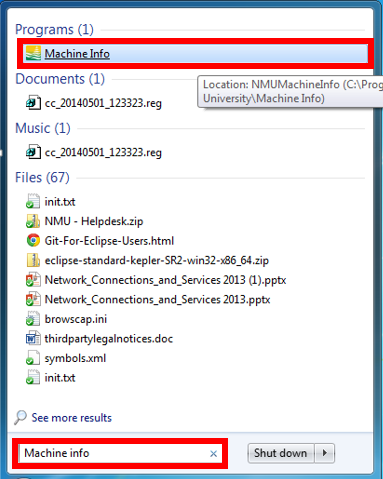
  1. In the Start menu, or Classic Shell, type "Machine Info" and select that option from the results.

  2. A window will appear, showing your computer's information. 

NOTE: Try using the label on the bottom of the machine if you are unable to identify your machine type using the above method.

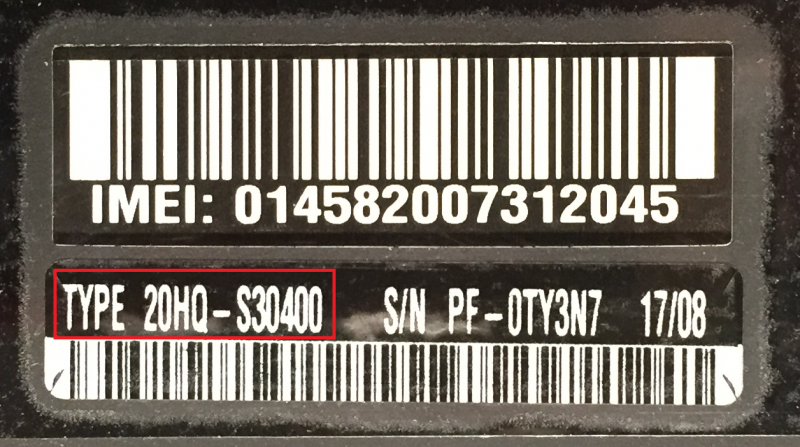
Label located on the bottom of machine.

Every ThinkPad is stamped with a label identifying the machine type, model, and serial number. This lable is located on the bottom of the machine

Below is a sample of a label.

  • ThinkPad X1 Carbon Gen 5  Model 20HQ

Useful Keyboard Shortcuts

Documentation

Keyboard shortcuts are combinations of keystrokes that allow you to quickly perform an action. They are useful and often great time-savers. This page includes a guide to a few useful combinations that will help you complete tasks more quickly. 

Windows
Mac OSX
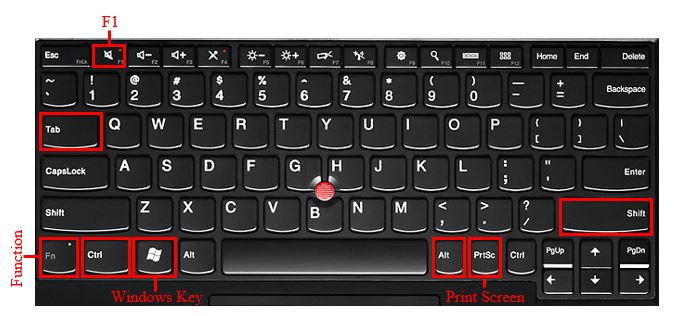
Where can I find these keys on my keyboard?

Windows

The list displays key combinations that are intended to be pressed and held until all are completed. For example, to copy text (Ctrl + "C"), you would highlight the text and press and hold the "Ctrl" (or control) key on your keyboard, then tap the "C" key before releasing both keys. 

  • Open a recently closed tab in your internet broswer: Ctrl + Shift "T"
  • Switch between open windows: Alt + Tab
  • Minimize everything and show desktop: (or between the desktop and Start screen in Windows 8.1): Windows Key + "D" 
  • Minimize window: Windows Key + Down Arrow
  • Maximize window: Windows Key + Up Arrow
  • Bold: Ctrl + "B"
  • Paste selected Item: Ctrl + "V"
  • Copy selected Item: Ctrl + "C"
  • Cut selected Item: Ctrl + "X" 
  • Underline: Ctrl + "U"
  • Italicize: Ctrl + "I" 
  • Undo an action: Ctrl + "Z"
  • Print: Ctrl + "P"
  • Select all: Ctrl + "A"
  • Take screenshot: PrtScr
  • Take screenshot of active screen: Ctrl + Alt + PrtScr
  • Delete permanently: Shift + Delete
  • Open properties for selected item: Alt + Enter
  • Close current window: Alt + F4
  • Open the Start Menu: Ctrl + Esc
  • Flip screen rotation: Ctrl + Alt + any arrow key
  • Open Task Manager: Ctrl + Shift + Esc
  • Lock your PC or switch users: Windows Key + "L"
  • Choose a presentation display mode: Windows Key + "P"
  • Zoom in and out: Windows Key and plus or minus sign
  • Search for files and folders: Windows Key + "F"
  • Help: Windows Key + "F1"
  • Quick system access menu: Windows Key + "X"

View more shortcuts on Microsoft's Page
 

Mac OSX

  • Eject disk: Command + "E"
  • Get information:  Command + "I"
  • Add to dock: Command + Shift + Control + "T"
  • Minimize all windows: Command + Option + "M"
  • Minimize front window: Command + "M"
  • Swich applications: Command + Tab
  • Take screenshot: Command + Shift + "3"
  • Quit application: Command + "Q"
  • Force quit application: Command + Shift + Option + Esc
  • New folder: Command + Shift + "N"
  • Log out: Command + Shift + "Q"
  • Paste selected item: Command + "V"
  • Cut selected item: Command + "X"
  • Copy selected item: Command + "C"
  • Close all windows: Command + Option + "W"
  • Select all items: Command + "A" 
  • Take screenshot: Command + Shift + "3" 
  • Find: Command + "F"
  • Print: Command + "P"
  • Save: Command + "S"
  • Move to trash: Command + Delete
  • Undo/redo: Command + "Z"
  • Show desktop: Command + F3
  • Hide or display dashboard: F12
  • Choose a presentation display mode: Command + F1

View more shortcuts on Apple's page
 

Where can I find these keys on my keyboard?

Windows (Scroll over for a larger image)

MacBook 


Using the Lenovo System Update Tool

Documentation

The Lenovo System Update tool installs unique updates to your ThinkPad computer that are not included in the Microsoft updates. We recommend you routinely run System Update on a monthly basis and install the critical, recommended, and optional updates to keep your computer software up to date.

This page has been split into 2 sections. The first section covers installing the updates related to problems with audio, video and using projectors and takes about 20 minutes to complete. The second section covers installing the full set of recommended updates and takes about an hour to complete. You can do the first section and complete the second section at some later date if you would like.

Section 1 Updates that Resolve Audio, Video, and Projector Problems

WARNING: Lenovo System Updates can contain firmware updates. It is critical that firmware updates are not interrupted. Therefore, we recommend you preform the System Updates with the computer connected to AC power and a fast Internet connection (either NMU WiFi or NMU Ethernet) at a time and place where the update will not be interrupted. If this is something you do not feel comfortable doing yourself, please visit the HelpDesk and get a request to have Micro Repair perform the updates. You should back up your files prior to coming in and Micro Repair currently anticipates a 2 hour turnaround time to have your computer ready.
 

1. Close all other programs and applications.
2. Connect to AC Power.
3. Connect to a fast Internet connection (either NMU WiFi or NMU Ethernet).
4. Run Lenovo's "System Update".  To do this, click on the Windows icon found at the bottom left corner of the desktop on the task bar.  Type "system update" and choose it from the list of choices.
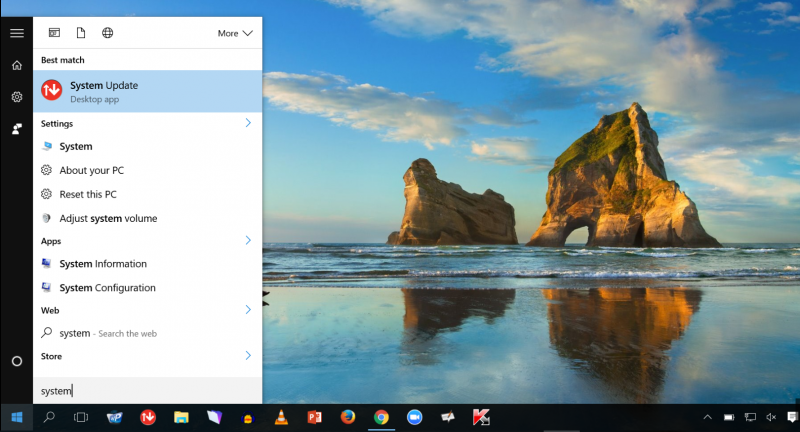
   click on system update
5. If this is your first time running System Update, it will need to update itself.
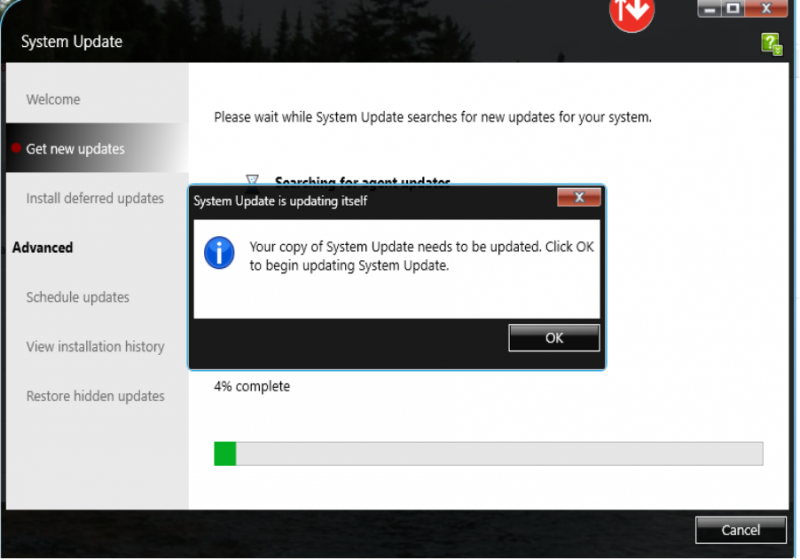
  
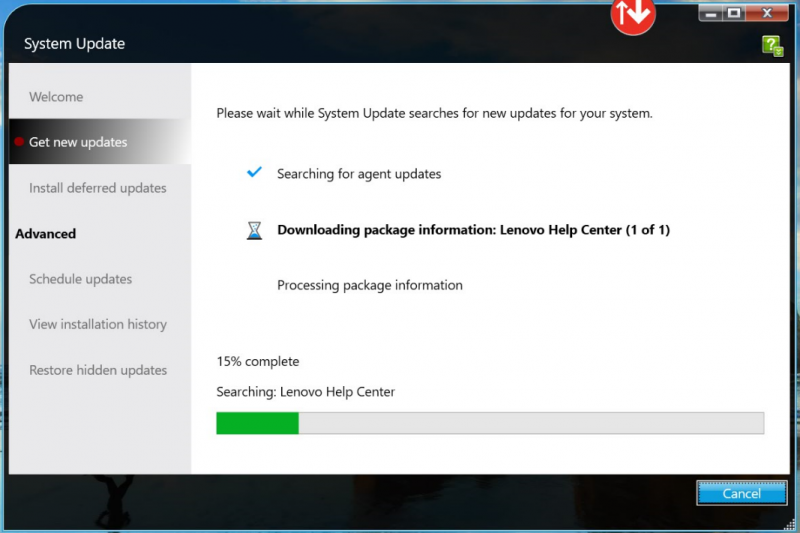
6. Once you are at the System Update home screen, it will look like this...
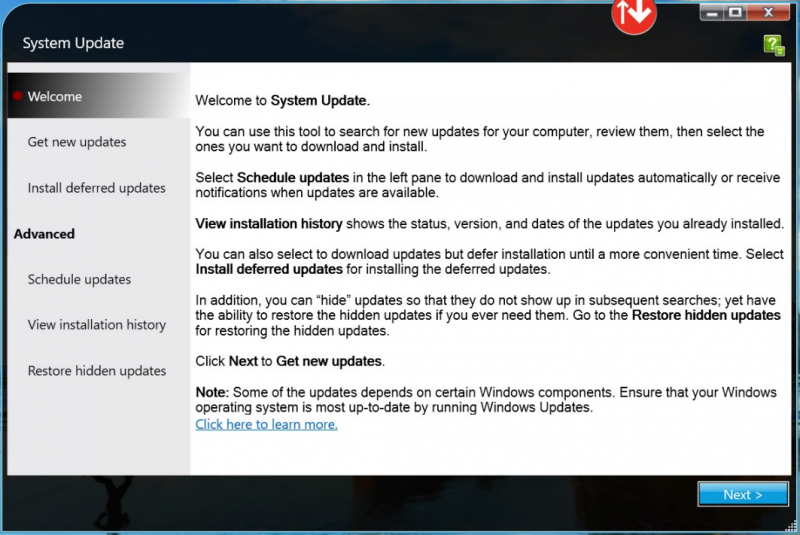
  
7. Click "Next" and System Updates will prepare all available updates for you to choose from.
  
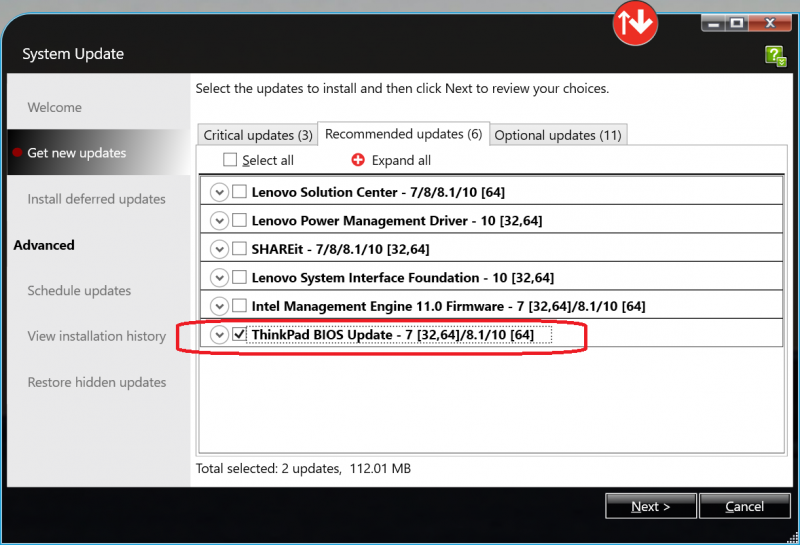
8. Once you are able to perform updates, make sure the first update you choose is JUST to update “BIOS” under "Critical Updates" or "Recommended Updates".  You will be prompted to reboot your laptop.
  
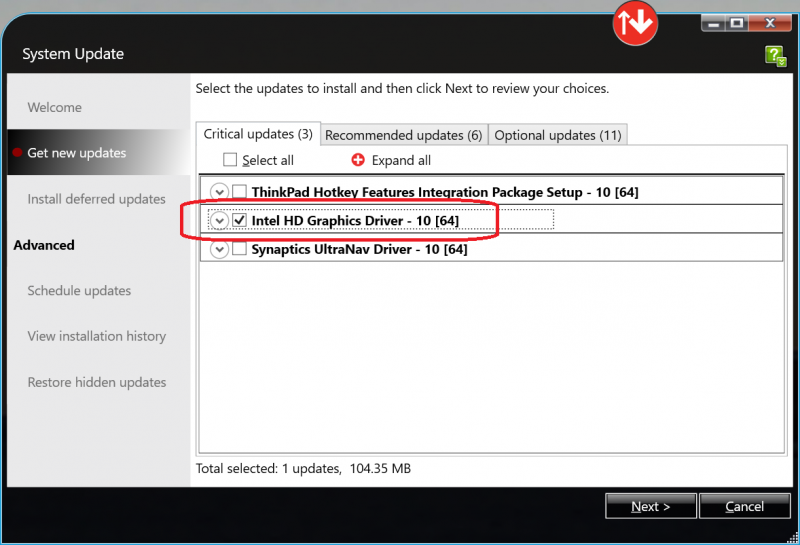
9. The second update you should choose should JUST be “Intel HD Graphics Driver” under "Critical Updates".  You will be prompted to reboot your laptop.
  
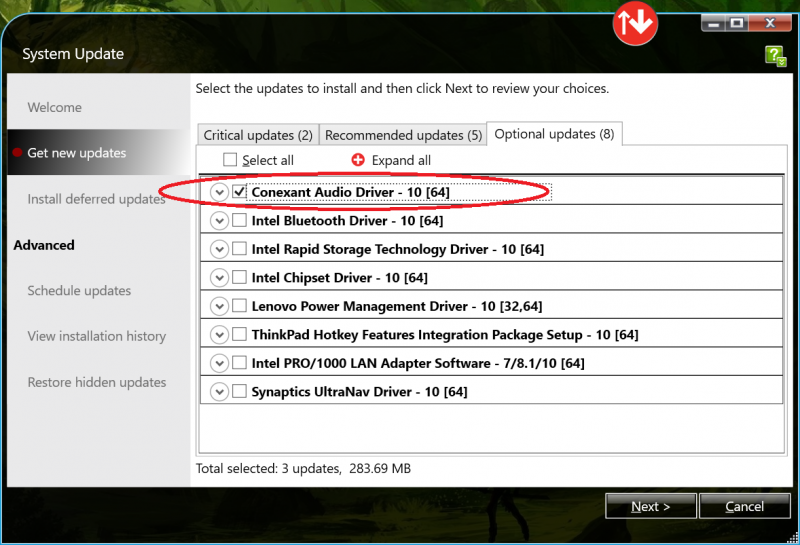
10. The third and final update you should choose should JUST be “Conexant Audio Driver” under "Optional Updates".  You will be prompted to reboot your laptop.
  
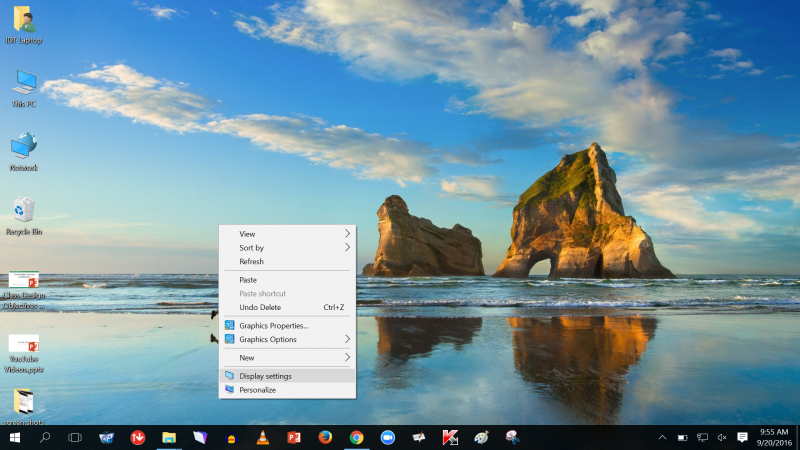
11. While connected to projector in classroom via the 15 pin VGA cable, right click on desktop and choose display settings.
  
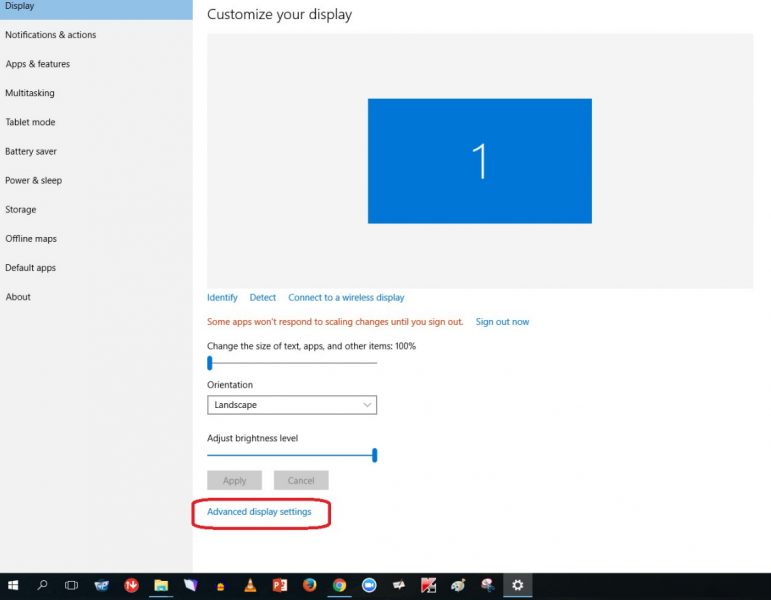
12. You will be brought to a screen where you choose "Advanced Settings".
  
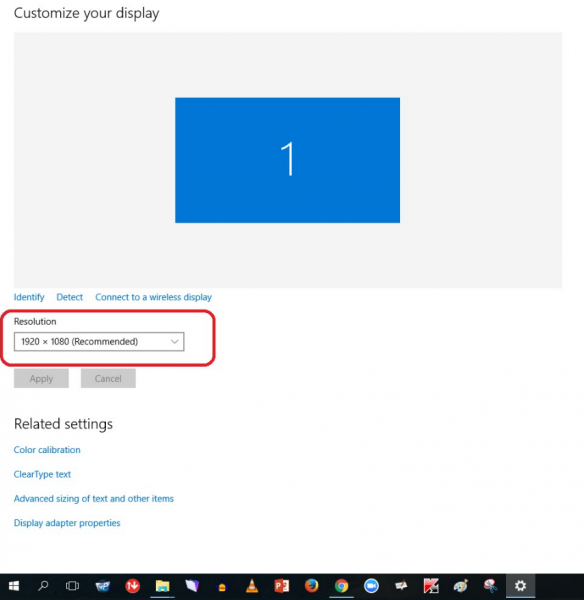
13. Then click on the recommended resolution...
  
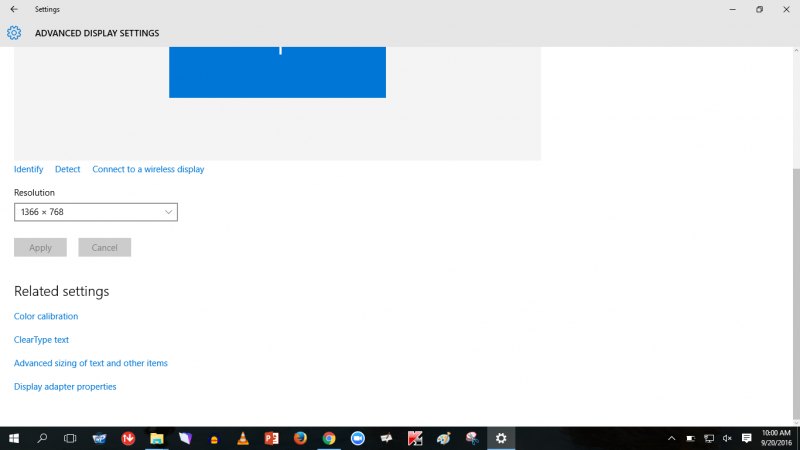
14. Reduce it to "1366x768"


Section 2 All Recommended Updates


The Lenovo System Updates also address network connectivity issues first identified on the T460s ThinkPads in August of 2016 and are recommended for the T460s with the fall 2016 NMU software image. For the T460s ThinkPads as of August 2016 these updates take approximately 1 hour to complete. 

WARNING: Lenovo System Updates can contain firmware updates. It is critical that firmware updates are not interrupted. Therefore, we recommend you preform the System Updates with the computer connected to AC power and a fast Internet connection (either NMU WiFi or NMU Ethernet) at a time and place where the update will not be interrupted. If this is something you do not feel comfortable doing yourself, please visit the HelpDesk and get a request to have Micro Repair perform the updates. You should back up your files prior to coming in and Micro Repair currently anticipates a 2 hour turnaround time to have your computer ready.

1. Close all other programs and applications.
2. Connect to AC Power.
3. Connect to a fast Internet connection (either NMU WiFi or NMU Ethernet).
4. Go to the “Start” menu and type “system update” and select “System Update” from the list of results. The program will start.  
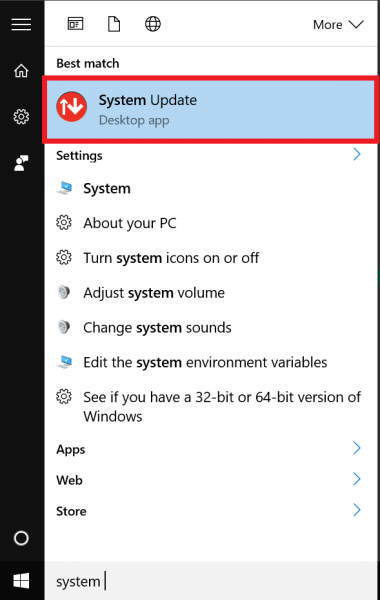


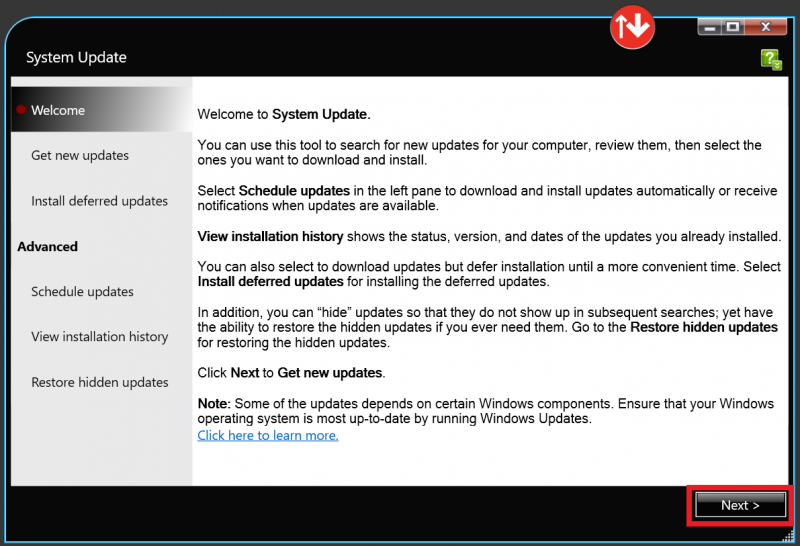
5. The program will start and provide a System Update Welcome screen. Click “Next”.
 

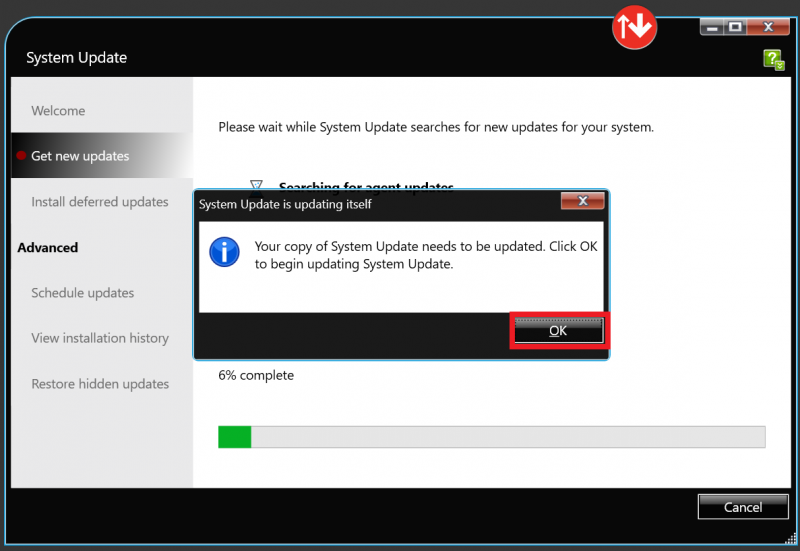
6. The program will search for and download available updates.


7. If prompted to update the System Update tool click “OK”.

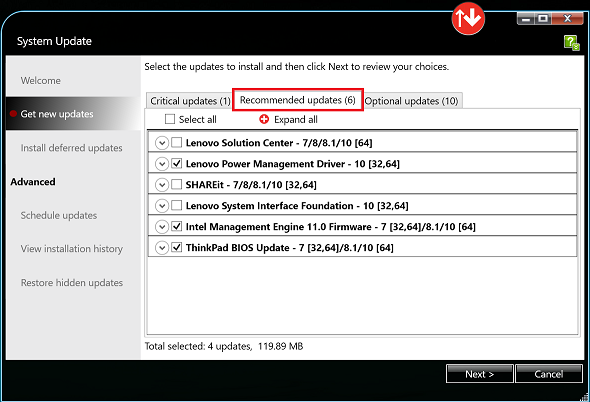
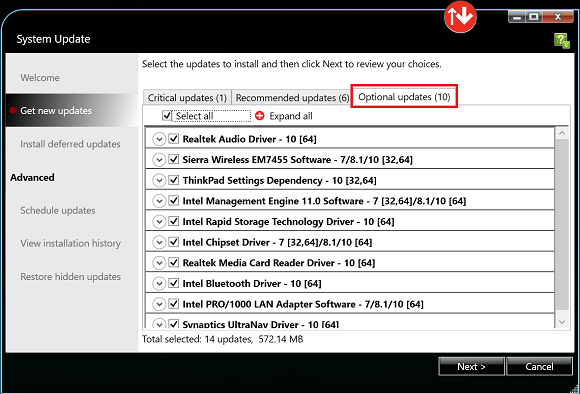
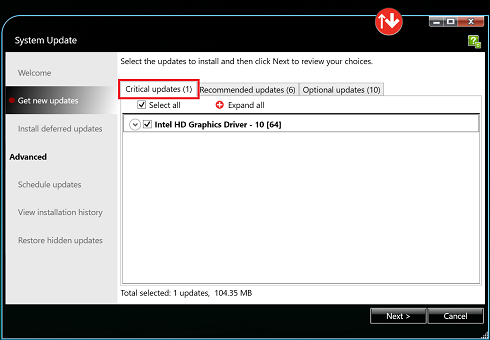
8. Lists of available critical, recommended, and optional updates will be displayed in 3 tabs. On the "Critical" and "Optional" tabs, check the “Select All” checkbox to select all the updates. On the "Recommended" tab, select the individual updates excluding "Lenovo Solution Center", "SHAREit", and "Lenovo System Interface Foundation." Click “Next” to begin the update process.


9. You may be prompted to download the updates, Click “Download.”
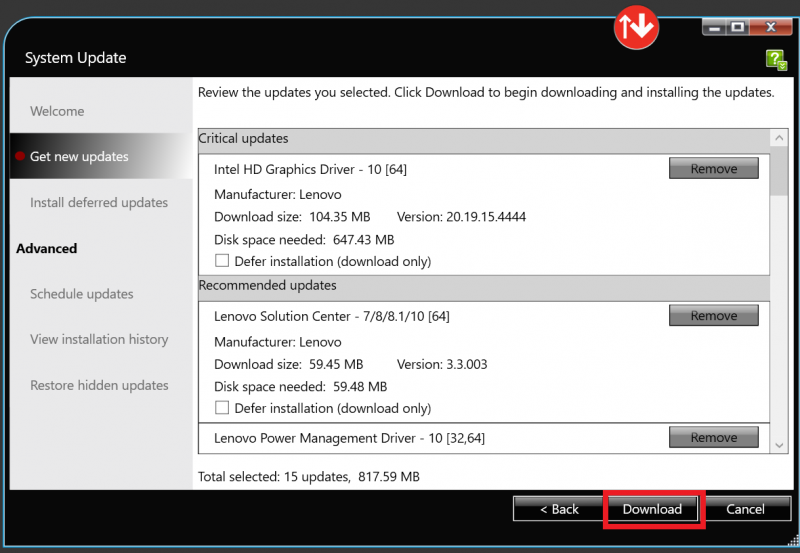

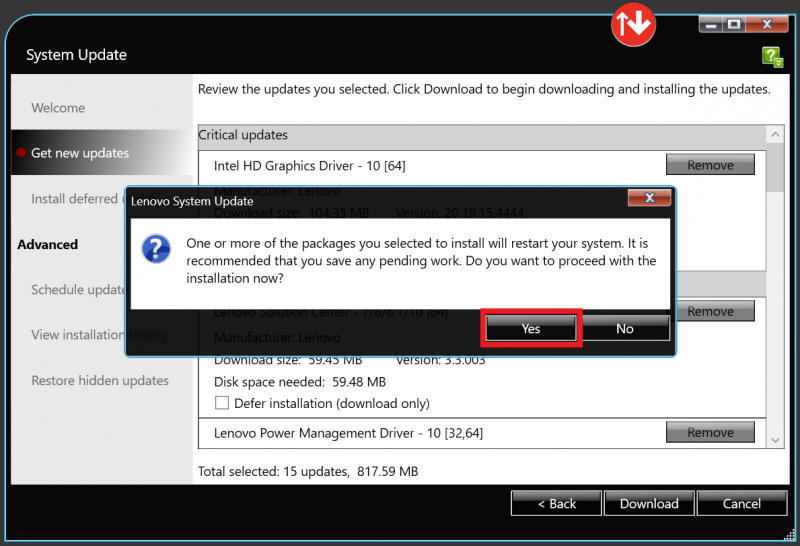
10. You may be prompted to restart your computer, click “Yes”
.
11. The updates will begin downloading.


12. Wait about an hour and expect at least one restart to complete the process.
Windows Activation

Documentation

Occasionally the Windows software on NMU issued machines may state that it is not activated or genuine (especially if you haven't connected to an on-campus network recently). You may see prompts stating "The activation period has expired," "You may be a victim of software counterfeiting," or "Windows is not genuine." Follow these intstructions to verify and/or troubleshoot Windows activation. 


Activate Windows

1. You will need to be connected to an NMU network (Wifi, Ethernet, or LTE) to activate. If you are off campus, you can also connect using the VPN client.


2. Once connected to an NMU network, you must first ensure that your date and time are correctly synchronized. It is possible for AM/PM to be incorrect, the date to be wrong, or even for the clock to be off by minutes or seconds.  Ensure your time is correct and change it if it isn't by following the instructions at our "Windows Date and Time Zone Settings" page. 

To check activation status in Windows 11, select the Start button, and then select Settings > System and then select Activation .  Your activation status will be listed next to Activation.

Check  activation status in Settings

You'll see one of these activation status messages on the Activation page:

Activation statusDescription
Windows is activated
Windows is activated with a digital license
Windows is activated with a digital license linked to your Microsoft account
  • You are activated.
  • Your Microsoft account is already linked to your digital license.
Windows is not activated
  • You are not activated.
  • You will see an error message explaining the failure.
  • You might need to purchase Windows 11 to activate.


Subscribe to ThinkPad