Notebook Computer Care Tips

Documentation

Notebook computers are precision machines that require a bit of careful handling. Though the ThinkPad computer is designed and tested to be a durable notebook computer that functions reliably in normal work environments, you need to use some common sense in handling it.

Below is a list of things you can do to prevent possible damage to your notebook computer.

  • Turn off all attached devices.
  • Turn off the computer and close the LCD.
  • Unplug all external cables, devices, and cords connected to your computer before you relocate it. 
  • Make sure all computer doors and covers are closed.
  • Use a quality carrying case that provides adequate cushion and protection.
  • Shut your computer off before transporting it.
  • Back up your files often in case of damage.
  • Be sure to keep your machine up to date to avoid software problems in the future.
  • Make sure your computer is password protected.
  • Regularly scan for viruses. Viruses can hide in places you wouldn’t expect and can slow down your machine without you realizing it.
  • Always make sure that software you download has come from a reliable source to prevent viruses.
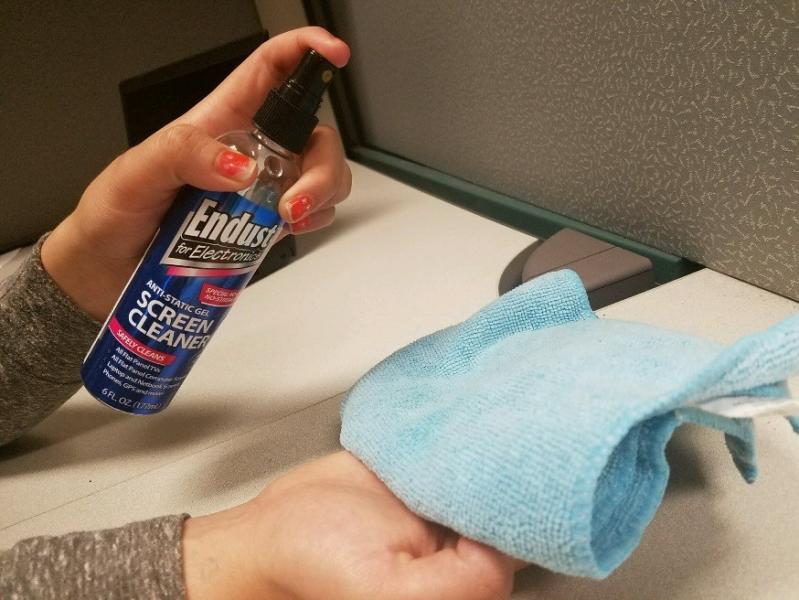
  • Keep canned air handy to dust the machine regularly.
  • A re-image isn’t a bad thing! Re-imaging your machine at the beginning of the year can help keep your machine updated and can better prepare your machine for new class-related software.

Below is a list of things you should not do.

  • Subject your computer to physical punishment, such as dropping or bumping.
  • Place heavy objects on your computer.
  • Spill or allow liquids into your computer.
  • Pack your computer in a tightly packed suitcase or bag. The compression might cause internal damage.
  • Disassemble your computer.
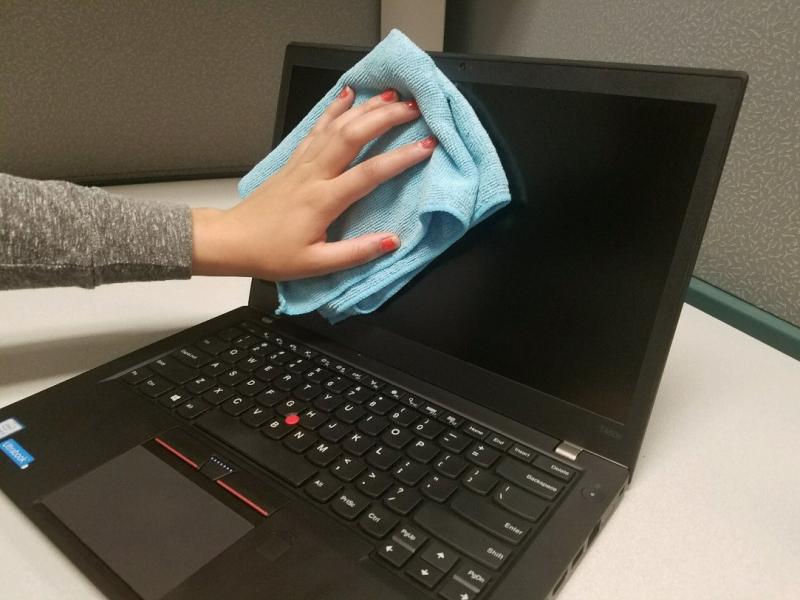
  • Scratch, twist, hit, or push the surface of your computer display.
  • Place any objects between the display and keyboard or under the keyboard.
  • Pick up or hold your computer by the display. When picking up your open computer, hold it by the bottom (keyboard) half.
  • Turn your computer over while the AC Adapter is plugged in. This could break the adapter plug.
  • Store your computer where the temperature is below 41° F or above 95° F (5° C and 35° C).
  • Lend your computer to anyone while you are not present.
  • It is not recommended to use your machine anywhere near sand, dirt, gravel, etc. Sand can get into small places in the machine and could cause problems.
  • When cleaning the keyboard it is not advised to remove the keys yourself. It is possible to break a small piece on the key that holds it to the keyboard.
  • Do not torrent software! While file sharing may not inherently be bad, it is sometimes used illegally and can make your machine vulnerable to a lot of different viruses!

Mapping a Network Drive and DepartmentShare

Documentation

Faculty, staff, and some students have access to an NMU network drive. This offers the opportunity to share files with others in the department. It is important to note that these folders are only available from an NMU network connection such as WiFi, wired or WiMAX. Some offices are required to use the VPN client in order to connect to a network drive. Mapping these drives give you easy access to network folders without having to manually connect each time. This is an excellent way for faculty to add their Departmentshare if use it regularly.

Windows
OS X

Windows

1. Open "This PC" from your desktop or from "File Explorer" in the Windows "Start" menu. 


2. Click the "Computer" tab and "Map Network Drive" at the top of the window.


3. In the drive list, click a drive letter. you can choose any available letter. You'll need to be connected via VPN or Ethernet to access the drive.


4. In the "Folder" box, type the path of the folder or computer - Using Departmentshare as an example.

  • For faculty the department share you would use \\departmentshare.nmu.edu\deptname
  • If you do not have access to this, you will need to ask your Department Head or Secretary to add you.

5. To connect every time you log in, select the "Reconnect at logon" check box.


6. Click "Finish." You will be prompted to log in with your credentials. 


Your computer is now connected, or mapped, to the network drive. If you can't connect to a network drive or folder, the computer you're trying to connect to might be turned off or you might not have the correct permissions. If you can't connect, contact your network administrator. 
 

OS X

1. Minimize all open windows and single-click anywhere on the background to make sure "Finder" is the active application on the top left of the screen. 

2. Once you see "Finder" in the top left corner, click the "Go" button. Scroll down and click "Connect to Server."
     

3. Type the path of the share you are trying to map. In most cases you will need to start the server address with "smb://"

For example to connect to the departmentshare you would use "smb://departmentshare.nmu.edu/deptname"

4. Once the path is entered click the "+" sign, and then click "Connect."
 

5. Type in your credentials. Check the "Remember this password in the keychain" to allow the drive to map automatically. Click "Connect."
 

6. Once you connected, your mapped network drive should appear on the upper-right hand portion of your desktop. Double clicking it will show its contents.

Installing the Jacobetti Laser Printer

Documentation

As of 9/21/18 the Jacobetti, PEIF, and HelpDesk Laser printers use the same printer settings as the "Library Laser" printer already configured on the NMU Thinkpad and MacBook issued computers. Please use the "Library Laser" printer for the Jacobetti, PEIF, and HelpDesk Laser printers.

If you need to configure a computer to access the printers please see the instructions at the NMU Library web site https://lib.nmu.edu/print.

Identifying Phishing Attempts

Documentation

At the HelpDesk, and throughout campus, there has been an influx of phishing attempts on NMU accounts. In response to this we would like to get the word out to the NMU community about ways to tell if you are looking at a possible phishing attempt. Our friends over at James Madison University (jmu.edu) came up with a great rule of thumb when faced with a possible attempt to gather personal information. They suggest, “counting the periods.” What this means is that you will want to look at the link, count back two from the first slash after “http://” and note those two sections. What you are looking at is what’s called the domain of the site or e-mail address. 

We hope that you are able to take this information and use it beyond your time here at NMU to continue to keep your personal information safe. Remember that Northern Michigan University, your bank, your financial advisors, and any other person or organization that deals with personal information will typically NOT ask for your information via e-mail including but not limited to: your password or your unique identifier (NMUIN, Member Number, Social Security Number, etc.).  If you ever receive a message asking for personal information it is safe practice to contact the support group for that organization. It’s always better to be safe and ask.

Knowing Trusted Domains
Identifying Untrustworthy Domains
 

Knowing Trusted Domains

http://www.nmu.edu/ - Here we count back two periods from that first slash after "http://" and we see "nmu.edu" which is the standard domain for an NMU site. 


https://mynmu.nmu.edu/ - Again, if we count back two periods from the slash we see "nmu.edu."


http://educat.nmu.edu - This one doesn't have a slash, so now what? Count your two periods back from the end of the address as if there was a slash and note the doman, in this case, "nmu.edu."


myuser.nmu.edu - This one doesn't have an 'http' or a slash! Follow the same guideline as the last example and you'll see the "nmu.edu" domain. 


Identifying Untrustworthy Domains

We recently recieved a phishing attempt on campus from http://mailnmuedu.webs/com, which is NOT a trusted NMU site and should NOT be followed or clicked. 


  • Counting the periods here shows us that this is not an nmu.edu site. 
  • If a link just says "Click Here" or you can't see the URL or domain, just hover over without clicking the link and a link description will appear. You can count the periods here.
  • If an email ends in anything other than @nmu.edu or @mes.nmu.edu, chances are it's NOT from a trusted Northern Michigan University account, though we do use a few third party systems in some departments
  • If you aren't sure, feel free to ask a coworker or contact the HelpDesk.


We hope that you are able to take this information and use it beyond your time here at NMU to continue to keep your personal information safe. Remember that Northern Michigan University, your bank, your financial advisors, and any other person or organization that deals with personal information will typically NOT ask for your information via e-mail including but not limited to: your password or your unique identifier (NMUIN, Member Number, Social Security Number, etc.).  If you ever receive a message asking for personal information it is safe practice to contact the support group for that organization. It’s always better to be safe and ask.

Identifying and Limiting Spam

Documentation

Here are some tips to help you identify if an email is spam:

  • Northern will NEVER ask you for any personal information such as your NMU password or Social Security Number through an email. In fact, NMU will NEVER ask for your password no matter what the circumstance could be.
  • To be safe, never send any personal information over email. Over the phone is better, but in person is always the way to go.
  • Never enter your information on a pop-up screen.
  • To verify if links in an email are legitimate or not, move your cursor over the link to view the address used in the link. If it doesn't appear to match what the message is about don't click on it. If you are still not sure if it is legitimate contact the place of business to see if they sent it to you. 
  • If the email address ends in something you do not recognize, don't trust it. If the email says that it is coming from the "Helpdesk" then it would come from helpdesk@nmu.edu. If it is coming from another email address it is most likely spam, you can get more information on this on our phishing attempts page.
  • The message contains a fuzzy or illegitimate logo.
  • The message shows the sender on behalf of someone, such as NMU, but does not have a legitimate NMU email address.
  • The message requires you to enter a password.
  • The message requires you to download a file.
  • You may get emails about verifying your account or to take action quickly with a link for you to enter your information. Ignore and delete this type of email.

To avoid getting more spam emails:

  • Do not sign up for services or use your email on sites that you do not trust.
  • Unsubscribe from messages by looking at the bottom of the email for a button or link that says "unsubscribe".
  • Change your NMU email spam settings in myuser.nmu.edu/user by following our instructions

If you clicked a link you don't trust or shouldn't have and entered your information:

  1. If you entered your password after clicking the link, go to myuser.nmu.edu/user immediately to change your password.
  2. If you downloaded or saved anything from an email that was illegitimate open your "downloads" folder by opening windows explorer and selecting "downloads" located on the left hand side of that screen.
  3. After you delete the item from your downloads folder, empty your recycle bin as well that way it will no longer be on your computer.

Ethernet Connection Information

Documentation

There are more than 10,000 network ports on Northern's campus. For help connecting to one of them see:

Connecting on Campus Via a Network Port (Windows)

These instructions tell how to connect to the campus network through one of the orange network ports on campus. They assume your network settings are already configured.

  • NMU notebook computers are already configured to connect to the NMU network.
  1. Find an orange network port.
  2. Plug your network cable into the orange network port and into the network port on the side of your computer.
  3. If the connection is not established automatically, open ThinkVantage Access Connections and troubleshoot the connection from there.

Note: The first time you connect a computer to the campus network, you must register the computer's network interface(s).

Drag and Drop Back Up Method

Documentation

Drag and Drop Back Up Method

There are many ways to back up your computer. The drag-and-drop method is a common one. It is recommended that you do a back-up at least once a month, That way if something were to happen with your computer, you would have most of your files. We recommend using an external USB drive with sufficient space available to store all of your files.


1. Plug in the device you'd like to back up your files to. In our example. It is a Kinston drive with the drive letter of D: Your name and drive letter may be different, depending on what drive you use.


2. Type File Explorer click File Explorer and open a new window.


3. Right-click the File Explorer icon and click "File Explorer" to open a second window.     


4. Drag and resize the second window to the right so it displays on the second half of the screen, next to the previous one. 


5. Navigate in one window to your external device, then in the other window navigate to the locations you would like to copy files from. In this case, click and drag the files from your PC to the external drive. In our example, the target drive is KINGSTON (D): Your external drive may have a different name and drive letter. Repeat the procedure until you've backed up all the desired files. 


We recommend backing up the following folders. You may have others that contain data important to you.

Music

Pictures

Desktop

Documents

Downloads

Favorites

Videos

Backup using File History

  • File History is a handy feature in Windows that helps you protect your personal files and folders from accidental loss or damage. Think of it as a backup system that automatically saves copies of your files, so you can easily restore them if something goes wrong. Whether you accidentally delete a file, make unwanted changes, or experience a technical issue, File History can come to your rescue by allowing you to recover previous versions of your files and folders.
  • One of the great things about File History is that it automatically backs up all your libraries. This includes default libraries like Documents, Pictures, Videos, and Music, as well as any custom libraries you have created. If you have folders elsewhere that you want to back up, you can add them to an existing library or create a new library for them.
  • Setting up File History is straightforward. Once enabled, it continuously monitors your files and folders, making regular backups to an external drive or network location. This means you don't have to worry about manually saving copies of your important documents, photos, videos, or entire folders. If you ever need to recover a file or folder, you can browse through the different versions saved by File History and restore the one you need. It's a simple yet powerful tool that provides peace of mind by ensuring your valuable data is always protected. 
  • Configure File History

  • Here are the steps to configure File History:

  • Connect an external drive or a network location: ensure you have an external drive connected to your computer or a network location configured where you want to save your backups
  • From the Control Panel, under System and Security, select Save backup copies of your files with File History
  • Select Turn on to enable File History


Windows Update

Documentation

NMU issued desktops and ThinkPad notebooks are configured with Automatic Updates, which means that each computer regularly communicates with a local Automatic Updates server. The server tells the computer what updates are available, and the computer tells you they are ready to be installed. Windows updates are available typically the second Tuesday of each month after 6:00 pm but critical updates might be available more often. It is best to routinely install the updates at a time that is convenient to you since the computer will install them automatically install the next time you restart or turn your computer off and on.


Never turn your computer off when it is installing updates and ensure that it is plugged in if the power is low. If the computer is shut down when installing updates your system will become corrupted. It is important to keep windows up to date to eliminate any software bugs and protect your computer from malicious software. To learn more reasons why you should update, click here

To manually check for and install updates, follow the steps below. Though the screenshots show Windows 10, the steps are similar for earlier versions of windows. 

1. Save and close all open work and windows.

2. In the Windows Start Menu type in and click the "Check for Updates" option in the new window.

3. Click the "Check for Updates" button in the new window and wait while Windows searches Microsoft's update server for available updates.

3. If any are available, they will automatically start to download. 

4. Once the updates are finished downloading you will be prompted to install them. You can either click "Install now" in the open "Update & Security" window, or you can click on the notification in the action center in the charms bar. 


NOTE: Downloading and Installing are two different steps in their own. You download the updates from the Microsoft server, but will have to actually Install them to the computer in order to take advantage of the new features. The newly downloaded updates will not be fully installed to the computer until the computer has been restarted. We recommend restarting the computer as soon as the updates are installed so the installation doesn't happen at a time that is inconvenient for you such as the start of class or when attempting to take an online exam.


5. Once you select the restart option in the prompt, the computer will restart and install the updates. Some updates, large ones or if you haven't updated in a while, will take a fair amount of time. You'll know once the update is completed, when your computer returns you to the login screen. 
 

Connecting to NMU LTE

Documentation

Is NMU LTE available in your area?

NMU LTE is available everywhere NMU EAN is available. Go to the Check Availabilty page and click the "Check Availabilty" button. Enter your complete address with Street Address, City, State, and Zip code to see if NMU LTE is available in your location.

If you were issued an NMU ThinkPads NMU LTE is not installed by default. You can get the NMU LTE network and SIM cards installed at no charge so the computer can access the NMU LTE network. If you have not already done so, please stop at the Helpdesk to get a work order for the LTE hardware to be installed. 

Connecting the ThinkPad to NMU (LTE)
 

1.Left click the “WiFi” or “Ethernet” icon in the system tray in the lower right corner of the Windows desktop.
  

2.Make sure an Ethernet cable is not connected,  “NMU" "WiFi” is "Off" (grayed out) and “Cellular"or "Mobile Broadband" is turned "On" (displayed in blue) and click the “NMU (LTE)” icon in the top section of the “Networks” menu.
  

3.Check the “Connect automatically” checkbox if it isn’t already checked and click the “Connect” button. The icon initially may indicate a “Limited” connection but then display “Connected”
 

4.The “LTE” icon will appear in the system tray when NMU (LTE) is in use. The number of white bars indicates the signal strength. You should now be able to access the NMU network using NMU LTE.
  

Connecting the ThinkPad to NMU WiFi (preferred if on campus)

1.Left click the “LTE” or “Ethernet” icon in the system tray in the lower right corner of the Windows desktop. 
  

2.Click the "NMU" "WiFi" to turn on (turn blue) the WiFi network adapter in the “Networks” menu.
  

3.Select the WiFi connection you want to use (Use the “NMU” WiFi connection if on campus). 
 

4.Check the “Connect automatically” checkbox if it isn’t already checked and click the “Connect” button. The icon initially may indicate a “Limited” connection but then display “Connected”.
  

 5.The “WiFi” 
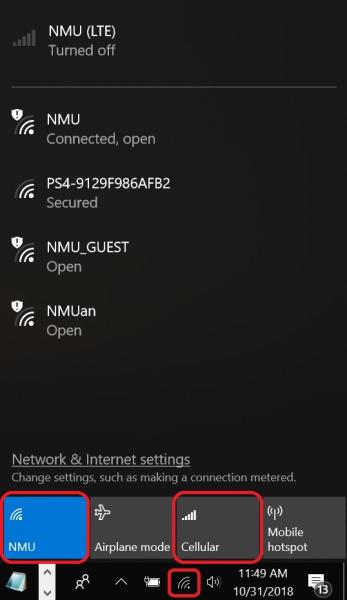
icon will appear in the system tray when WiFi is in use. The number of white bars indicates the signal strength. You should now be able to access the NMU network using NMU WiFi. NOTE: The system will use the WiFi connection by default even if the NMU (LTE) connection is on.
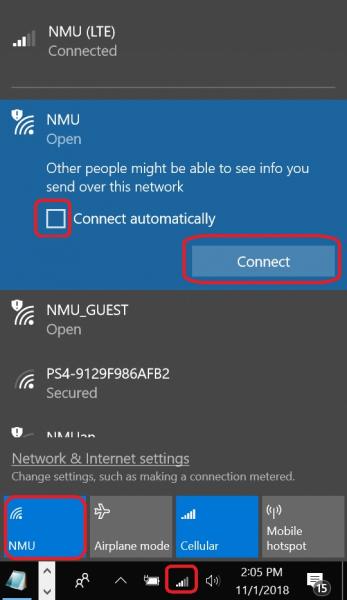
Cleaning a ThinkPad

Documentation

You should take care to clean your ThinkPad properly. Select a part of your computer to learn how to safely clean it. 

Case
Keyboard
LCD Screen


Cleaning your computer's case

  • Prepare a small mixture of a gentle kitchen-use detergent (one that does not contain abrasive powder or strong chemicals such as an acid or alkaline). Use 5 parts water to 1 part detergent.
  • Absorb the diluted detergent into a sponge or lint-free, soft cloth.
  • Squeeze out the excess liquid from the sponge or cloth.
  • Wipe the cover, using a circular motion and taking care not to let any excess liquid drip.
  • Wipe the surface to remove the detergent.
  • Rinse the sponge or cloth with clean running water and squeeze out any excess liquid.
  • Wipe the cover with the clean sponge or lint-free, soft cloth.
  • Wipe the surface again with a dry, lint-free, soft cloth.
  • Wait for the surface to dry completely and then remove any fibers left from the sponge or cloth.

Cleaning your computer keyboard

  • Absorb some isopropyl rubbing alcohol on a lint-free, soft cloth.
  • Wipe the keytop surface with the cloth, ensuring no liquid drips on or between the keys.
  • Allow to dry.

Notes: Never spray or pour any liquid cleaner directly on the LCD display or the keyboard. You can use compressed air to remove any crumbs and dust from beneath the keys.

Cleaning your computer LCD display


  • Gently wipe the display with a dry, lint-free, soft cloth. If you see a scratch-like mark on your display, it might be a stain transferred from the keyboard or the TrackPoint pointer when the cover was pressed from the outside.
  • Wipe or dust the stain gently with a dry, soft cloth.
  • If the stain remains, moisten a lint-free, soft cloth with water or a 50-50 mixture of isopropyl alcohol and water that does not contain impurities.
  • Wring out as much of the liquid as you can.
  • Wipe the display again; do not let any liquid drip into the computer.
  • Dry the display before closing the lid.

Notes: Anti-static LCD cleaning cloths and Kim Wipes are also acceptable alternatives. Isopropyl Alcohol is a flammable liquid. Do not use this cleaner near an exposed flame or when the system is on.

Subscribe to ThinkPad