Checking TCP or IP Address Settings

Documentation

If you're having network issues, it may be a good idea to check your settings. Click below to get started.
Mac OS X
Windows 10 (Similar to earlier versions)


MAC OS X

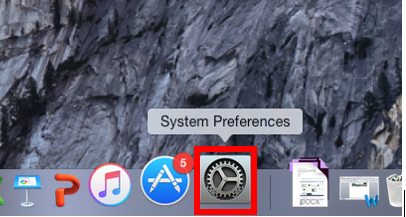
1. Click on "System Preferences" on the dock.


2. Click on "Network.
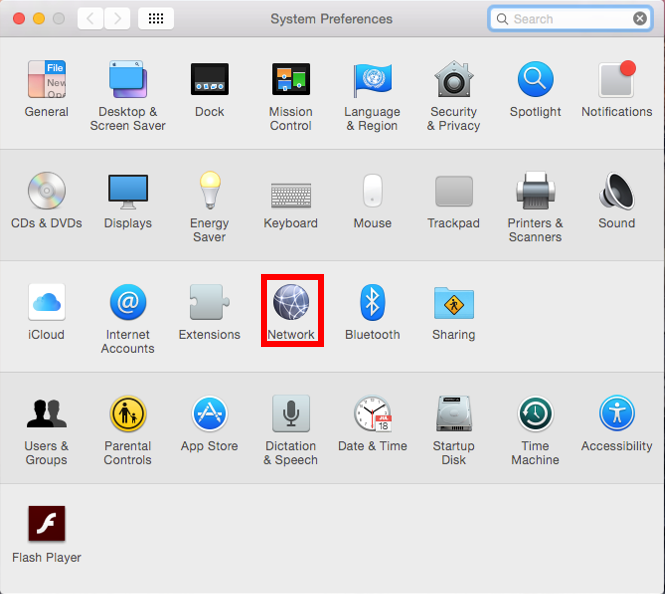


3. To check Wifi settings, click here. To check Ethernet, click here.


WIFI
 

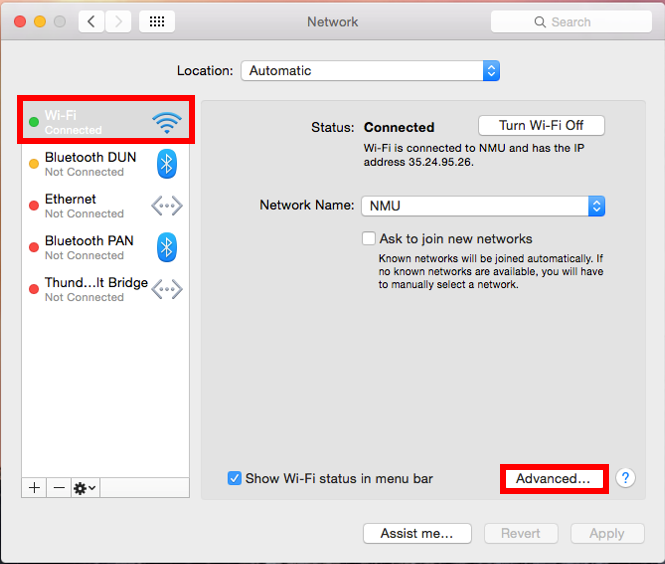
1. Click on "WiFi," then click on "Advanced."


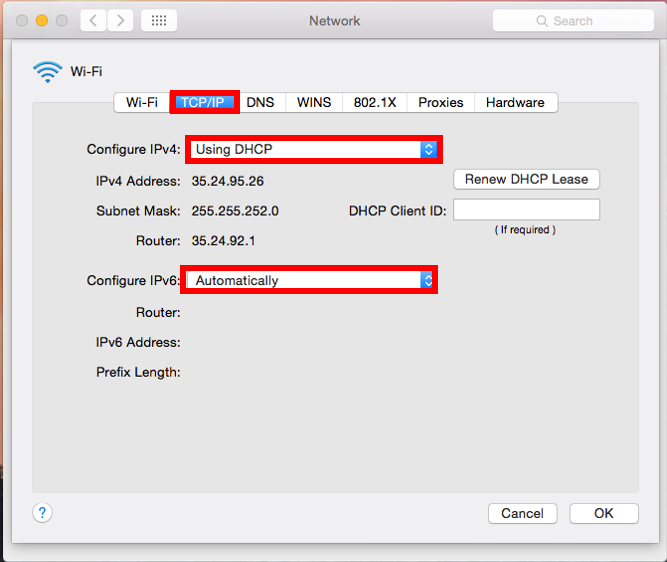
2. In the "TCP/IP" tab, verify that "Configure IPv4" is set to "Using DHCP." Then, verify that "Configure IPv6" is set to "Automatically."


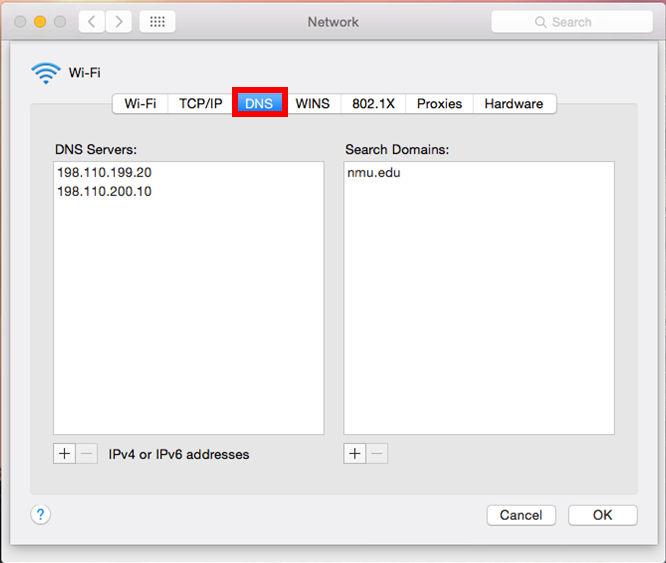
3. Click the "DNS" tab, and verify that the DNS Servers and Search Domains match what is shown below. 


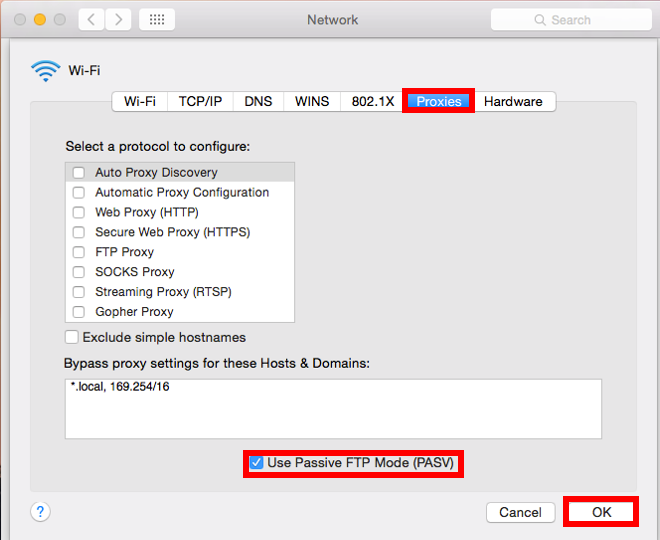
4. Click "Proxies" and be sure that everything is unchecked except "Use Passive FTP Mode (PASV)." Click "OK" to exit.


ETHERNET
 

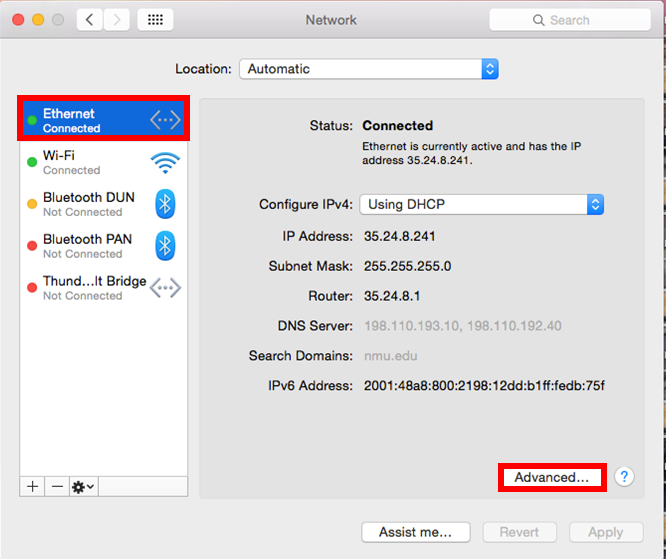
1. Click on "Ethernet" and veryfy that "Configure IPv4 is set to "Using DHCP." Now, click "Advanced.


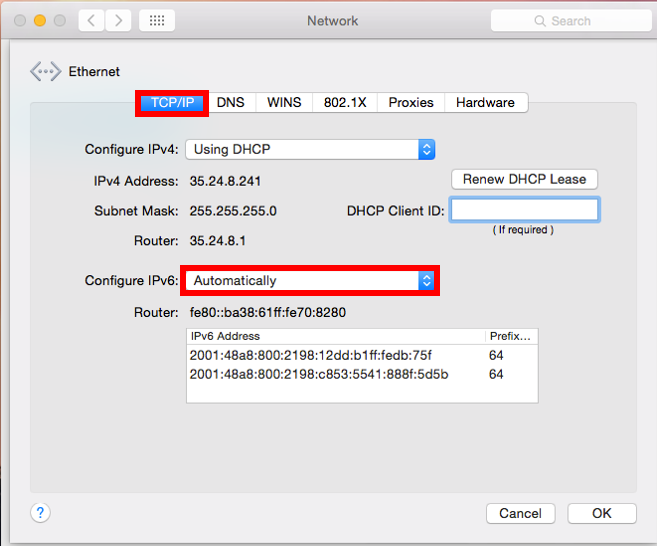
2. In the "TCP/IP" tab, verify that "Configure IPv4" is set to "Using DHCP." Then, verify that "Configure IPv6" is set to "Automatically.


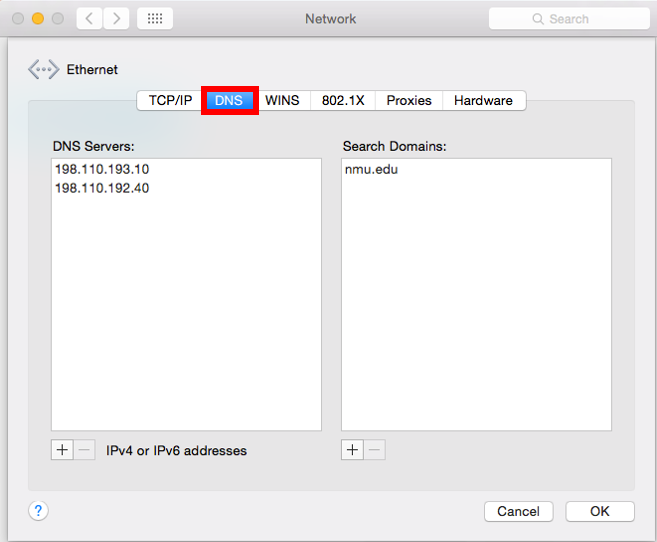
3. Click the "DNS" tab, and verify that the DNS Servers and Search Domains match what is shown.


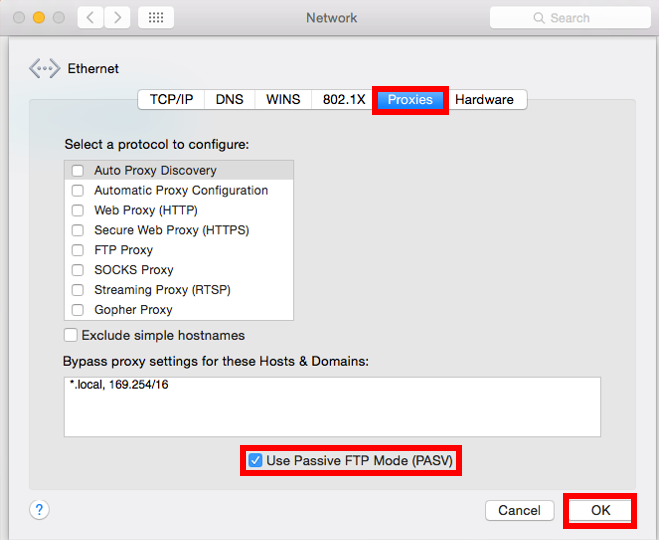
4. Click "Proxies" and be sure that everything is unchecked except "Use Passive FTP Mode (PASV).


Windows 10

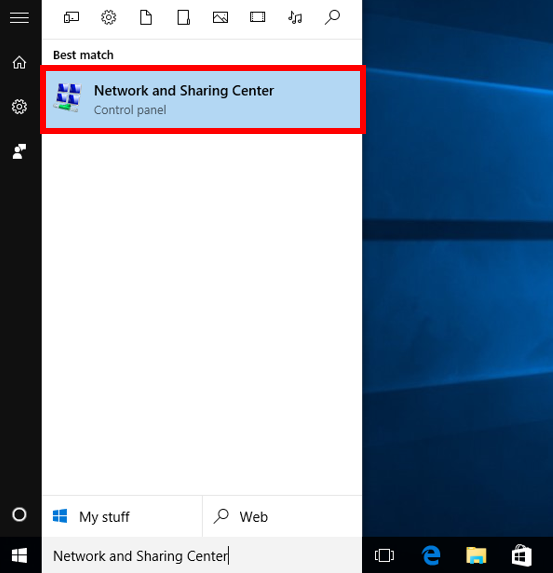
1. In the Start menu or search bar, type "Network and Sharing Center" and select that option. 


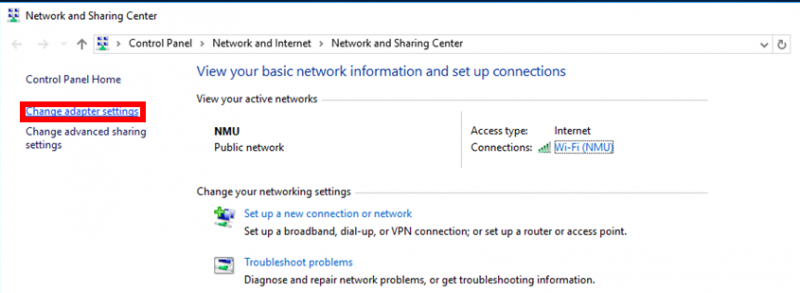
2. Select "Change adapter settings" to the right. 


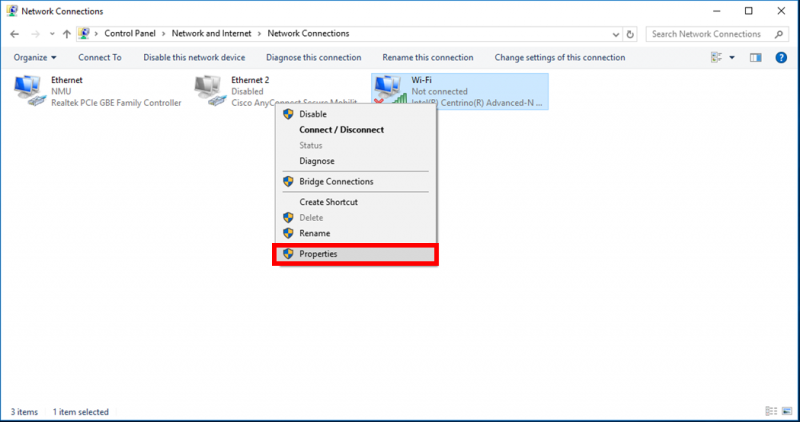
3. Right click the network you'd like to check and select "Properties." The information will be the same for both ethernet and WiFi. 


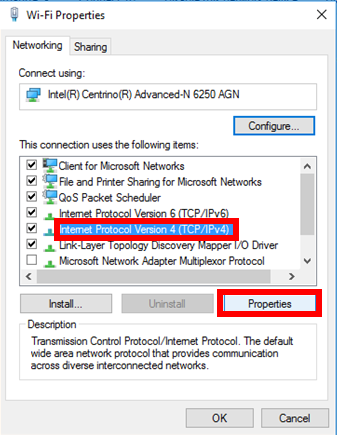
4. In the new window, scroll down to select "Internet Protocol Version 4 (TCP/IPv4)" and click "Properties." 


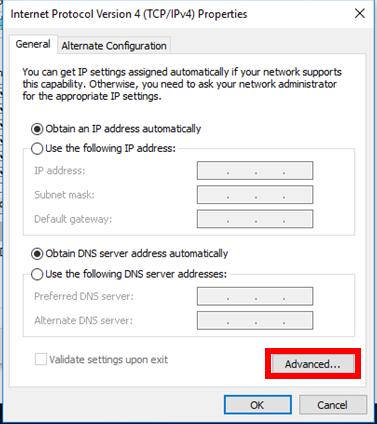
5. Assure that "Obtain an IP address automatically" and "Obtain DNS server address automatically," then click the "Advanced" button. 


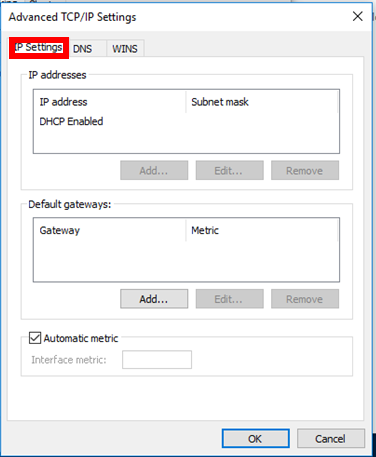
6. Ensure that the settings in the
tab match those shown below. 


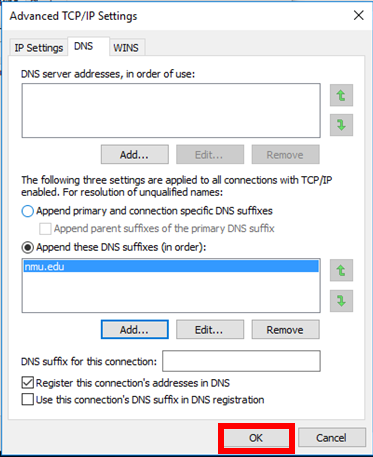
7. Ensure that the settings in the "DNS" tab match those shown below. Click "OK" to close the window. 
    

Changing Your Computer's Power Options

Documentation

There are times when you may want to change your computer’s power options to increase performance, decrease energy consumption, or assure the computer does not go into sleep in the middle of a key process such as uploading or downloading large files, giving a presentation, or watching a long video.
 

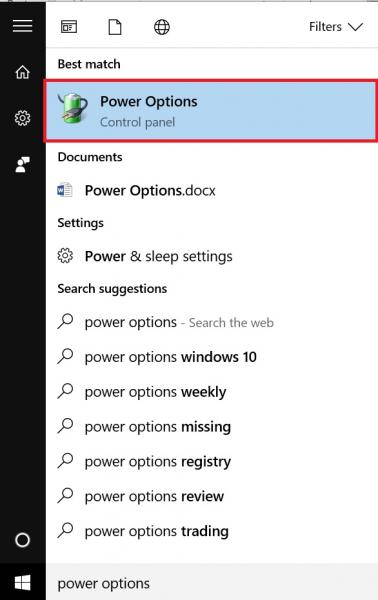
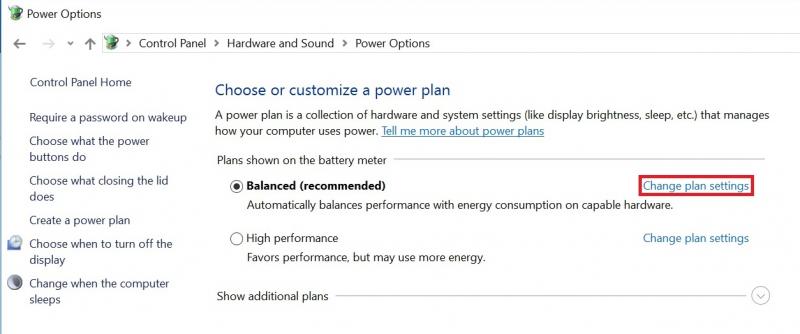
1. In the Windows Start menu, type in “power options” to find and click on the “Power Options” control panel settings.
    Power Options Control panel
2. Click the “Change plan settings” link for the currently selected plan.
    Click the “Change plan settings” link for the currently selected plan.
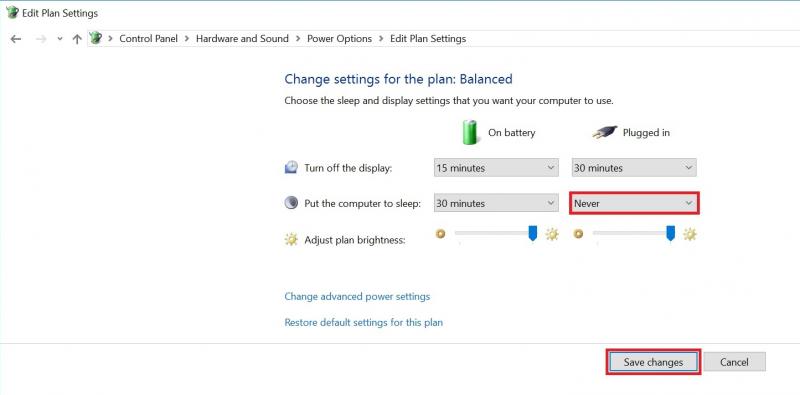
3. Modify the settings as needed and click the “Save Settings” button.
    Modify the settings as needed and click the “Save Settings” button.

Changing the Windows Sound Theme

Documentation

The sounds that Windows makes on Startup, when a program is closed, or during other program events can be changed. The following steps outline this process.

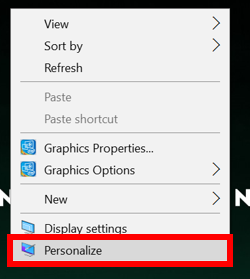
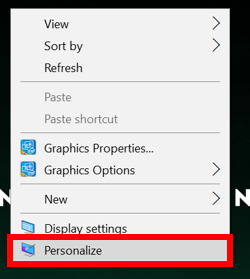
1. Right click on any empty space on the desktop and select "Personalize" from the drop-down menu.


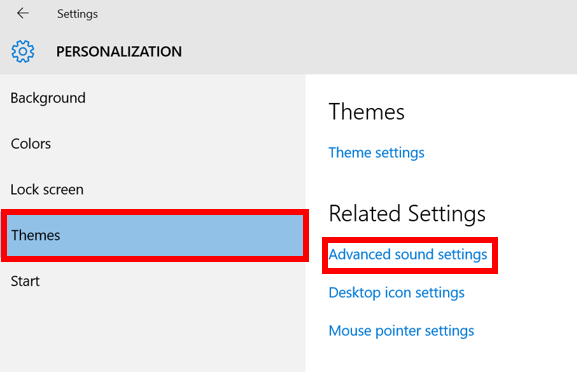
2. In the "Themes" tab of the Personalization window, select "Advanced Sound Settings" under "Related Settings." 
    

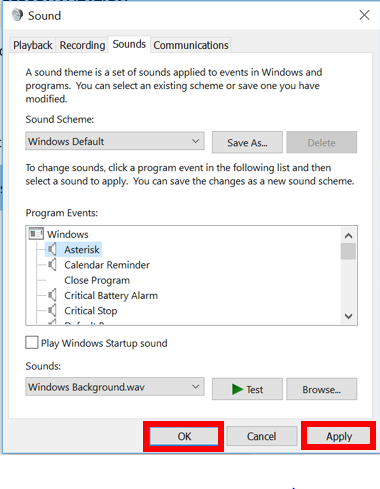
3. A new window will appear. From the "Sound Scheme" dropdown menu, you can select a premade sound scheme. 


  • To hear the sounds, select an item from "Program Events" and click the "Test" button with the green arrow to hear it.

4. Select "Apply" and "OK" when you have selected the desired scheme. 

Changing the Windows Screen Saver

Documentation

The Windows screen saver can be changed to fit your personal preferences and make your computer more secure by requiring the Windows password after a set number of minutes of inactivity. The steps below cover the process of changing the screen saver. 

1. Right click on any empty space on the desktop and select "Personalize" from the drop-down menu. 


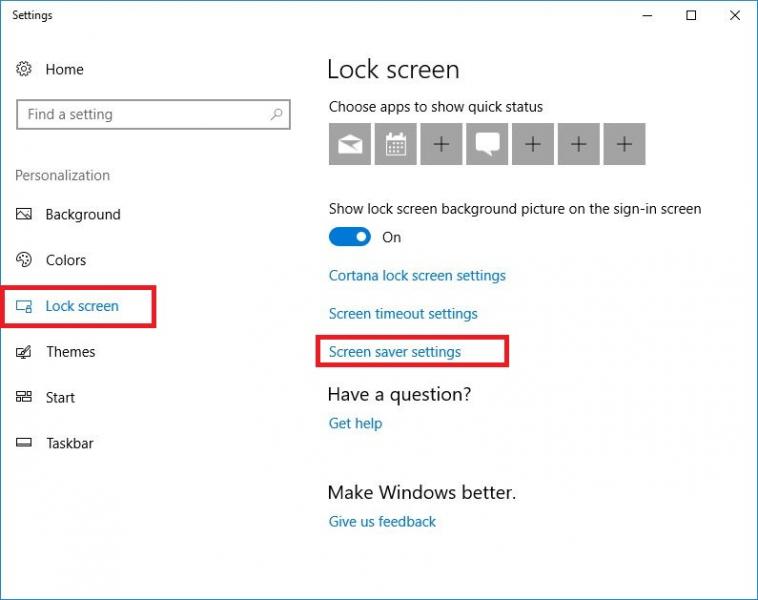
2. Click on the "Lock Screen" option on the left and scroll down the right side of the window and select "Screen saver settings".
    

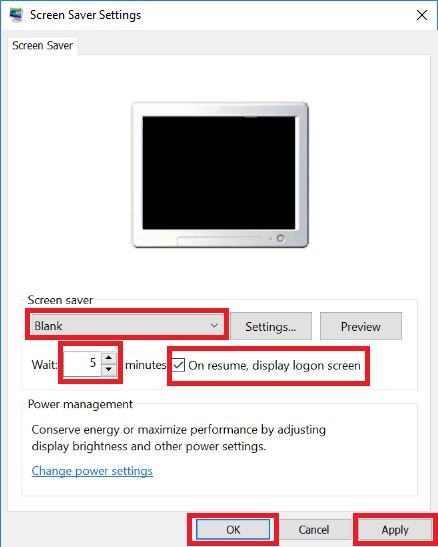
3. In the new window, select the "Screen Saver" option from the pulldown menu. Set the "Wait" time to 5 minutes and check the "On resume, desplay the logon screen" checkbox. Click "Apply" and "OK". This will automatically bring up the screen saver after 5 minutes of inactivity and you will be prompted for the Windows password to use the computer.


4. HELPFUL HINT: You don't have to wait for your screen saver to lock your computer. You can lock your Windows computer at any time by using the "Ctrl-L" key combination. The "Ctrl-L" key combination will work any time you want secure your computer. You don't have to set up the screen saver to use the "Ctrl-L" key combination.

Camera Freezes on Thinkpad

Documentation

Using Windows search, look for Device Manager.

Once open, look for the Cameras in the list. Click on the arrow on the right or double click the word to see the actual driver.

Right-click on the driver (Integrated Camera) and select Uninstall.

When the window pops up, check the box to "Delete the driver software for this device.

Click uninstall.

After it finishes, Restart your computer. Log in and open an application that uses the camera such as Zoom.

The freezing or stutter should be gone. If not, contact the Helpdesk for further assistance.

Backing Up NMU G Suite

Documentation

Unless you retire as an employee at NMU, as a faculty, staff, or student your NMU G Suite account will become disabled 1 year after you leave NMU and 3 years afterward if you were a graduate student. For these reasons, or just for the piece of mind of having a backup of your NMU G Suite content for yourself, you might consider backing up your NMU G Suite content.

Backing up your content to a ZIP file

Google's Takeout application, https://takeout.google.com, can be used to create an archive and/or ZIP file of your NMU G Suite content and download it to your computer. Google Takeout will convert the Google document formats to offline formats (Google Docs -> Word format, etc.). If you have a large amount of content, such as many video files, creating a ZIP file using Google Takeout may not be a good choice. More information is available from Google at "Download your data" and a 1 minutes video at "How to Use Google Takeout - YouTube".

If you later chose to upload the content to a different G Suite account, open the Google Drive settings and choose the option to "convert files on upload" before you upload the files if you want them in the Google Docs and other formats again.

Transferring your content to another G Suite account

The same Google Takeout application offers a way to transfer the NMU G Suite content to another Google G Suite account using https://takeout.google.com/transfer. See "Copy content from your school account to another account" for details.

The Google Takeout Transfer option, https://takeout.google.com/transfer, may be a great choice especially if you have an "Email for Life" account available through the NMU Alumni office. The Alumni "Email for Life" accounts are Google G Suite accounts with an @alumni.nmu.edu email address, have unlimited space available to you, and currently, unlike your NMU G Suite account, do not expire. Visit http://nmu.edu/alumni and the "Email for Life" link to request an @alumni.nmu.edu Alumni G Suite account and see if you qualify.

Adding a Security Exception to Your Browser

Documentation

NMU creates its own SSL security certificates used for some network services. These certificates are already installed on NMU issued computers but you may need to install them on your personally owned device in order to access some of the NMU network services. Installing the NMU SSL certificates is the preferred solution. Instructions are available on the "Add the NMU SSL Certificate" page.

Another option is to allow an exception for the NMU network service you are trying to access. Here are instructions for doing so with popular web browsers.

Firefox

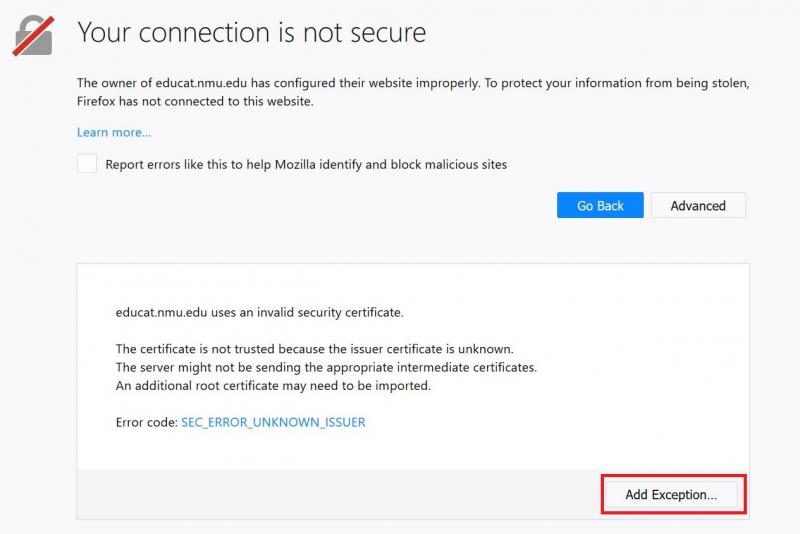
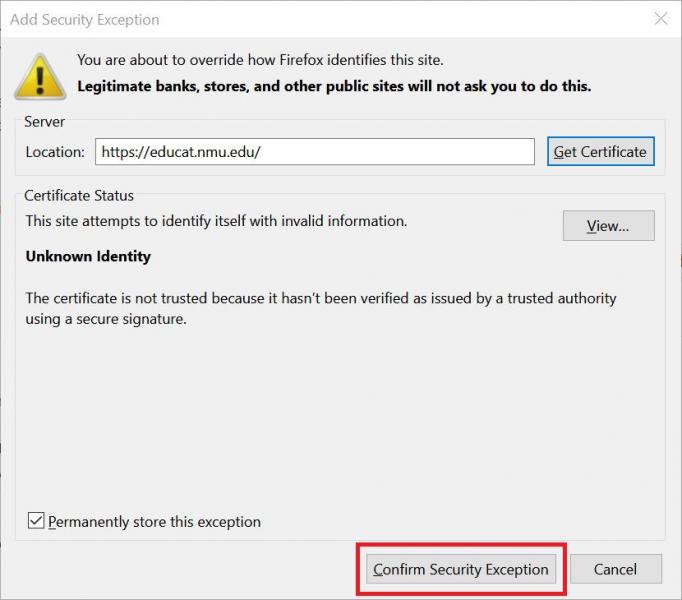
    Click "Advanced" at the bottom of the page, click "Add Exception...", then click an “Confirm Security Exception” button at the bottom of the page and the web page will be added to an exception list. 


Chrome

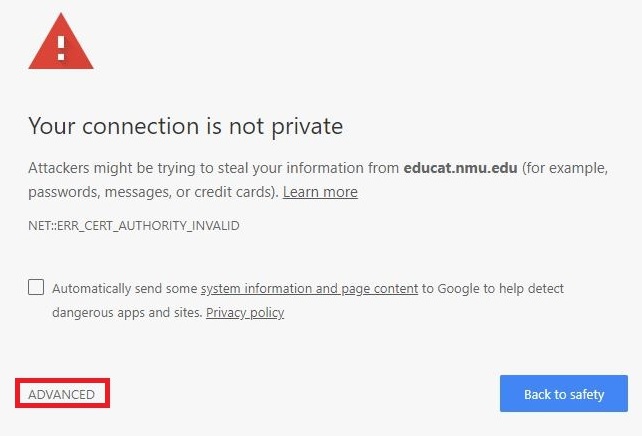
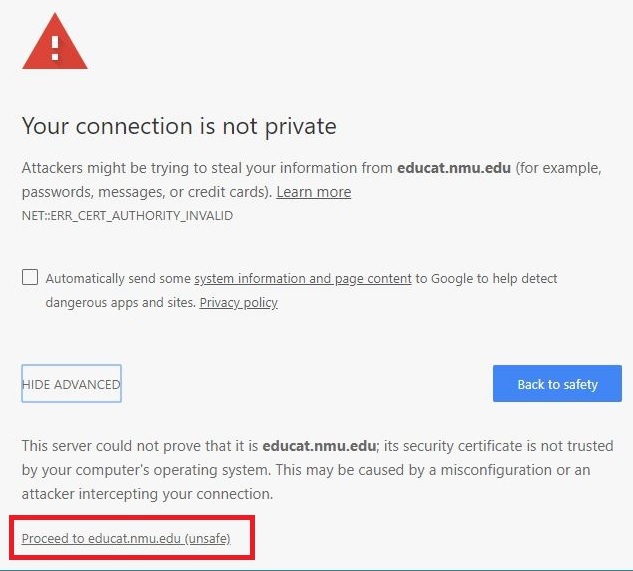
    Click "Advanced" at the bottom of the page, then click "Proceed to address-of-the-website (unsafe)"


Safari

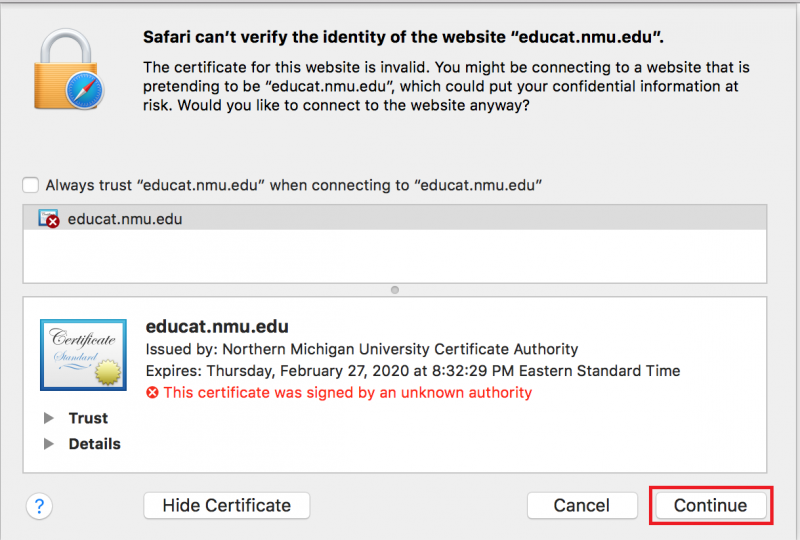
    Click "Show Certificate", review the certificate content is from NMU, then click "Continue"  to get to the website.


Edge

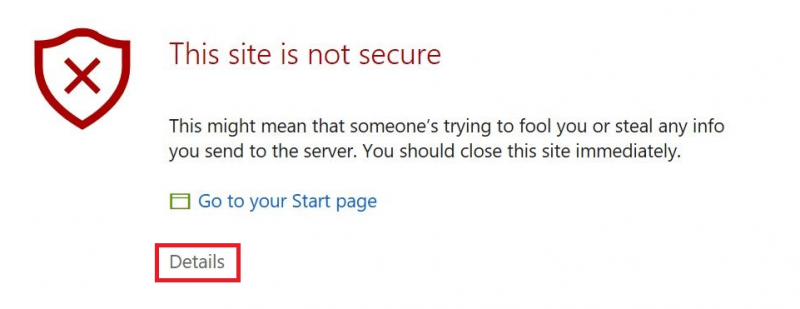
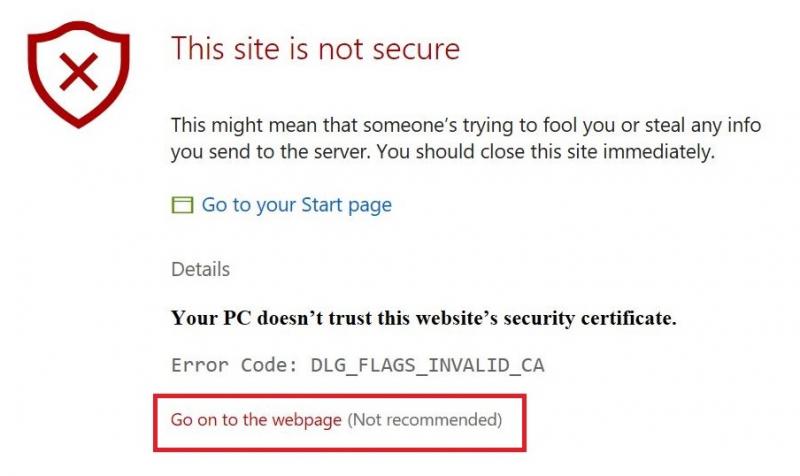
    Click "Details" and then "Go on to webpage"


Internet Explorer

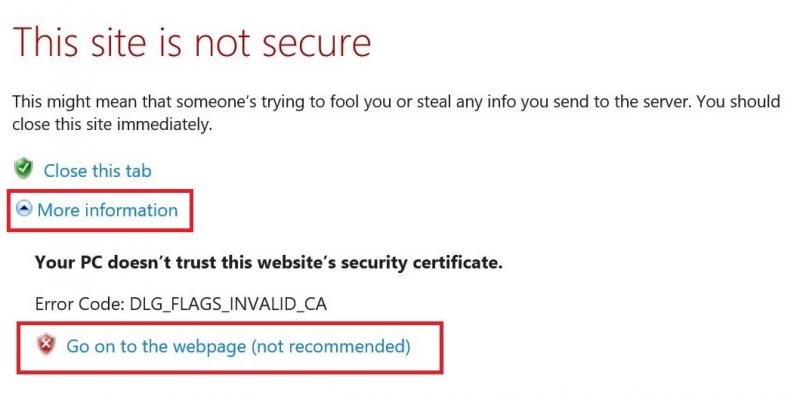
    Click "More Information” the click "Go on to webpage (not recommended)"
   

Subscribe to ThinkPad