Printing to the On-campus Printers

Documentation

NMU public network printers are located in the NMU Library, Jacobetti Center, and PEIF. For your convenience these printers are already set up on your NMU issued ThinkPad or MacBook.

Using the printers requires you to pay for each printed page using CatCash on your NMU ID (Wildcat Express Card). See the Library's Printing page for help on setting up for their printers or adding funds to your CatCash.

Reimage

Documentation

The NMU MacBooks and ThinkPads are already pre-imaged wth the NMU software image when it is issued to you. If your comptuer needs the NMU software image restored or updated you will need to bring it the HelpDesk.

Since the involves erasing your hard disk please make sure to backup all critical files first. USB flash drives are available for check out from the NMU library circulation desk with a NMU Wildcat ID card. The HelpDesk can assist you with backing up your files if you need help.

Remove a printer on the MacBook

Documentation

1. Click on the "Apple" menu icon in the upper right of the screen and select "System Preferences..." from the menu.


2. Select the printer you want to remove and click the "-" minus sign toward the bottom left of the window.


3. Click the "Delete Printer" button.


If you remove a NMU public network printer you can re-install it using instructions at the NMU Library web site https://lib.nmu.edu/print.

Taking a Respondus Lockdown Browser Quiz on Educat

Documentation

  1. Make sure your computer is connected to the Internet in the location where you will be taking the quiz.
  2. Log into your class on Educat in Chrome or Firefox.
  3. Click on the quiz you need to take. If Lockdown Browser is required, it will now launch.
  4. If prompted to close a blocked program (e.g. screen capture, instant messaging) choose "Yes" when prompted. This may occur several times until everything needed to be quit is closed. -- OR -- , close LockDown Browser and then close the blocked program(s) before restarting.
  5. Once a quiz has been started with LockDown Browser, you cannot exit until the "Submit all and finish" button is clicked.

TIPS

  • Prior to your first assessment, complete the practice quiz available in most courses using the LockDown Browser to make sure it works correctly.
  • If a LockDown Browser update is available the program will take time to install it when the Lockdown Browser is a opened. Something you might check for before the day of a major exam.
  • For Windows computers, routinely install Windows updates (due on the second Tuesday of the month after 6 pm) so you don't have to wait for them to install if you have to restart your computer just before the exam.

Useful Keyboard Shortcuts

Documentation

Keyboard shortcuts are combinations of keystrokes that allow you to quickly perform an action. They are useful and often great time-savers. This page includes a guide to a few useful combinations that will help you complete tasks more quickly. 

Windows
Mac OSX
Where can I find these keys on my keyboard?

Windows

The list displays key combinations that are intended to be pressed and held until all are completed. For example, to copy text (Ctrl + "C"), you would highlight the text and press and hold the "Ctrl" (or control) key on your keyboard, then tap the "C" key before releasing both keys. 

  • Open a recently closed tab in your internet broswer: Ctrl + Shift "T"
  • Switch between open windows: Alt + Tab
  • Minimize everything and show desktop: (or between the desktop and Start screen in Windows 8.1): Windows Key + "D" 
  • Minimize window: Windows Key + Down Arrow
  • Maximize window: Windows Key + Up Arrow
  • Bold: Ctrl + "B"
  • Paste selected Item: Ctrl + "V"
  • Copy selected Item: Ctrl + "C"
  • Cut selected Item: Ctrl + "X" 
  • Underline: Ctrl + "U"
  • Italicize: Ctrl + "I" 
  • Undo an action: Ctrl + "Z"
  • Print: Ctrl + "P"
  • Select all: Ctrl + "A"
  • Take screenshot: PrtScr
  • Take screenshot of active screen: Ctrl + Alt + PrtScr
  • Delete permanently: Shift + Delete
  • Open properties for selected item: Alt + Enter
  • Close current window: Alt + F4
  • Open the Start Menu: Ctrl + Esc
  • Flip screen rotation: Ctrl + Alt + any arrow key
  • Open Task Manager: Ctrl + Shift + Esc
  • Lock your PC or switch users: Windows Key + "L"
  • Choose a presentation display mode: Windows Key + "P"
  • Zoom in and out: Windows Key and plus or minus sign
  • Search for files and folders: Windows Key + "F"
  • Help: Windows Key + "F1"
  • Quick system access menu: Windows Key + "X"

View more shortcuts on Microsoft's Page
 

Mac OSX

  • Eject disk: Command + "E"
  • Get information:  Command + "I"
  • Add to dock: Command + Shift + Control + "T"
  • Minimize all windows: Command + Option + "M"
  • Minimize front window: Command + "M"
  • Swich applications: Command + Tab
  • Take screenshot: Command + Shift + "3"
  • Quit application: Command + "Q"
  • Force quit application: Command + Shift + Option + Esc
  • New folder: Command + Shift + "N"
  • Log out: Command + Shift + "Q"
  • Paste selected item: Command + "V"
  • Cut selected item: Command + "X"
  • Copy selected item: Command + "C"
  • Close all windows: Command + Option + "W"
  • Select all items: Command + "A" 
  • Take screenshot: Command + Shift + "3" 
  • Find: Command + "F"
  • Print: Command + "P"
  • Save: Command + "S"
  • Move to trash: Command + Delete
  • Undo/redo: Command + "Z"
  • Show desktop: Command + F3
  • Hide or display dashboard: F12
  • Choose a presentation display mode: Command + F1

View more shortcuts on Apple's page
 

Where can I find these keys on my keyboard?

Windows (Scroll over for a larger image)

MacBook 


Using the Mac OS X Dock

Documentation

Using the Dock
Starting Applications Without Using the Dock
Adding Items to the Dock
Removing items from the Dock
Changing the Dock Appearance
Stacks

Using the Dock

To access any of these files or applications, click one of the icons in the Dock. When an application launches a small white orb will appear under the application icon to signify that the application has launched. If a file or application isn't in the dock, its icon appears there once you open it.


To open a document using one of the applications in the dock, simply drag the document to the applications icon in the dock, and the document opens.


Starting Applications Without Using the Dock

1. Open the Hard Drive icon.
   

2. Click the Applications label. All of the applicatons are displayed in the window. You will need to double-click the application to launch it, whereas in the dock only a single-click is needed.


Adding items to the Dock

Dragging an applications icon to a space between other icons on the dock will a new entry. This same process can be used to add frequently accessed documents or other items as well.
When an application is open, you can hold control and click it, expand "Options" and click "Keep in Dock." 


Removing items from the Dock

Just as dragging a file/folder onto the Trash icon will delete the file/folder, dragging a dock item onto the Trash icon in the dock will remove the entry from the dock. You can also drag it into a blank section on your desktop. It will disappear in a puff of smoke. Additionally, control-click, expand "Options," and click "Keep in Dock" to uncheck it. 


Changing the Dock Appearance and Order

Click on the System Preferences item in the dock and then the dock preferences item to view or change the dock settings. You can reposition items by clicking and dragging them to a new location on the dock. 

Stacks

A stack is a dock item that gives you fast, convenient access to a folder of files. When you click a stack, the files within spring from the Dock in a fan or a grid, depending on the number of items (or the preference you set). You can create as many stacks as you wish simply by dragging folders to the right side of your Dock.

Mapping a Network Drive and DepartmentShare

Documentation

Faculty, staff, and some students have access to an NMU network drive. This offers the opportunity to share files with others in the department. It is important to note that these folders are only available from an NMU network connection such as WiFi, wired or WiMAX. Some offices are required to use the VPN client in order to connect to a network drive. Mapping these drives give you easy access to network folders without having to manually connect each time. This is an excellent way for faculty to add their Departmentshare if use it regularly.

Windows
OS X

Windows

1. Open "This PC" from your desktop or from "File Explorer" in the Windows "Start" menu. 


2. Click the "Computer" tab and "Map Network Drive" at the top of the window.


3. In the drive list, click a drive letter. you can choose any available letter. You'll need to be connected via VPN or Ethernet to access the drive.


4. In the "Folder" box, type the path of the folder or computer - Using Departmentshare as an example.

  • For faculty the department share you would use \\departmentshare.nmu.edu\deptname
  • If you do not have access to this, you will need to ask your Department Head or Secretary to add you.

5. To connect every time you log in, select the "Reconnect at logon" check box.


6. Click "Finish." You will be prompted to log in with your credentials. 


Your computer is now connected, or mapped, to the network drive. If you can't connect to a network drive or folder, the computer you're trying to connect to might be turned off or you might not have the correct permissions. If you can't connect, contact your network administrator. 
 

OS X

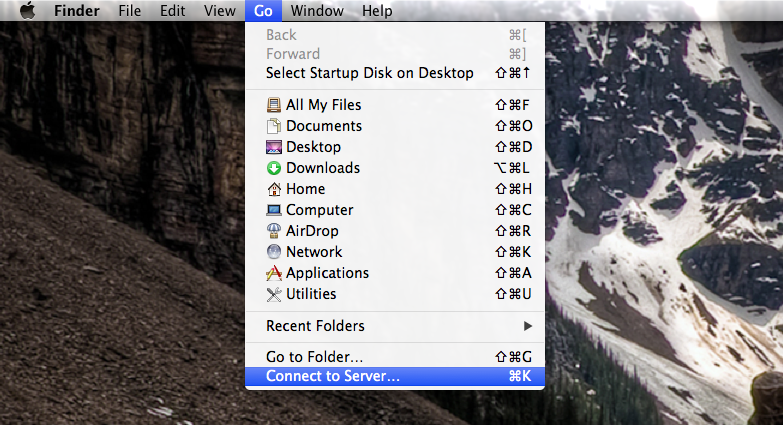
1. Minimize all open windows and single-click anywhere on the background to make sure "Finder" is the active application on the top left of the screen. 

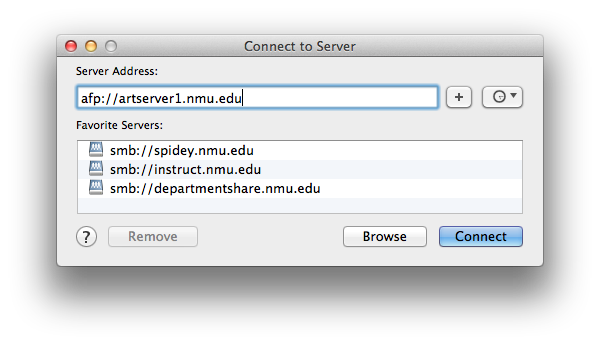
2. Once you see "Finder" in the top left corner, click the "Go" button. Scroll down and click "Connect to Server."
     

3. Type the path of the share you are trying to map. In most cases you will need to start the server address with "smb://"

For example to connect to the departmentshare you would use "smb://departmentshare.nmu.edu/deptname"

4. Once the path is entered click the "+" sign, and then click "Connect."
 

5. Type in your credentials. Check the "Remember this password in the keychain" to allow the drive to map automatically. Click "Connect."
 

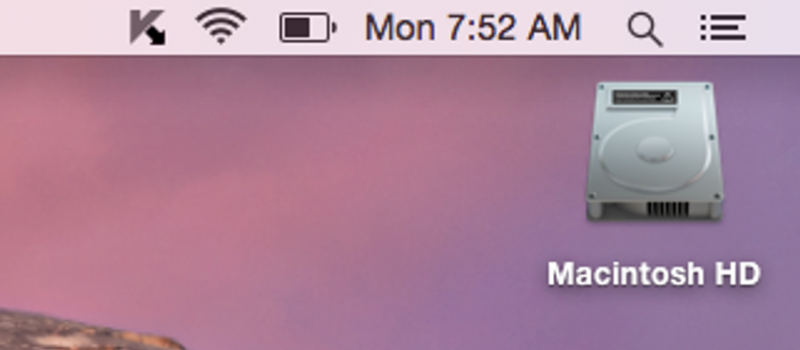
6. Once you connected, your mapped network drive should appear on the upper-right hand portion of your desktop. Double clicking it will show its contents.

macOS Recovery

Documentation

macOS Recovery should only be used when you are instructed to do so. This is typically used when you purchase your MacBook. You should make sure you have a known good and verified backup before proceeding, this method will erase your data.

How to start up from macOS Recovery

  1. To start up from macOS Recovery, turn on your Mac and immediately press and hold one of the following combinations on your keyboard. Release the keys when you see an Apple logo

    Command (⌘)-R

    Option-⌘-R

    Shift-Option-⌘-R

    Reinstall the latest macOS that was installed on your Mac (recommended). Upgrade to the latest macOS that is compatible with your Mac. Reinstall the macOS that came with your Mac, or the closest version still available.
  2. When you see the utilities window, you have started up from macOS Recovery.
    macOS Utilities window
  3. Select Disk Utility from the Utilities window and click Continue.
  4. Choose View > Show All Devices from the menu bar in Disk Utility. The sidebar now shows your disks (devices) and any containers and volumes within them. The disk your Mac started up from is at the top of the list. In this example, Apple SSD is the startup disk:
    Erasing a disk and choosing a scheme in Disk Utility
  5. Select the disk that you want to erase.
  6. Click Erase, then complete these items:
    • Name: Type the name that you want the disk to have after you erase it.
    • Format: Choose APFS or Mac OS Extended.
    • Scheme: Choose GUID Partition Map.
  7. Click Erase to begin erasing your disk and every container and volume within it. You might be asked to enter your Apple ID.
  8. When done, quit Disk Utility.
  9. Reinstall macOS from the Utilities window. Then click Continue and follow the onscreen instructions. You will be asked to choose a disk on which to install.
  10. Please allow installation to complete without putting your Mac to sleep or closing its lid. During installation, your Mac might restart and show a progress bar several times, and the screen might be empty for minutes at a time.

macOS Recovery exceptions

The version of macOS offered by macOS Recovery might differ in certain circumstances:

  • If macOS Sierra 10.12.4 or later has never been installed on this Mac, Option-Command-R installs the macOS that came with your Mac, or the closest version still available. And Shift-Option-Command-R isn't available.
  • If you erased your entire disk instead of just the startup volume on that disk, macOS Recovery might offer only the macOS that came with your Mac, or the closest version still available. You can upgrade to a later version afterward.
  • If your Mac has the Apple T2 Security Chip and you never installed a macOS update, Option-Command-R installs the latest macOS that was installed on your Mac.
  • If you just had your Mac logic board replaced during a repair, macOS Recovery might offer only the latest macOS that is compatible with your Mac.

If you can't get macOS Recovery to offer the installer you want, please contact the TSS Help Center at (906) 227-2468

Macbook Backup and Restore

Documentation

It's always a good idea to back your files up regularly and especially if you are planning to transfer them to a new machine. In addition to dragging and dropping files onto an external device, you can also burn files to a CD. Follow these instructions to learn how. 


1. Insert a blank CD and wait a few seconds for the OS to realize that it is, in fact, a blank CD.

2. When a dialog box appears make sure that "Open Finder" is chosen in action menu and click "OK."
     

3. Wait while the Mac prepares the CD for use.

4. When the CD appears on the Desktop, add items to the CD by dragging-and-dropping files to it.
    

5. When you are ready to burn the disk, click the disk to select it, click the "File" menu and select "Burn Disc." 

6. When the dialog box appears, name your CD and click "Burn."
    

7. A progress bar display how much data has been burned.
    

8. When finished, the CD will mount on the desktop. 
 

Note: You can restore files by dragging and dropping then from the disk and back to the location where you'd like 

Mac OS X Mail Setup

Documentation

Mac OSX Mail is an application you can utilize to check your @nmu.edu mail. Instructions for setting up Mac Mail as a POP account are below. To learn how to use MAC OS X, visit the Using MAC OS X Mail page


1. Launch the Mail application from the dock.
    
2. Select "Mail" from the top left menu, and select "Add Account..."
    
3. Select "Add Other Mail Account..." and click "Continue."
    
4. Enter your Name, NMU Email Address, and Password, then click "Sign In" 


5. Enter your User Name, Select the "POP" accont type button and enter "pop.nmu.edu" in the Incoming Mail Server, and enter "semail.nmu.edu" in the Outgoing Mail Server, then click "Sign In".
    
6. Click "Done".
7. Select "Mail" from the top left menu, and select "Preferences."
    

8. Select your account from the left and select the "Advanced" tab.  Enter "995" in the "Port" field and select the check box next to "Use SSL."
    
9. Close the window, select "Save" to keep changes. 


Subscribe to Macbook