Keep Your MacBook Clean

Documentation

You should take care to clean your MacBook properly. Select a part of your laptop to learn how to safely clean it. 

Keyboard
LCD Screen
Case

Keyboard

  • Take care not to spill any liquid on the keyboard. If you do, turn off your computer immediately.
    • If you spill liquid that is thin and clear, turn off your computer, turn it upside down to let the liquid drain out, and let it dry for 24 hours at room temperature. If the keyboard doesn't work, take it to your Apple-authorized service provider for repair. For your NMU MacBook, bring it to Micro Repair.
    • If you spill liquid that is greasy, sweet, or sticky, unplug the keyboard and take it to your Apple-authorized service provider for repair, or Micro Repair for an NMU MacBook. 
  • Remove any surface dirt gently with your bare hand before proceeding with a soft, lint-free cloth.
    • Do not use acetone, alcohol, or any alcohol-based cleaner on your computer. Never spray cleaner directly onto your computer. Liquid could drip inside the keyboard or case and cause an electrical shock

LCD Screen

  1. Turn off the MacBook. 
  2. Dampen a clean, soft, lint-free cloth or paper with water only.
    1. You may also use a mild glass cleaner that contains no alcohol or ammonia. Most office supply stores sell cleaning kits specifically designed for this purpose.
  3. Wipe the screen. Do not spray liquid directly on the screen.

Case

  1. ​​Turn of your Mac and unplug the power cord from the wall or power strip. 
  2. Use a damp, soft, lint-free cloth with mild non-abrasive soap or detergent. You may also use isopropyl alcohol or iKlear.
  3. Remove any surface dirt gently with your hand, then proceed with the cloth. 
  4. After washing, dry the case with a soft, lint-free cloth. 
  • DO NOT use window sprays or products containing ammonia, alcohol, or abrasive ingredients
  • DO NOT use rough towels or cloths
  • DO NOT spray cleaner directly on your computer, as liquid could drip inside the case and cause an electric shock or malfunction.

Ethernet Connection Information

Documentation

There are more than 10,000 network ports on Northern's campus. For help connecting to one of them see:

Connecting on Campus Via a Network Port (Windows)

These instructions tell how to connect to the campus network through one of the orange network ports on campus. They assume your network settings are already configured.

  • NMU notebook computers are already configured to connect to the NMU network.
  1. Find an orange network port.
  2. Plug your network cable into the orange network port and into the network port on the side of your computer.
  3. If the connection is not established automatically, open ThinkVantage Access Connections and troubleshoot the connection from there.

Note: The first time you connect a computer to the campus network, you must register the computer's network interface(s).

Connecting to a Wireless Network (MAC OS X)

Documentation

These instructions tell how to connect to the campus network using AirPort. They assume your network settings are already configured.

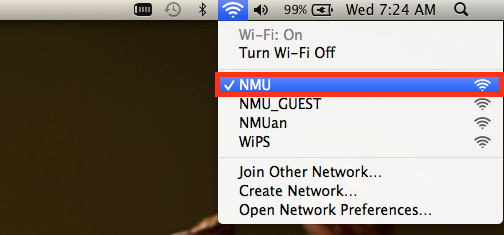
  1. Make sure you are in a location that has wireless network access.There are access points in many campus buildings.Click the wireless icon to see a list of locations:
  2. Make sure your computer is not connected to an orange network port.
  3. Click the AirPort icon on the Finder bar, and choose "Turn Wi-Fi On."

  4. Select the wireless network you would like to connect to, such as NMU.

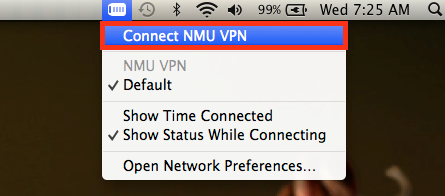
  5. If you need to connect to NMU resources on your home network (or other non-NMU network), such as art servers or department servers, you will need to use a VPN connection by clicking the VPN icon in the upper right of the screen. If that icon is not available see the Setting up the NMU VPN on a Mac page.

Note: The first time you connect a computer to the campus network, you must register the computer's network interface(s).

Connecting to NMU LTE

Documentation

Is NMU LTE available in your area?

NMU LTE is available everywhere NMU EAN is available. Go to the Check Availabilty page and click the "Check Availabilty" button. Enter your complete address with Street Address, City, State, and Zip code to see if NMU LTE is available in your location.

If you were issued an NMU ThinkPads NMU LTE is not installed by default. You can get the NMU LTE network and SIM cards installed at no charge so the computer can access the NMU LTE network. If you have not already done so, please stop at the Helpdesk to get a work order for the LTE hardware to be installed. 

Connecting the ThinkPad to NMU (LTE)
 

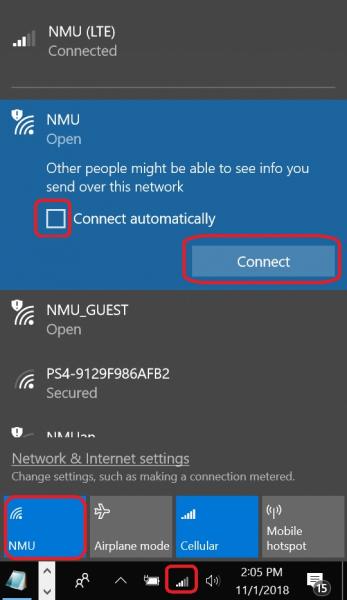
1.Left click the “WiFi” or “Ethernet” icon in the system tray in the lower right corner of the Windows desktop.
  

2.Make sure an Ethernet cable is not connected,  “NMU" "WiFi” is "Off" (grayed out) and “Cellular"or "Mobile Broadband" is turned "On" (displayed in blue) and click the “NMU (LTE)” icon in the top section of the “Networks” menu.
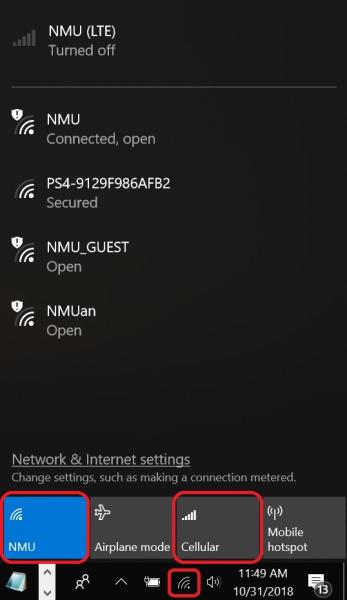
  

3.Check the “Connect automatically” checkbox if it isn’t already checked and click the “Connect” button. The icon initially may indicate a “Limited” connection but then display “Connected”
 

4.The “LTE” icon will appear in the system tray when NMU (LTE) is in use. The number of white bars indicates the signal strength. You should now be able to access the NMU network using NMU LTE.
  

Connecting the ThinkPad to NMU WiFi (preferred if on campus)

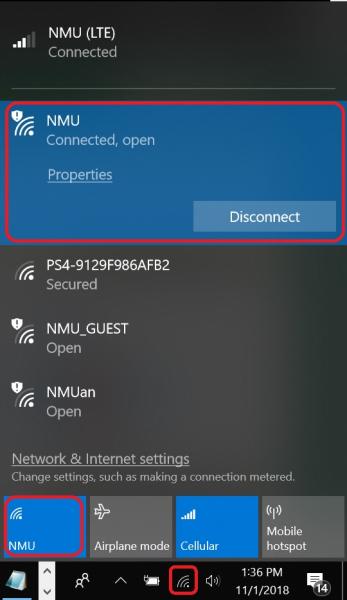
1.Left click the “LTE” or “Ethernet” icon in the system tray in the lower right corner of the Windows desktop. 
  

2.Click the "NMU" "WiFi" to turn on (turn blue) the WiFi network adapter in the “Networks” menu.
  

3.Select the WiFi connection you want to use (Use the “NMU” WiFi connection if on campus). 
 

4.Check the “Connect automatically” checkbox if it isn’t already checked and click the “Connect” button. The icon initially may indicate a “Limited” connection but then display “Connected”.
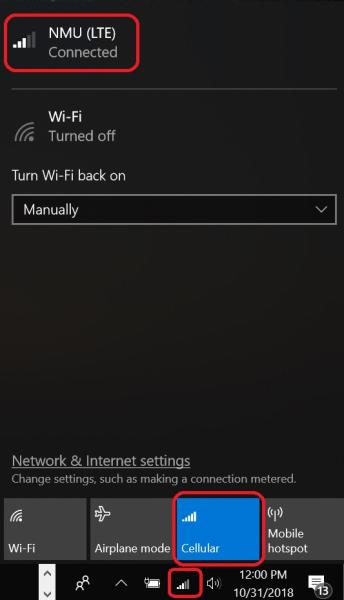
  

 5.The “WiFi” icon will appear in the system tray when WiFi is in use. The number of white bars indicates the signal strength. You should now be able to access the NMU network using NMU WiFi. NOTE: The system will use the WiFi connection by default even if the NMU (LTE) connection is on.
Checking TCP or IP Address Settings

Documentation

If you're having network issues, it may be a good idea to check your settings. Click below to get started.
Mac OS X
Windows 10 (Similar to earlier versions)


MAC OS X

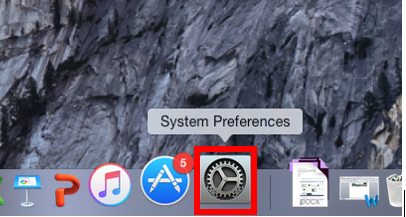
1. Click on "System Preferences" on the dock.


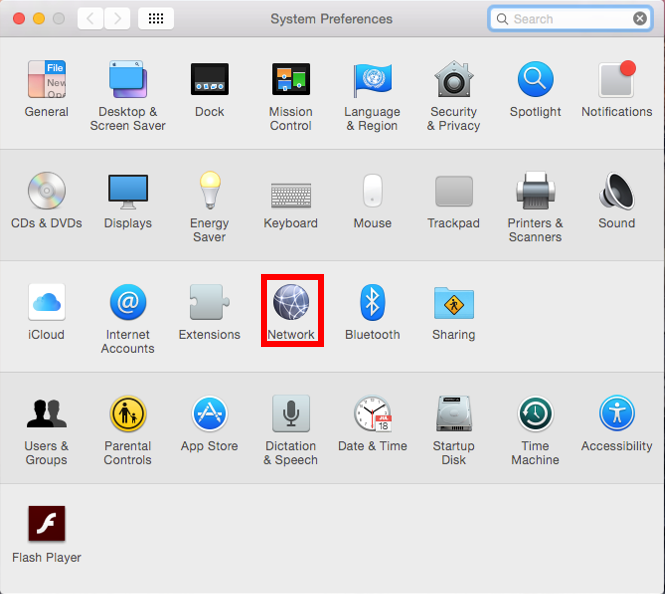
2. Click on "Network.


3. To check Wifi settings, click here. To check Ethernet, click here.


WIFI
 

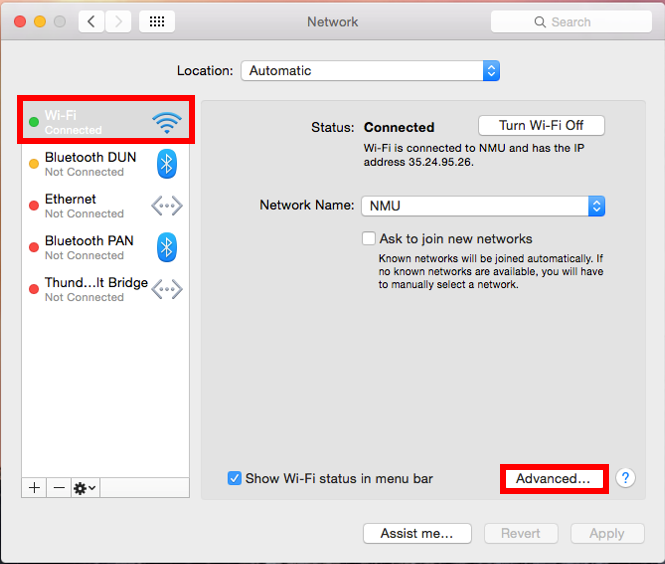
1. Click on "WiFi," then click on "Advanced."


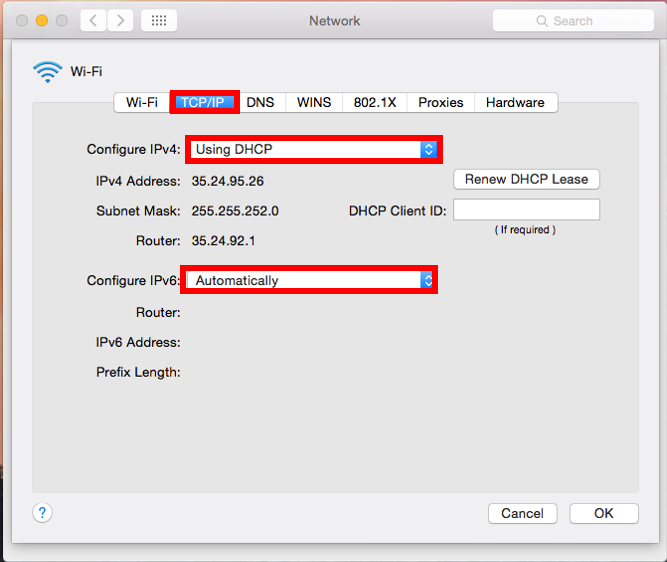
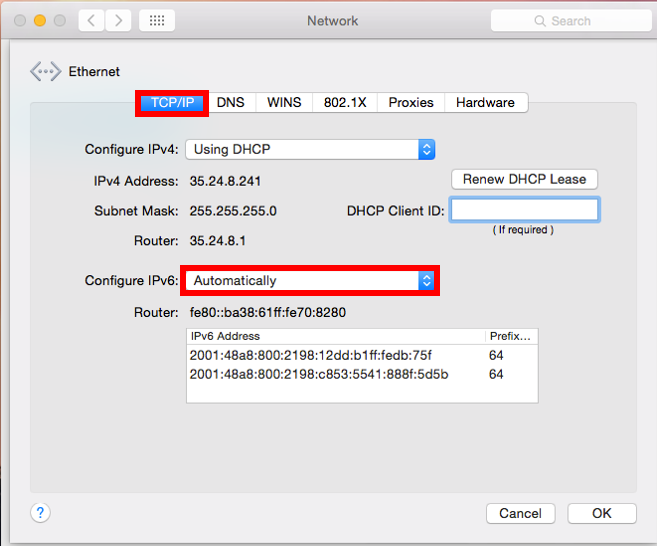
2. In the "TCP/IP" tab, verify that "Configure IPv4" is set to "Using DHCP." Then, verify that "Configure IPv6" is set to "Automatically."


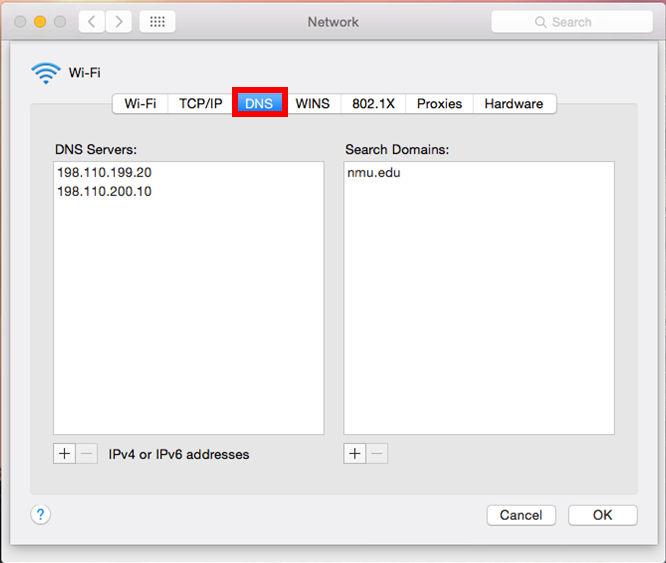
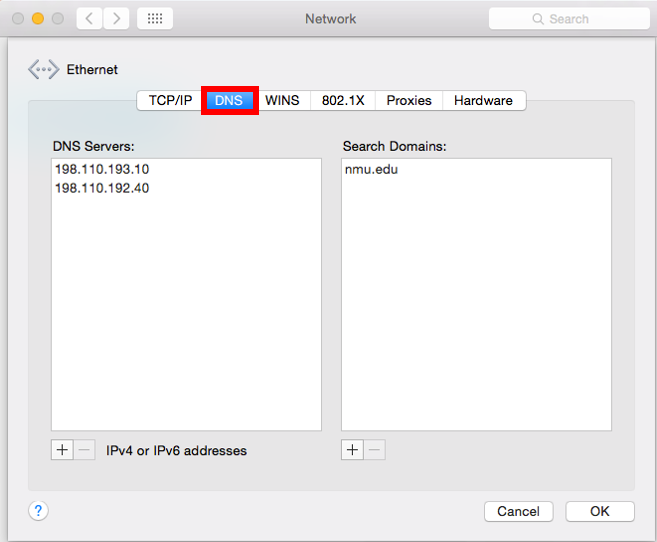
3. Click the "DNS" tab, and verify that the DNS Servers and Search Domains match what is shown below. 


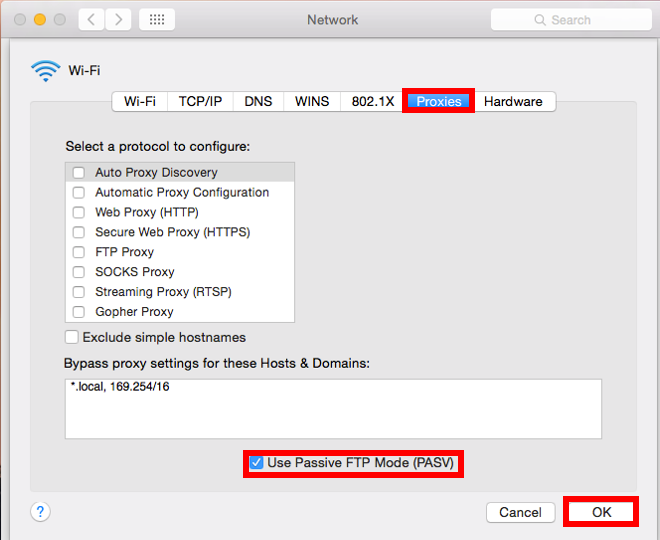
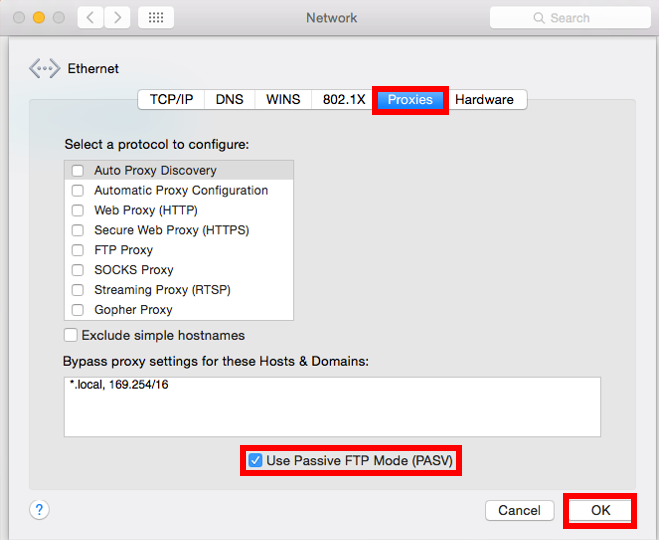
4. Click "Proxies" and be sure that everything is unchecked except "Use Passive FTP Mode (PASV)." Click "OK" to exit.


ETHERNET
 

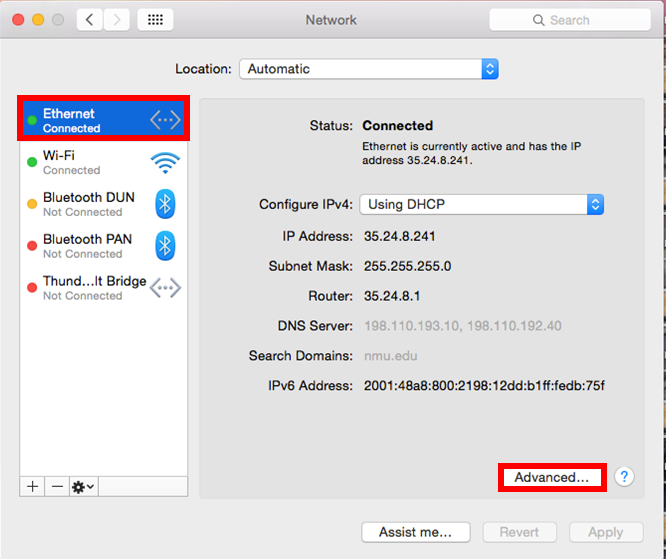
1. Click on "Ethernet" and veryfy that "Configure IPv4 is set to "Using DHCP." Now, click "Advanced.


2. In the "TCP/IP" tab, verify that "Configure IPv4" is set to "Using DHCP." Then, verify that "Configure IPv6" is set to "Automatically.


3. Click the "DNS" tab, and verify that the DNS Servers and Search Domains match what is shown.


4. Click "Proxies" and be sure that everything is unchecked except "Use Passive FTP Mode (PASV).


Windows 10

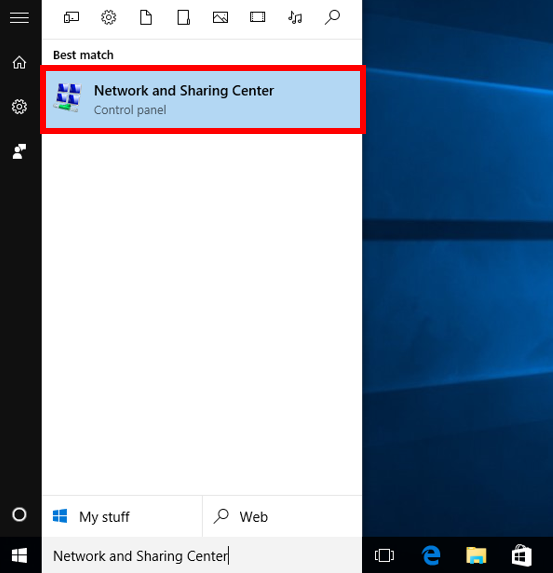
1. In the Start menu or search bar, type "Network and Sharing Center" and select that option. 


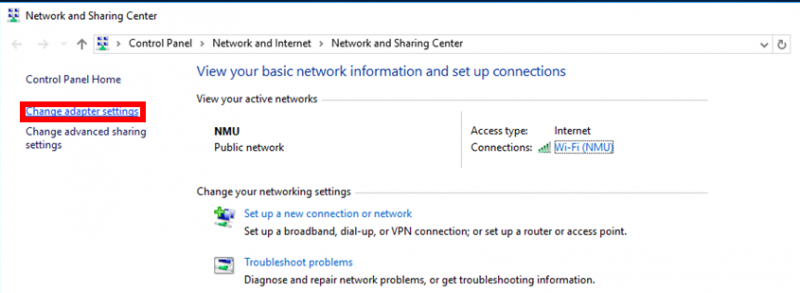
2. Select "Change adapter settings" to the right. 


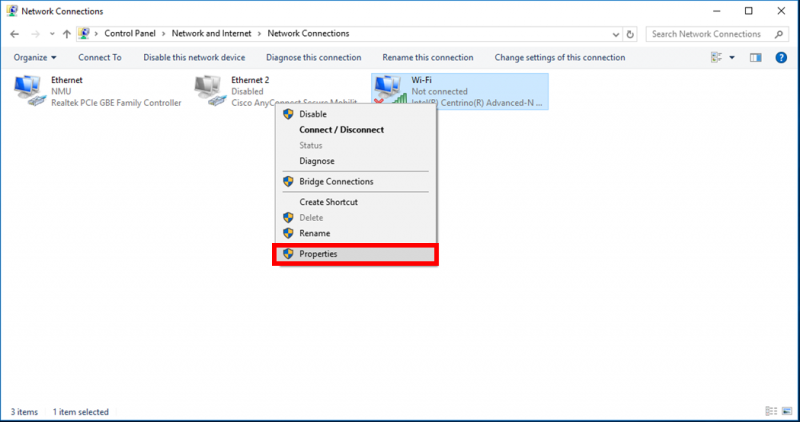
3. Right click the network you'd like to check and select "Properties." The information will be the same for both ethernet and WiFi. 


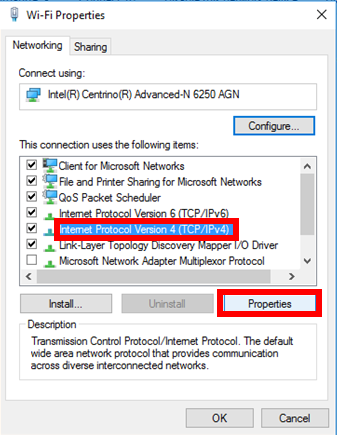
4. In the new window, scroll down to select "Internet Protocol Version 4 (TCP/IPv4)" and click "Properties." 


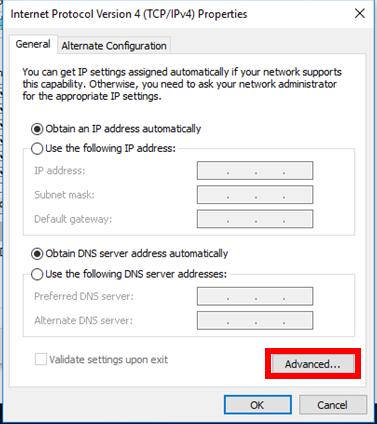
5. Assure that "Obtain an IP address automatically" and "Obtain DNS server address automatically," then click the "Advanced" button. 


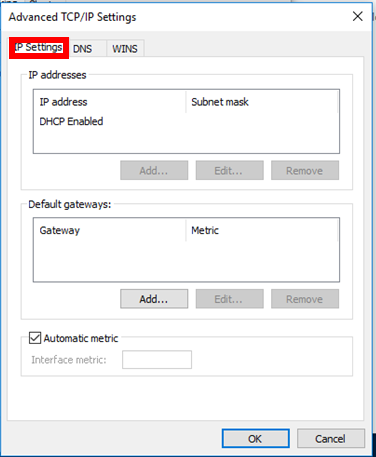
6. Ensure that the settings in the
tab match those shown below. 


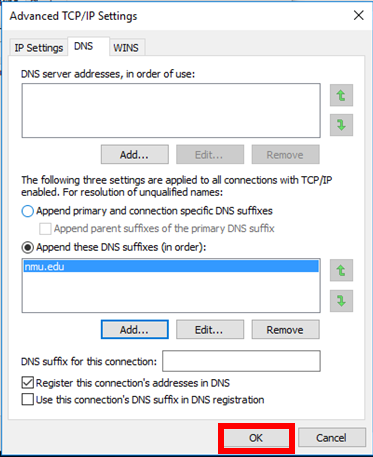
7. Ensure that the settings in the "DNS" tab match those shown below. Click "OK" to close the window. 
    

Caring for a MacBook battery

Documentation

Below are a list of battery care recommendations.

  • Apple recommends using the battery and charging it when prompted.
  • Allow the battery to fully discharge, then charge at least once a month.
  • The MacBook uses an Energy Saver which includes dimming the screen when using the battery. These settings may be modified, but if they are modified, the changes may drain the battery more quickly.
  • Dim the screen to the lowest comfortable level to maximum battery life.
  • If the AirPort (wireless) is on but not being used, it will still drain the battery.
  • Use only the power adapter that is issued with the computer.
  • Both hot and cold weather will affect the battery.

Backing Up NMU G Suite

Documentation

Unless you retire as an employee at NMU, as a faculty, staff, or student your NMU G Suite account will become disabled 1 year after you leave NMU and 3 years afterward if you were a graduate student. For these reasons, or just for the piece of mind of having a backup of your NMU G Suite content for yourself, you might consider backing up your NMU G Suite content.

Backing up your content to a ZIP file

Google's Takeout application, https://takeout.google.com, can be used to create an archive and/or ZIP file of your NMU G Suite content and download it to your computer. Google Takeout will convert the Google document formats to offline formats (Google Docs -> Word format, etc.). If you have a large amount of content, such as many video files, creating a ZIP file using Google Takeout may not be a good choice. More information is available from Google at "Download your data" and a 1 minutes video at "How to Use Google Takeout - YouTube".

If you later chose to upload the content to a different G Suite account, open the Google Drive settings and choose the option to "convert files on upload" before you upload the files if you want them in the Google Docs and other formats again.

Transferring your content to another G Suite account

The same Google Takeout application offers a way to transfer the NMU G Suite content to another Google G Suite account using https://takeout.google.com/transfer. See "Copy content from your school account to another account" for details.

The Google Takeout Transfer option, https://takeout.google.com/transfer, may be a great choice especially if you have an "Email for Life" account available through the NMU Alumni office. The Alumni "Email for Life" accounts are Google G Suite accounts with an @alumni.nmu.edu email address, have unlimited space available to you, and currently, unlike your NMU G Suite account, do not expire. Visit http://nmu.edu/alumni and the "Email for Life" link to request an @alumni.nmu.edu Alumni G Suite account and see if you qualify.

Allowing Third Party Applications to Install on a MacBook

Documentation

Some applications are not signed by Apple and will not be able to be installed. If you trust the application and know you want to install it, follow these steps to allow third party apps to install.

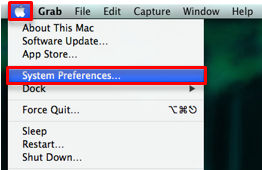
  1. Open "System Preferences" by clicking on the Apple icon and choosing that option.

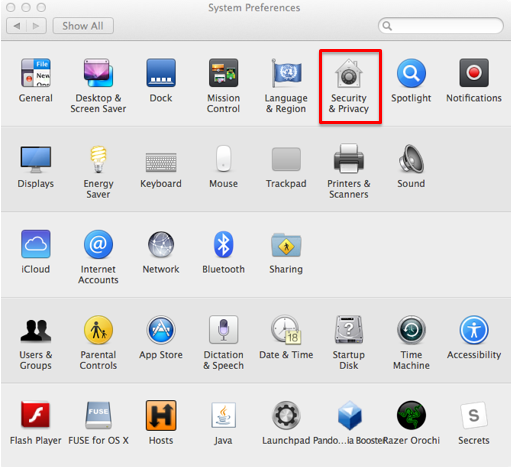
  2. Select "Security & Privacy" from the "System Preferences" window.

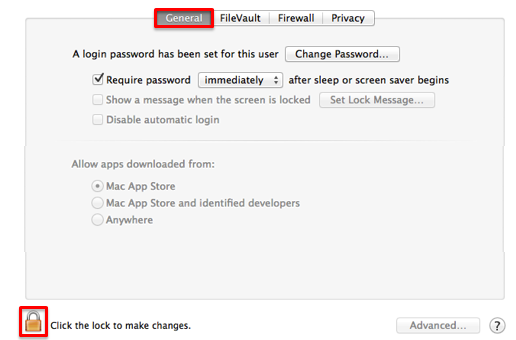
  3. Select the "General" tab, and select the lock in the lower left corner to allow changes. 

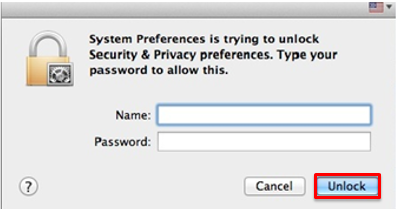
  4. Enter your computer username and password, then select "Unlock."

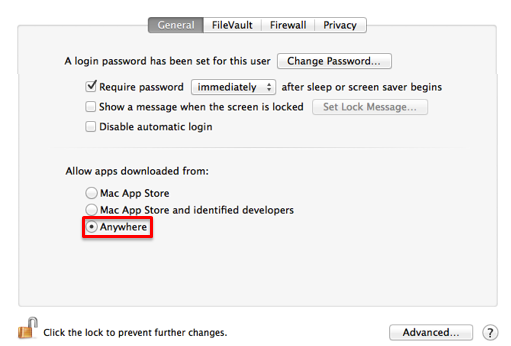
  5. In the "Allow apps downloaded from:" section, select the radio button to the left of "Anywhere."

  6. Close the window. You can now install unsigned applications that you trust. 
    • For security reasons, you may want to repeat this process checking "Mac App Store" on step five in order to turn this feature back off. 

Adding a Security Exception to Your Browser

Documentation

NMU creates its own SSL security certificates used for some network services. These certificates are already installed on NMU issued computers but you may need to install them on your personally owned device in order to access some of the NMU network services. Installing the NMU SSL certificates is the preferred solution. Instructions are available on the "Add the NMU SSL Certificate" page.

Another option is to allow an exception for the NMU network service you are trying to access. Here are instructions for doing so with popular web browsers.

Firefox

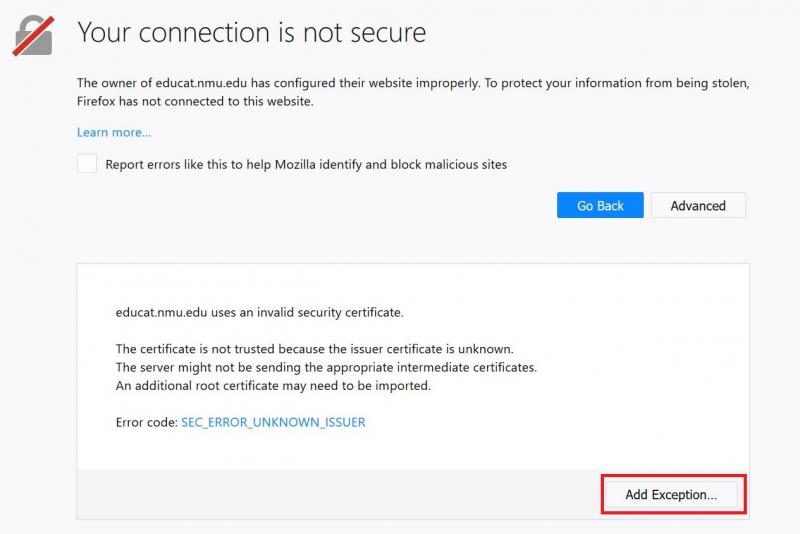
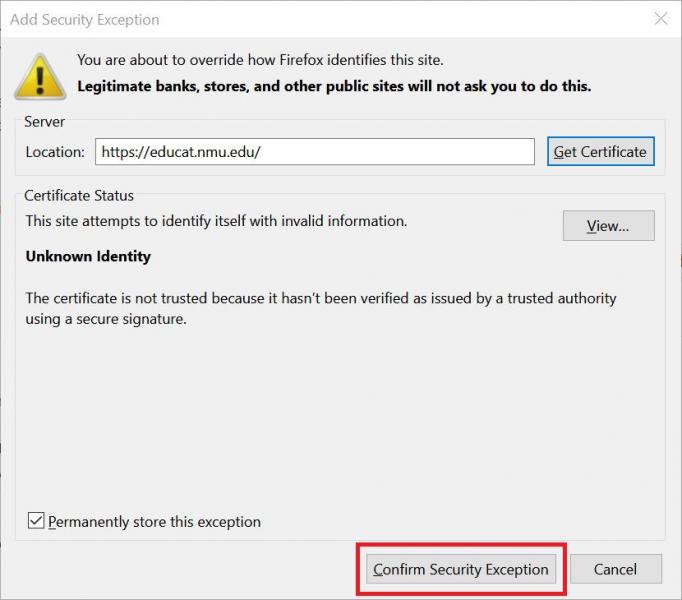
    Click "Advanced" at the bottom of the page, click "Add Exception...", then click an “Confirm Security Exception” button at the bottom of the page and the web page will be added to an exception list. 


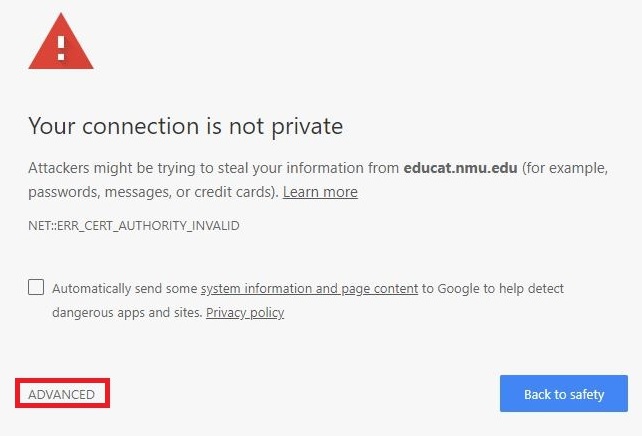
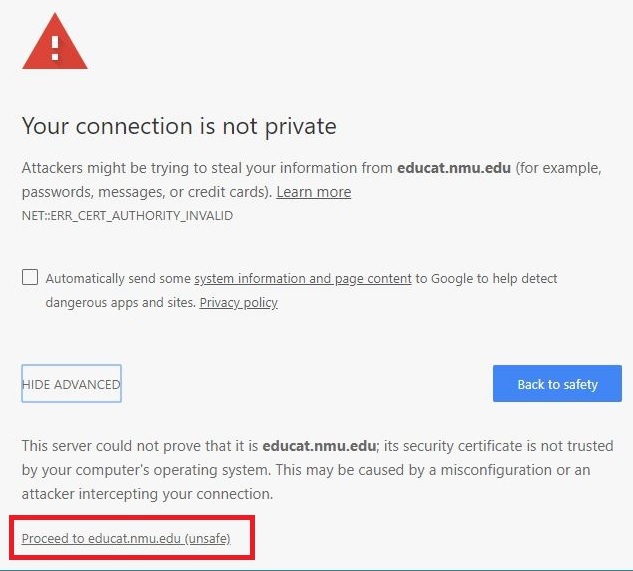
Chrome

    Click "Advanced" at the bottom of the page, then click "Proceed to address-of-the-website (unsafe)"


Safari

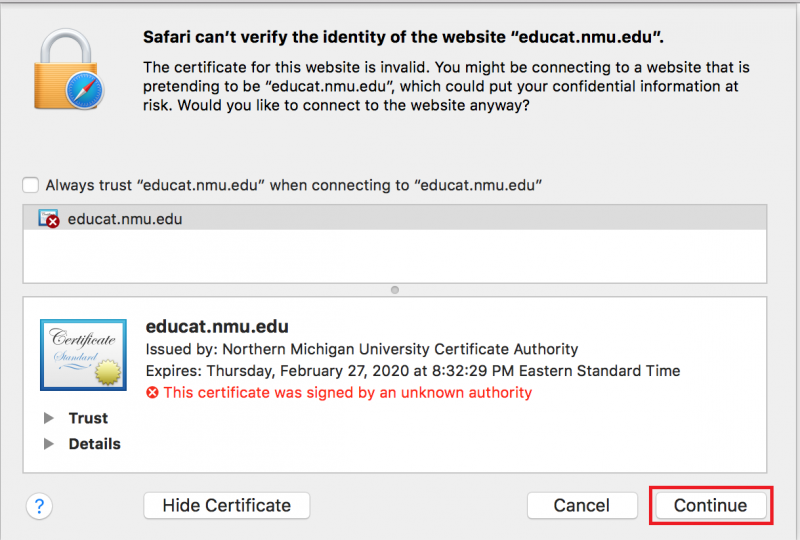
    Click "Show Certificate", review the certificate content is from NMU, then click "Continue"  to get to the website.


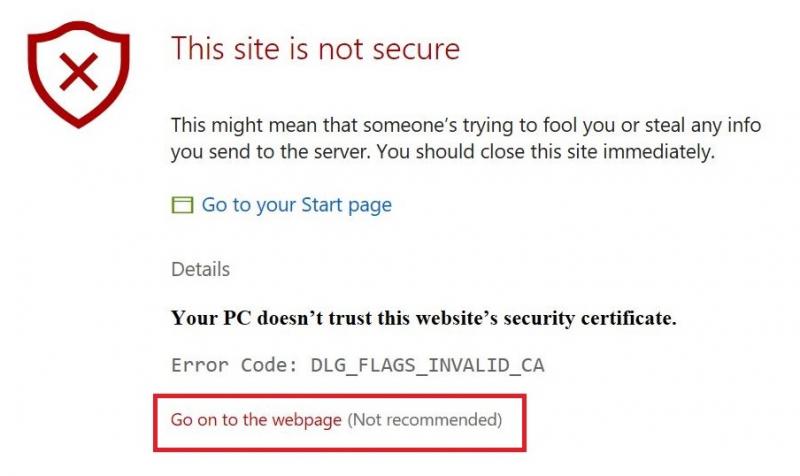
Edge

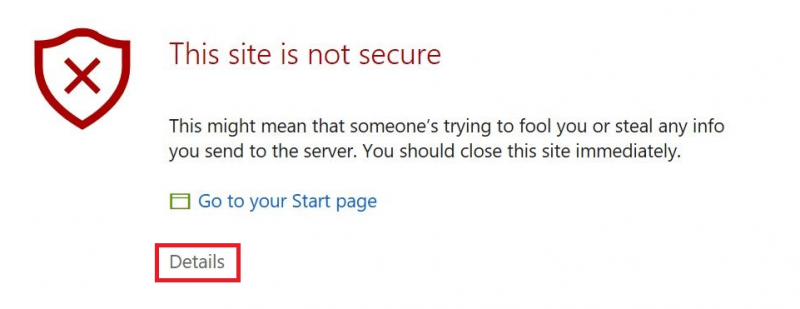
    Click "Details" and then "Go on to webpage"


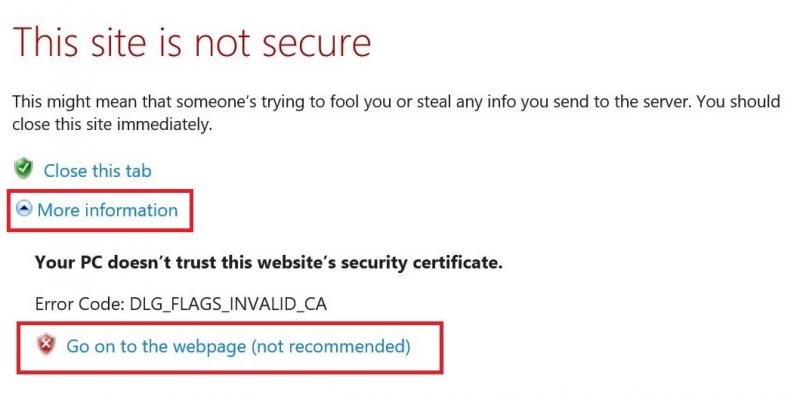
Internet Explorer

    Click "More Information” the click "Go on to webpage (not recommended)"
   

Subscribe to Macbook