Reimage

Documentation

The NMU MacBooks and ThinkPads are already pre-imaged wth the NMU software image when it is issued to you. If your comptuer needs the NMU software image restored or updated you will need to bring it the HelpDesk.

Since the involves erasing your hard disk please make sure to backup all critical files first. USB flash drives are available for check out from the NMU library circulation desk with a NMU Wildcat ID card. The HelpDesk can assist you with backing up your files if you need help.

Remove a printer on the MacBook

Documentation

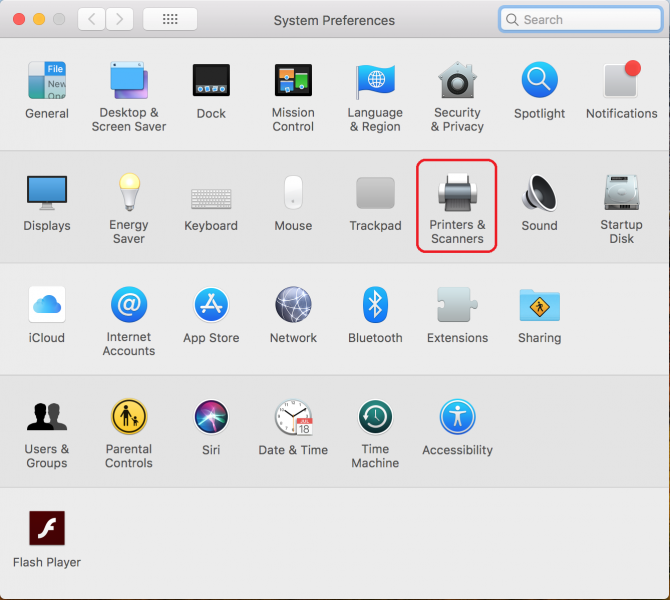
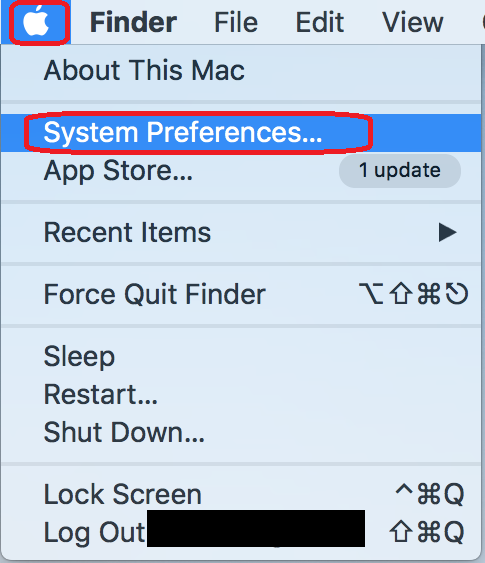
1. Click on the "Apple" menu icon in the upper right of the screen and select "System Preferences..." from the menu.


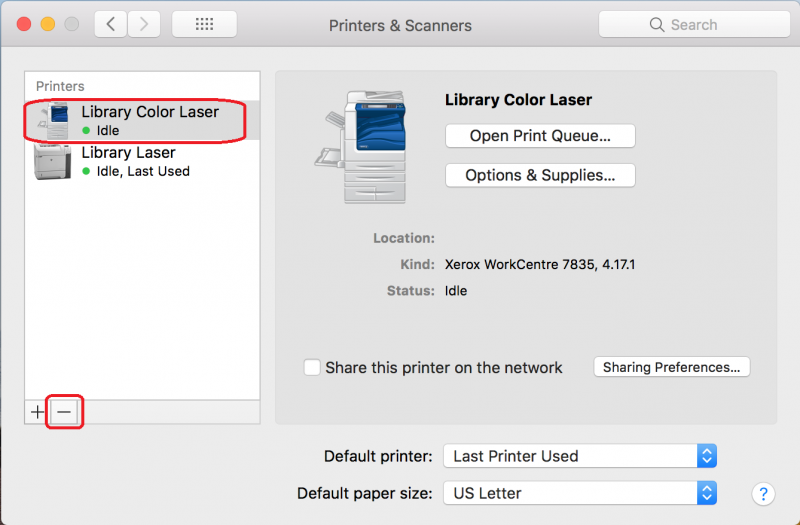
2. Select the printer you want to remove and click the "-" minus sign toward the bottom left of the window.


3. Click the "Delete Printer" button.


If you remove a NMU public network printer you can re-install it using instructions at the NMU Library web site https://lib.nmu.edu/print.

Useful Keyboard Shortcuts

Documentation

Keyboard shortcuts are combinations of keystrokes that allow you to quickly perform an action. They are useful and often great time-savers. This page includes a guide to a few useful combinations that will help you complete tasks more quickly. 

Windows
Mac OSX
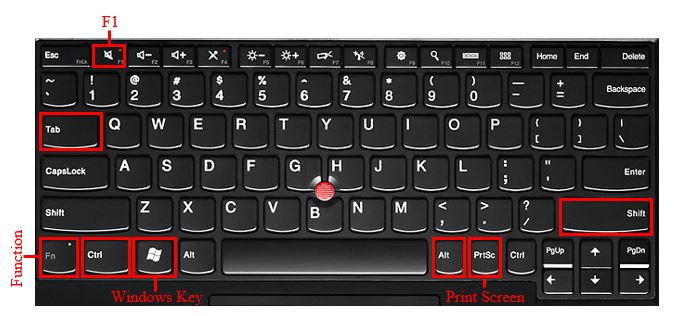
Where can I find these keys on my keyboard?

Windows

The list displays key combinations that are intended to be pressed and held until all are completed. For example, to copy text (Ctrl + "C"), you would highlight the text and press and hold the "Ctrl" (or control) key on your keyboard, then tap the "C" key before releasing both keys. 

  • Open a recently closed tab in your internet broswer: Ctrl + Shift "T"
  • Switch between open windows: Alt + Tab
  • Minimize everything and show desktop: (or between the desktop and Start screen in Windows 8.1): Windows Key + "D" 
  • Minimize window: Windows Key + Down Arrow
  • Maximize window: Windows Key + Up Arrow
  • Bold: Ctrl + "B"
  • Paste selected Item: Ctrl + "V"
  • Copy selected Item: Ctrl + "C"
  • Cut selected Item: Ctrl + "X" 
  • Underline: Ctrl + "U"
  • Italicize: Ctrl + "I" 
  • Undo an action: Ctrl + "Z"
  • Print: Ctrl + "P"
  • Select all: Ctrl + "A"
  • Take screenshot: PrtScr
  • Take screenshot of active screen: Ctrl + Alt + PrtScr
  • Delete permanently: Shift + Delete
  • Open properties for selected item: Alt + Enter
  • Close current window: Alt + F4
  • Open the Start Menu: Ctrl + Esc
  • Flip screen rotation: Ctrl + Alt + any arrow key
  • Open Task Manager: Ctrl + Shift + Esc
  • Lock your PC or switch users: Windows Key + "L"
  • Choose a presentation display mode: Windows Key + "P"
  • Zoom in and out: Windows Key and plus or minus sign
  • Search for files and folders: Windows Key + "F"
  • Help: Windows Key + "F1"
  • Quick system access menu: Windows Key + "X"

View more shortcuts on Microsoft's Page
 

Mac OSX

  • Eject disk: Command + "E"
  • Get information:  Command + "I"
  • Add to dock: Command + Shift + Control + "T"
  • Minimize all windows: Command + Option + "M"
  • Minimize front window: Command + "M"
  • Swich applications: Command + Tab
  • Take screenshot: Command + Shift + "3"
  • Quit application: Command + "Q"
  • Force quit application: Command + Shift + Option + Esc
  • New folder: Command + Shift + "N"
  • Log out: Command + Shift + "Q"
  • Paste selected item: Command + "V"
  • Cut selected item: Command + "X"
  • Copy selected item: Command + "C"
  • Close all windows: Command + Option + "W"
  • Select all items: Command + "A" 
  • Take screenshot: Command + Shift + "3" 
  • Find: Command + "F"
  • Print: Command + "P"
  • Save: Command + "S"
  • Move to trash: Command + Delete
  • Undo/redo: Command + "Z"
  • Show desktop: Command + F3
  • Hide or display dashboard: F12
  • Choose a presentation display mode: Command + F1

View more shortcuts on Apple's page
 

Where can I find these keys on my keyboard?

Windows (Scroll over for a larger image)

MacBook 


MacBook Specs

Documentation

MacBook Pro 2024 Model
ProcessorM3 chip with 8-core CPU, 10-core GPU,
16-core Neural Engine                                                                  
RAM16GB unified memory
Storage512GB SSD Storage
Display14 inch Retina display with true tone
Ports

Two Thunderbolt/USB 4 ports, HDMI Port, SDXC Card Slot, 

3.5mm Headphone Jack, MagSafe Charging Port

Touch Bar    Touch Bar and Touch ID
KeyboardMagic backlit keyboard English


MacBook Pro 2023 Model
ProcessorApple M2 Chip with 8-core CPU and 10-core GPU                      
RAM16GB RAM
Storage512GB SSD Storage
Display13.3 inch Retina display with true tone
PortsTwo Thunderbolt/USB 4 ports
Touch Bar    Touch Bar and Touch ID
KeyboardMagic backlit keyboard English
Faculty MacBook Pro 2021 Model
Processor2.6GHz 6-core 9th gen intel core i7 processor
VideoAMD Radeon Pro 5300M with 4GB of GDDR6 memory               
RAM16GB 2666MHz DDR4 memory 
Storage1TB SSD storage
Display16 inch Retina display with true tone
PortsFour Thunderbolt 3 ports
Touch Bar    Touch Bar and Touch ID
KeyboardMagic backlit keyboard English
2020 MacBook Pro
Processor1.4 GHz quad-core 8th gen Intel core i5
VideoIntel Iris Plus Graphics 645
RAM16GB 2666MHz DDR4 memory 
Storage256GB SSD
Display13-inch Retina display with True Tone                                          
PortsTwo Thunderbolt 3 ports
Touch Bar    Touch Bar and Touch ID
KeyboardMagic backlit keyboard - English

Macbook Backup and Restore

Documentation

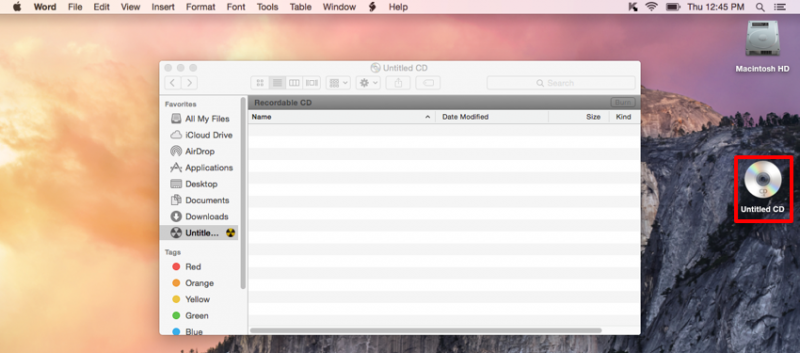
It's always a good idea to back your files up regularly and especially if you are planning to transfer them to a new machine. In addition to dragging and dropping files onto an external device, you can also burn files to a CD. Follow these instructions to learn how. 


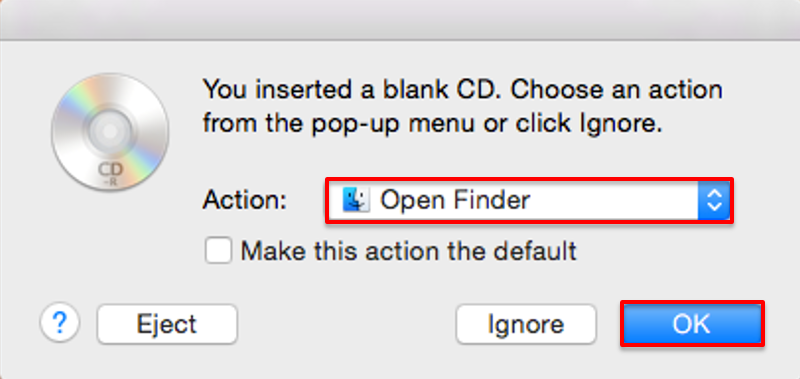
1. Insert a blank CD and wait a few seconds for the OS to realize that it is, in fact, a blank CD.

2. When a dialog box appears make sure that "Open Finder" is chosen in action menu and click "OK."
     

3. Wait while the Mac prepares the CD for use.

4. When the CD appears on the Desktop, add items to the CD by dragging-and-dropping files to it.
    

5. When you are ready to burn the disk, click the disk to select it, click the "File" menu and select "Burn Disc." 

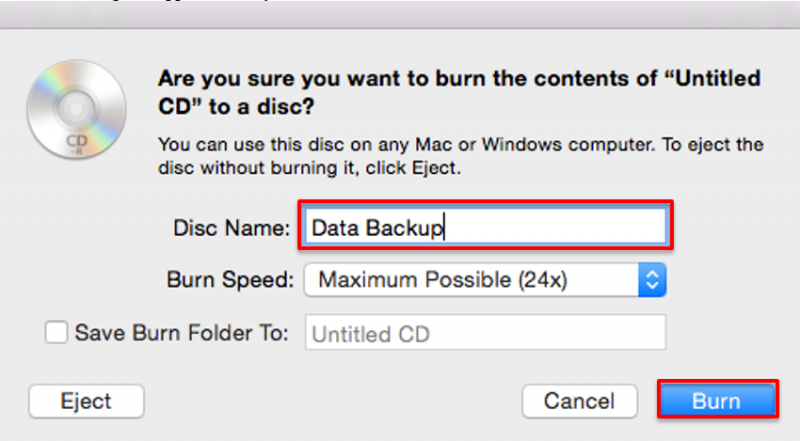
6. When the dialog box appears, name your CD and click "Burn."
    

7. A progress bar display how much data has been burned.
    

8. When finished, the CD will mount on the desktop. 
 

Note: You can restore files by dragging and dropping then from the disk and back to the location where you'd like 

Keep Your MacBook Clean

Documentation

You should take care to clean your MacBook properly. Select a part of your laptop to learn how to safely clean it. 

Keyboard
LCD Screen
Case

Keyboard

  • Take care not to spill any liquid on the keyboard. If you do, turn off your computer immediately.
    • If you spill liquid that is thin and clear, turn off your computer, turn it upside down to let the liquid drain out, and let it dry for 24 hours at room temperature. If the keyboard doesn't work, take it to your Apple-authorized service provider for repair. For your NMU MacBook, bring it to Micro Repair.
    • If you spill liquid that is greasy, sweet, or sticky, unplug the keyboard and take it to your Apple-authorized service provider for repair, or Micro Repair for an NMU MacBook. 
  • Remove any surface dirt gently with your bare hand before proceeding with a soft, lint-free cloth.
    • Do not use acetone, alcohol, or any alcohol-based cleaner on your computer. Never spray cleaner directly onto your computer. Liquid could drip inside the keyboard or case and cause an electrical shock

LCD Screen

  1. Turn off the MacBook. 
  2. Dampen a clean, soft, lint-free cloth or paper with water only.
    1. You may also use a mild glass cleaner that contains no alcohol or ammonia. Most office supply stores sell cleaning kits specifically designed for this purpose.
  3. Wipe the screen. Do not spray liquid directly on the screen.

Case

  1. ​​Turn of your Mac and unplug the power cord from the wall or power strip. 
  2. Use a damp, soft, lint-free cloth with mild non-abrasive soap or detergent. You may also use isopropyl alcohol or iKlear.
  3. Remove any surface dirt gently with your hand, then proceed with the cloth. 
  4. After washing, dry the case with a soft, lint-free cloth. 
  • DO NOT use window sprays or products containing ammonia, alcohol, or abrasive ingredients
  • DO NOT use rough towels or cloths
  • DO NOT spray cleaner directly on your computer, as liquid could drip inside the case and cause an electric shock or malfunction.

Install Cisco AnyConnect VPN Client [macOS]

Documentation

If you need to connect to NMU resources on your home network (or other non-NMU network), such as art servers or department servers, you will need to a VPN connection. VPN is short for Virtual Private Network. A VPN encrypts the information to and from your computer to a server on campus and also simulates an on campus connection.  The instructions below will show you how to set up that client to connect to the NMU VPN server. 

1. Using your internet browser (Firefox, Chrome, Edge, etc.), open the https://it.nmu.edu/downloads page or click here.

2. Click on the “Download Now” link for the “Cisco AnyConnect VPN Client [Mac]” and you will be prompted to log into the “NVPNSSO”. Click “Login.”


3. This will bring you to the NMU Login page where you sign in with your NMU credentials.


4. Once logged in you will want to click the button that says “AnyConnect” on the left side of the screen.


5. Next click “Start AnyConnect” This will take you to the download page.


6. Click the blue "Download for macOS" button. 


7. Double-click the .dmg file once it's done downloading. It will most likely be located in the Downloads folder. 


8. Double-click the .pkg file shown below:


9. Click “Continue”“Continue” again, then “Agree” then “Install”.


10. You should be prompted to login with your computer login password. Once you continue the progam will then install. 

11. After the program says "Install complete", click "Finish."

12. Press the magnifying glass symbol in the top right corner of the screen.


13. This will bring up the Spotlight Search. Type in "Cisco" and press enter.


14. The AnyConnect Secure Mobility Client window will pop up. Make sure the box contains “nmuvpn5520.nmu.edu” as shown below. Click "Connect" and you'll be brought to the NMU login page again.


15. Enter your NMU login credentials.


16. Once successful you should see the following message pop up in the lower right corner, indicating you are connected to the VPN:

      

Connecting to a Wireless Network (MAC OS X)

Documentation

These instructions tell how to connect to the campus network using AirPort. They assume your network settings are already configured.

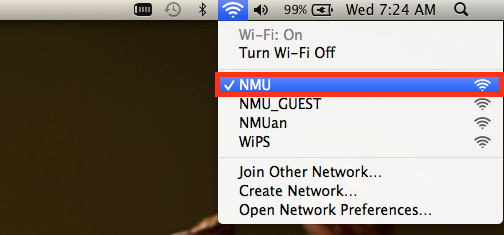
  1. Make sure you are in a location that has wireless network access.There are access points in many campus buildings.Click the wireless icon to see a list of locations:
  2. Make sure your computer is not connected to an orange network port.
  3. Click the AirPort icon on the Finder bar, and choose "Turn Wi-Fi On."

  4. Select the wireless network you would like to connect to, such as NMU.

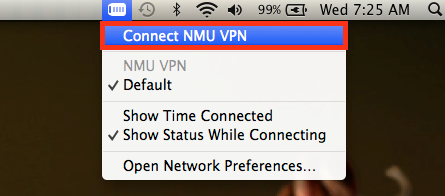
  5. If you need to connect to NMU resources on your home network (or other non-NMU network), such as art servers or department servers, you will need to use a VPN connection by clicking the VPN icon in the upper right of the screen. If that icon is not available see the Setting up the NMU VPN on a Mac page.

Note: The first time you connect a computer to the campus network, you must register the computer's network interface(s).

Caring for a MacBook battery

Documentation

Below are a list of battery care recommendations.

  • Apple recommends using the battery and charging it when prompted.
  • Allow the battery to fully discharge, then charge at least once a month.
  • The MacBook uses an Energy Saver which includes dimming the screen when using the battery. These settings may be modified, but if they are modified, the changes may drain the battery more quickly.
  • Dim the screen to the lowest comfortable level to maximum battery life.
  • If the AirPort (wireless) is on but not being used, it will still drain the battery.
  • Use only the power adapter that is issued with the computer.
  • Both hot and cold weather will affect the battery.
Subscribe to macbook