Remove a printer on the MacBook

Documentation

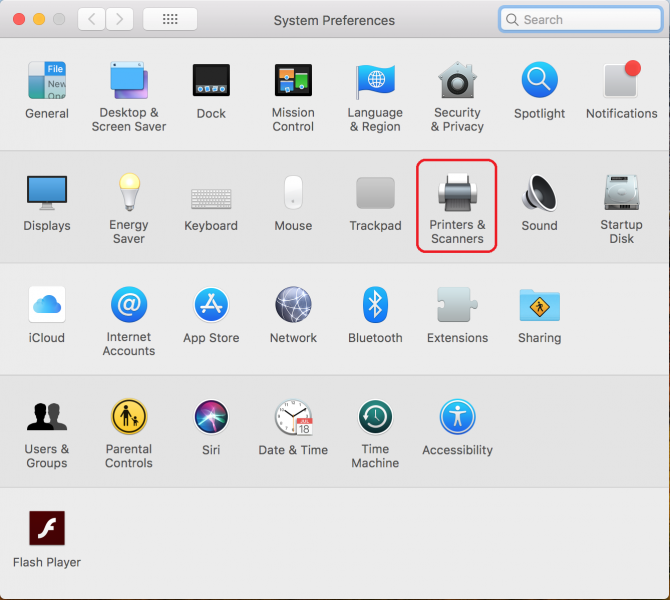
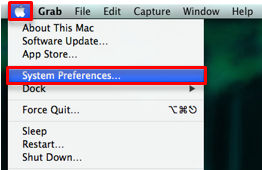
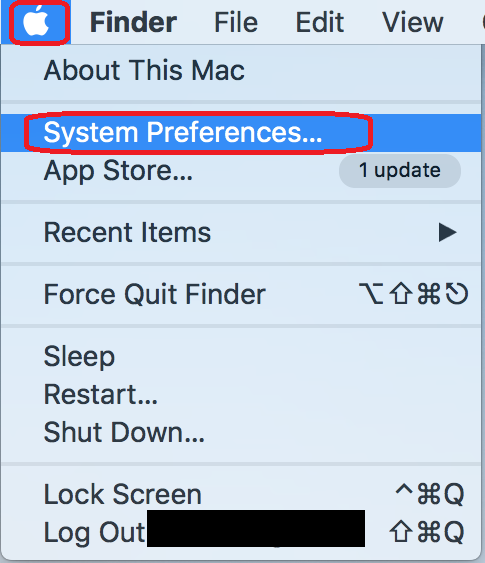
1. Click on the "Apple" menu icon in the upper right of the screen and select "System Preferences..." from the menu.


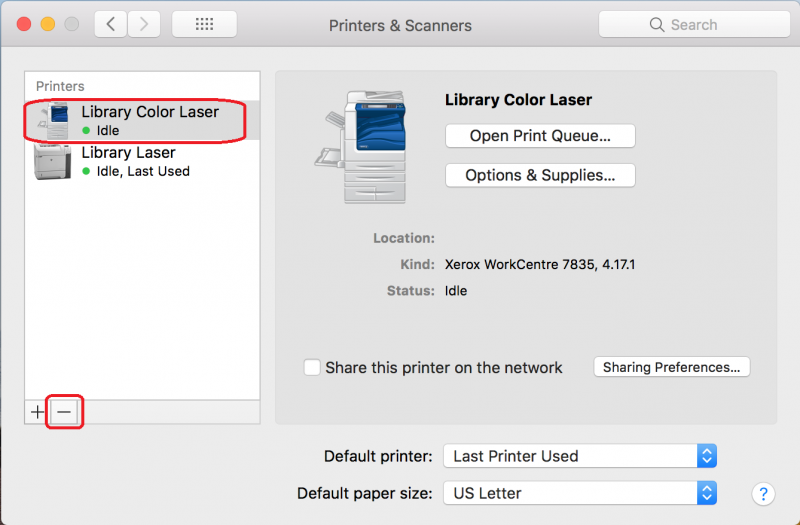
2. Select the printer you want to remove and click the "-" minus sign toward the bottom left of the window.


3. Click the "Delete Printer" button.


If you remove a NMU public network printer you can re-install it using instructions at the NMU Library web site https://lib.nmu.edu/print.

Using Fetch

Documentation

Fetch is a MAC OS X application for transferring files between your computer and a File Transfer Protocol (FTP) server. Using Fetch, you can connect to an FTP server, browse directories and files on both systems, and transfer files between the systems.

Note: While most FTP servers allow you to download files to your computer, your ability to upload a file to a remote server depends on your access privileges.

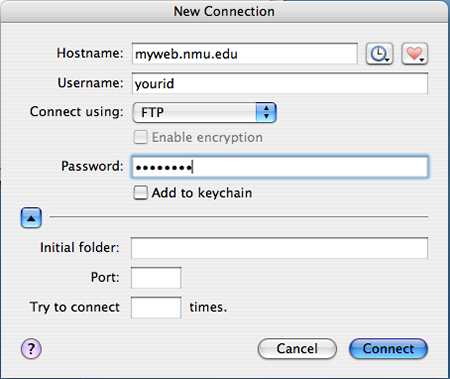
  1. Open Fetch and enter the connection information, then click "OK."
    • For Host, enter the server to which you are connecting.
    • For User ID and Password, enter your NMU ID and password in lower case letters.

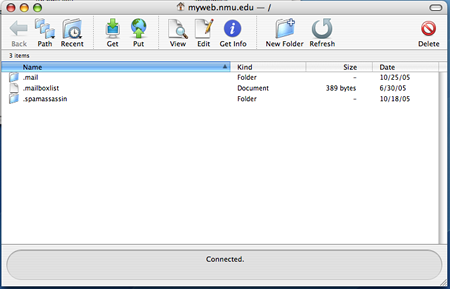
  2. Once connected, you will be able to browse directories on the remote server and your computer. Fetch supports a couple of methods to copy files:

    • The simplest method is just to drag files from your computer into the Fetch window (upload) or drag files from the Fetch window to your computer (download).
    • The other method is to use the "Get" (downdload) and "Put Files" (upload) buttons to copy files.

    Fetch can even copy entire folders, including their sub-folders, to the target location.

    For additional information on FTP file transfers, see the Fetch program's help.

Using the Mac OS X Dock

Documentation

Using the Dock
Starting Applications Without Using the Dock
Adding Items to the Dock
Removing items from the Dock
Changing the Dock Appearance
Stacks

Using the Dock

To access any of these files or applications, click one of the icons in the Dock. When an application launches a small white orb will appear under the application icon to signify that the application has launched. If a file or application isn't in the dock, its icon appears there once you open it.


To open a document using one of the applications in the dock, simply drag the document to the applications icon in the dock, and the document opens.


Starting Applications Without Using the Dock

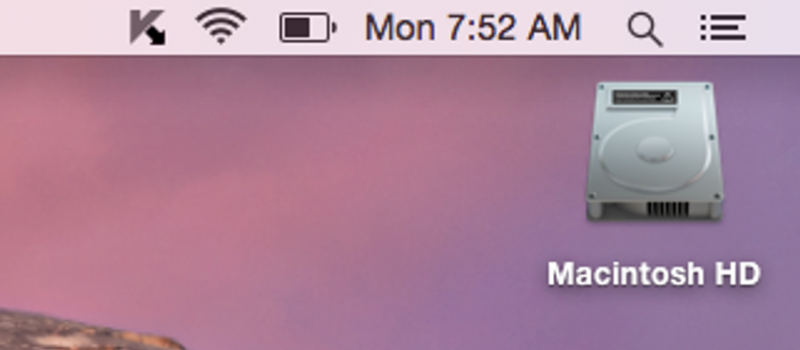
1. Open the Hard Drive icon.
   

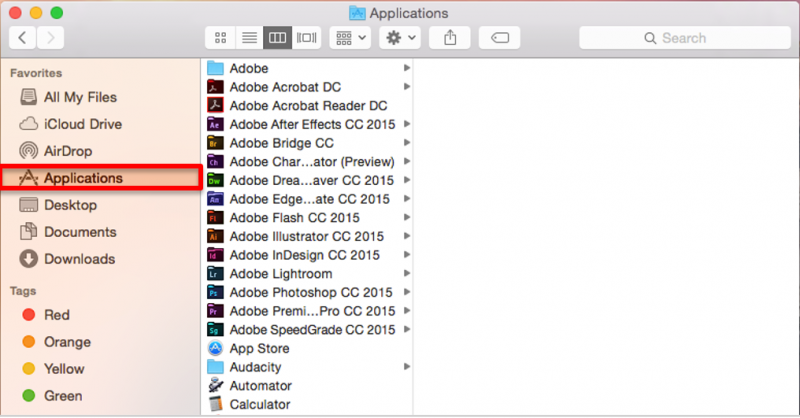
2. Click the Applications label. All of the applicatons are displayed in the window. You will need to double-click the application to launch it, whereas in the dock only a single-click is needed.


Adding items to the Dock

Dragging an applications icon to a space between other icons on the dock will a new entry. This same process can be used to add frequently accessed documents or other items as well.
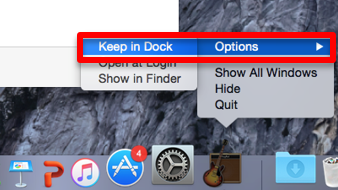
When an application is open, you can hold control and click it, expand "Options" and click "Keep in Dock." 


Removing items from the Dock

Just as dragging a file/folder onto the Trash icon will delete the file/folder, dragging a dock item onto the Trash icon in the dock will remove the entry from the dock. You can also drag it into a blank section on your desktop. It will disappear in a puff of smoke. Additionally, control-click, expand "Options," and click "Keep in Dock" to uncheck it. 


Changing the Dock Appearance and Order

Click on the System Preferences item in the dock and then the dock preferences item to view or change the dock settings. You can reposition items by clicking and dragging them to a new location on the dock. 

Stacks

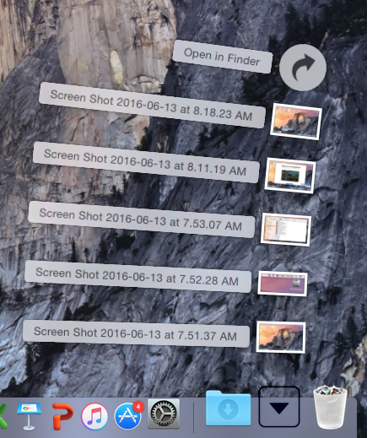
A stack is a dock item that gives you fast, convenient access to a folder of files. When you click a stack, the files within spring from the Dock in a fan or a grid, depending on the number of items (or the preference you set). You can create as many stacks as you wish simply by dragging folders to the right side of your Dock.

Mac OS X Mail Setup

Documentation

Mac OSX Mail is an application you can utilize to check your @nmu.edu mail. Instructions for setting up Mac Mail as a POP account are below. To learn how to use MAC OS X, visit the Using MAC OS X Mail page


1. Launch the Mail application from the dock.
    
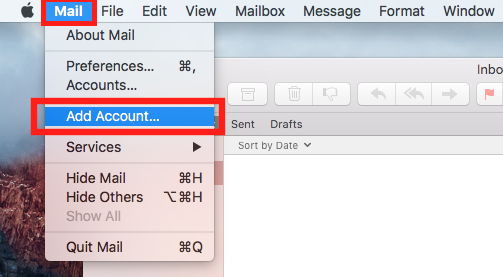
2. Select "Mail" from the top left menu, and select "Add Account..."
    
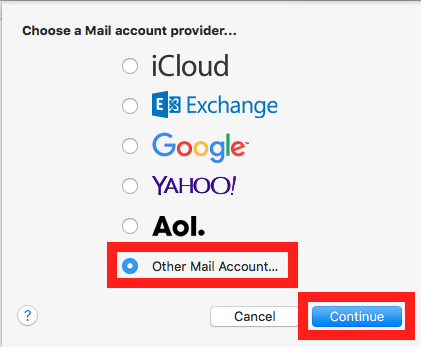
3. Select "Add Other Mail Account..." and click "Continue."
    
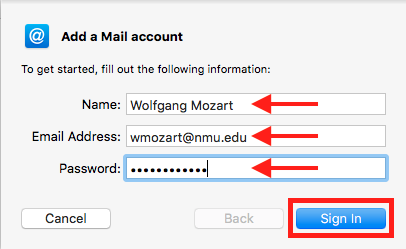
4. Enter your Name, NMU Email Address, and Password, then click "Sign In" 


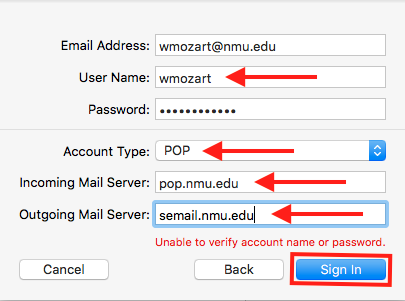
5. Enter your User Name, Select the "POP" accont type button and enter "pop.nmu.edu" in the Incoming Mail Server, and enter "semail.nmu.edu" in the Outgoing Mail Server, then click "Sign In".
    
6. Click "Done".
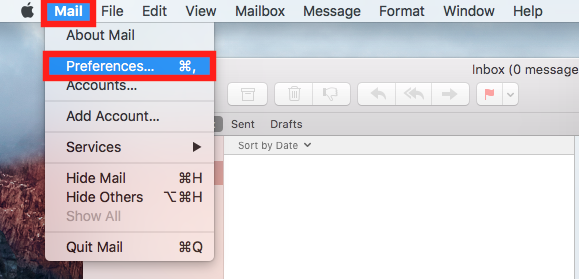
7. Select "Mail" from the top left menu, and select "Preferences."
    

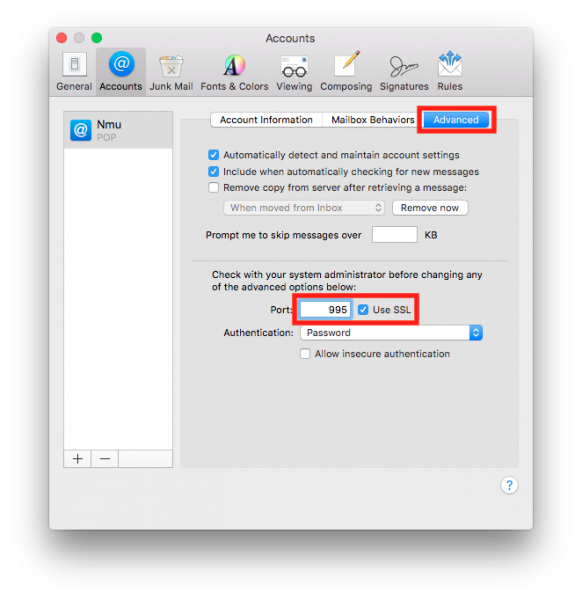
8. Select your account from the left and select the "Advanced" tab.  Enter "995" in the "Port" field and select the check box next to "Use SSL."
    
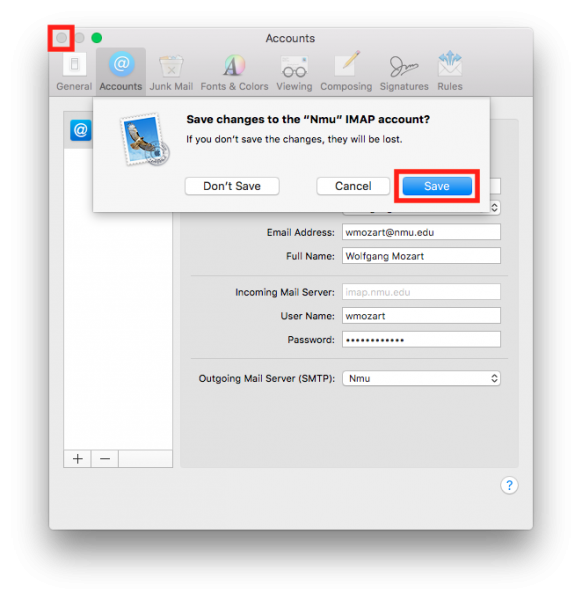
9. Close the window, select "Save" to keep changes. 


Install Cisco AnyConnect VPN Client [macOS]

Documentation

If you need to connect to NMU resources on your home network (or other non-NMU network), such as art servers or department servers, you will need to a VPN connection. VPN is short for Virtual Private Network. A VPN encrypts the information to and from your computer to a server on campus and also simulates an on campus connection.  The instructions below will show you how to set up that client to connect to the NMU VPN server. 

1. Using your internet browser (Firefox, Chrome, Edge, etc.), open the https://it.nmu.edu/downloads page or click here.

2. Click on the “Download Now” link for the “Cisco AnyConnect VPN Client [Mac]” and you will be prompted to log into the “NVPNSSO”. Click “Login.”


3. This will bring you to the NMU Login page where you sign in with your NMU credentials.


4. Once logged in you will want to click the button that says “AnyConnect” on the left side of the screen.


5. Next click “Start AnyConnect” This will take you to the download page.


6. Click the blue "Download for macOS" button. 


7. Double-click the .dmg file once it's done downloading. It will most likely be located in the Downloads folder. 


8. Double-click the .pkg file shown below:


9. Click “Continue”“Continue” again, then “Agree” then “Install”.


10. You should be prompted to login with your computer login password. Once you continue the progam will then install. 

11. After the program says "Install complete", click "Finish."

12. Press the magnifying glass symbol in the top right corner of the screen.


13. This will bring up the Spotlight Search. Type in "Cisco" and press enter.


14. The AnyConnect Secure Mobility Client window will pop up. Make sure the box contains “nmuvpn5520.nmu.edu” as shown below. Click "Connect" and you'll be brought to the NMU login page again.


15. Enter your NMU login credentials.


16. Once successful you should see the following message pop up in the lower right corner, indicating you are connected to the VPN:

      

Connecting to a Wireless Network (MAC OS X)

Documentation

These instructions tell how to connect to the campus network using AirPort. They assume your network settings are already configured.

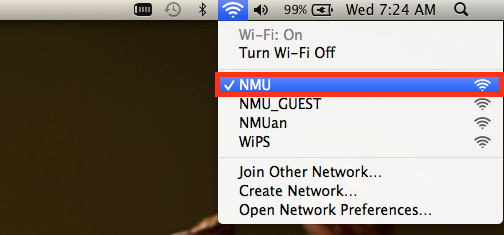
  1. Make sure you are in a location that has wireless network access.There are access points in many campus buildings.Click the wireless icon to see a list of locations:
  2. Make sure your computer is not connected to an orange network port.
  3. Click the AirPort icon on the Finder bar, and choose "Turn Wi-Fi On."

  4. Select the wireless network you would like to connect to, such as NMU.

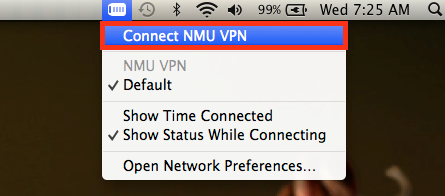
  5. If you need to connect to NMU resources on your home network (or other non-NMU network), such as art servers or department servers, you will need to use a VPN connection by clicking the VPN icon in the upper right of the screen. If that icon is not available see the Setting up the NMU VPN on a Mac page.

Note: The first time you connect a computer to the campus network, you must register the computer's network interface(s).

Allowing Third Party Applications to Install on a MacBook

Documentation

Some applications are not signed by Apple and will not be able to be installed. If you trust the application and know you want to install it, follow these steps to allow third party apps to install.

  1. Open "System Preferences" by clicking on the Apple icon and choosing that option.

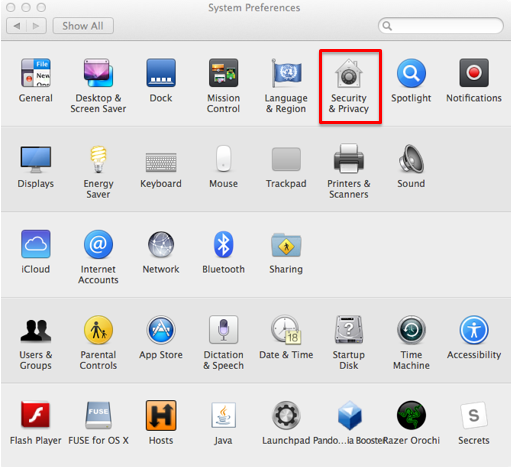
  2. Select "Security & Privacy" from the "System Preferences" window.

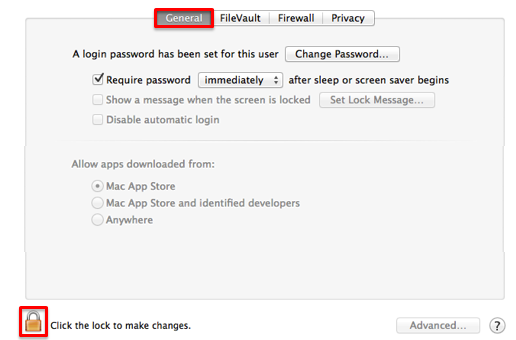
  3. Select the "General" tab, and select the lock in the lower left corner to allow changes. 

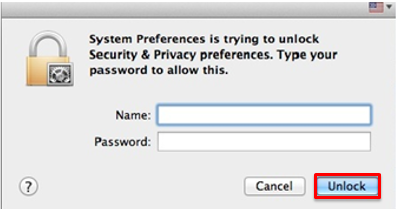
  4. Enter your computer username and password, then select "Unlock."

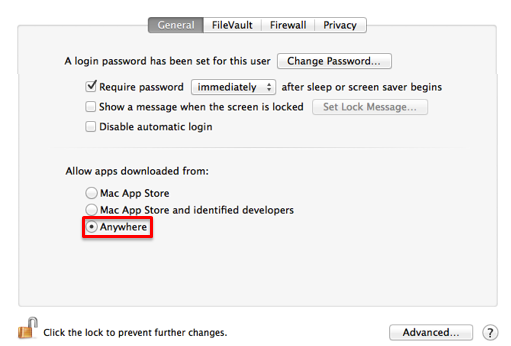
  5. In the "Allow apps downloaded from:" section, select the radio button to the left of "Anywhere."

  6. Close the window. You can now install unsigned applications that you trust. 
    • For security reasons, you may want to repeat this process checking "Mac App Store" on step five in order to turn this feature back off. 
Subscribe to OSX