Macbook Backup and Restore

Documentation

It's always a good idea to back your files up regularly and especially if you are planning to transfer them to a new machine. In addition to dragging and dropping files onto an external device, you can also burn files to a CD. Follow these instructions to learn how. 


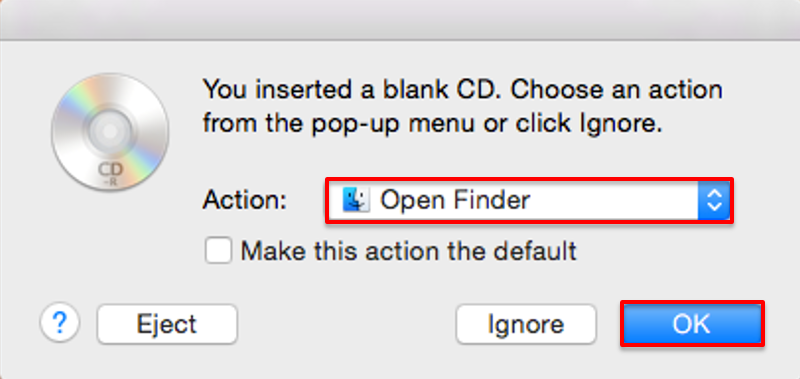
1. Insert a blank CD and wait a few seconds for the OS to realize that it is, in fact, a blank CD.

2. When a dialog box appears make sure that "Open Finder" is chosen in action menu and click "OK."
     

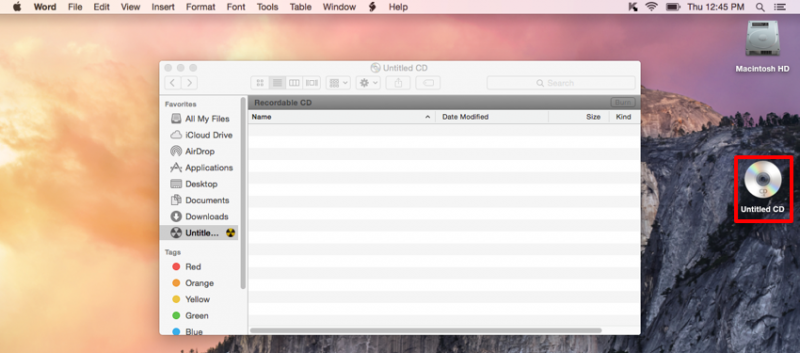
3. Wait while the Mac prepares the CD for use.

4. When the CD appears on the Desktop, add items to the CD by dragging-and-dropping files to it.
    

5. When you are ready to burn the disk, click the disk to select it, click the "File" menu and select "Burn Disc." 

6. When the dialog box appears, name your CD and click "Burn."
    

7. A progress bar display how much data has been burned.
    

8. When finished, the CD will mount on the desktop. 
 

Note: You can restore files by dragging and dropping then from the disk and back to the location where you'd like 

Drag and Drop Back Up Method

Documentation

Drag and Drop Back Up Method

There are many ways to back up your computer. The drag-and-drop method is a common one. It is recommended that you do a back-up at least once a month, That way if something were to happen with your computer, you would have most of your files. We recommend using an external USB drive with sufficient space available to store all of your files.


1. Plug in the device you'd like to back up your files to. In our example. It is a Kinston drive with the drive letter of D: Your name and drive letter may be different, depending on what drive you use.


2. Type File Explorer click File Explorer and open a new window.


3. Right-click the File Explorer icon and click "File Explorer" to open a second window.     


4. Drag and resize the second window to the right so it displays on the second half of the screen, next to the previous one. 


5. Navigate in one window to your external device, then in the other window navigate to the locations you would like to copy files from. In this case, click and drag the files from your PC to the external drive. In our example, the target drive is KINGSTON (D): Your external drive may have a different name and drive letter. Repeat the procedure until you've backed up all the desired files. 


We recommend backing up the following folders. You may have others that contain data important to you.

Music

Pictures

Desktop

Documents

Downloads

Favorites

Videos

Backup using File History

  • File History is a handy feature in Windows that helps you protect your personal files and folders from accidental loss or damage. Think of it as a backup system that automatically saves copies of your files, so you can easily restore them if something goes wrong. Whether you accidentally delete a file, make unwanted changes, or experience a technical issue, File History can come to your rescue by allowing you to recover previous versions of your files and folders.
  • One of the great things about File History is that it automatically backs up all your libraries. This includes default libraries like Documents, Pictures, Videos, and Music, as well as any custom libraries you have created. If you have folders elsewhere that you want to back up, you can add them to an existing library or create a new library for them.
  • Setting up File History is straightforward. Once enabled, it continuously monitors your files and folders, making regular backups to an external drive or network location. This means you don't have to worry about manually saving copies of your important documents, photos, videos, or entire folders. If you ever need to recover a file or folder, you can browse through the different versions saved by File History and restore the one you need. It's a simple yet powerful tool that provides peace of mind by ensuring your valuable data is always protected. 
  • Configure File History

  • Here are the steps to configure File History:

  • Connect an external drive or a network location: ensure you have an external drive connected to your computer or a network location configured where you want to save your backups
  • From the Control Panel, under System and Security, select Save backup copies of your files with File History
  • Select Turn on to enable File History


Backing Up NMU G Suite

Documentation

Unless you retire as an employee at NMU, as a faculty, staff, or student your NMU G Suite account will become disabled 1 year after you leave NMU and 3 years afterward if you were a graduate student. For these reasons, or just for the piece of mind of having a backup of your NMU G Suite content for yourself, you might consider backing up your NMU G Suite content.

Backing up your content to a ZIP file

Google's Takeout application, https://takeout.google.com, can be used to create an archive and/or ZIP file of your NMU G Suite content and download it to your computer. Google Takeout will convert the Google document formats to offline formats (Google Docs -> Word format, etc.). If you have a large amount of content, such as many video files, creating a ZIP file using Google Takeout may not be a good choice. More information is available from Google at "Download your data" and a 1 minutes video at "How to Use Google Takeout - YouTube".

If you later chose to upload the content to a different G Suite account, open the Google Drive settings and choose the option to "convert files on upload" before you upload the files if you want them in the Google Docs and other formats again.

Transferring your content to another G Suite account

The same Google Takeout application offers a way to transfer the NMU G Suite content to another Google G Suite account using https://takeout.google.com/transfer. See "Copy content from your school account to another account" for details.

The Google Takeout Transfer option, https://takeout.google.com/transfer, may be a great choice especially if you have an "Email for Life" account available through the NMU Alumni office. The Alumni "Email for Life" accounts are Google G Suite accounts with an @alumni.nmu.edu email address, have unlimited space available to you, and currently, unlike your NMU G Suite account, do not expire. Visit http://nmu.edu/alumni and the "Email for Life" link to request an @alumni.nmu.edu Alumni G Suite account and see if you qualify.

Subscribe to backup