Ethernet Connection Information

Documentation

There are more than 10,000 network ports on Northern's campus. For help connecting to one of them see:

Connecting on Campus Via a Network Port (Windows)

These instructions tell how to connect to the campus network through one of the orange network ports on campus. They assume your network settings are already configured.

  • NMU notebook computers are already configured to connect to the NMU network.
  1. Find an orange network port.
  2. Plug your network cable into the orange network port and into the network port on the side of your computer.
  3. If the connection is not established automatically, open ThinkVantage Access Connections and troubleshoot the connection from there.

Note: The first time you connect a computer to the campus network, you must register the computer's network interface(s).

Educational Access Network

Documentation

The goal of the Educational Access Network (EAN) is to provide broadband access and educational resources to individuals looking to take courses, advance their careers, fulfill personal development needs, explore new topics, or regularly exercise their brains.

Support is currently being provided by:

  •     http://www.nmu.edu/ean (This should answer most questions).
  •     Email: eansupport@nmu.edu
  •     Phone: 888-458-8668

Disable Random Hardware Address in Windows 10

Documentation

Some application settings or other issues might cause Windows 10 to enable randomized hardware addresses, which will cause issues with your registration to NMU's network. To disable this feature, follow the instructions below.

1. Click on the Network Settings icon and select "Network Settings." 
    

2. In the "WiFi" tab, select "Advanced Options."
    

3. Select "Off" under "Random Hardware Address." 
    

4. In the "WiFi" tab, select "Manage WiFi Settings."
    

5. Select "Off" under "Random Hardware Address." 
    

6. Restart your computer. 

De-Register a Device from the NMU Network

Documentation

Occasionally, you may want to remove a device from your account because you no longer use it or for a variety of reasons. These instructions will show you how to de-register a device from the NMU Network. Keep in mind that if you will need to re-register the device if you you want to re-connect it to the NMU network. 
 

1. Navigate to http://www-register.nmu.edu in a web browser. 
 

2. Click on "De-Register."


3. Type in your username and password then click "Sign In." 


4. Click the "De-Register" button next to the computer or device you would like to de-register.


5. Once you have clicked on the de-register button you will see the message below. You can now choose "Logout." 

Connecting to a Wireless Network (MAC OS X)

Documentation

These instructions tell how to connect to the campus network using AirPort. They assume your network settings are already configured.

  1. Make sure you are in a location that has wireless network access.There are access points in many campus buildings.Click the wireless icon to see a list of locations:
  2. Make sure your computer is not connected to an orange network port.
  3. Click the AirPort icon on the Finder bar, and choose "Turn Wi-Fi On."

  4. Select the wireless network you would like to connect to, such as NMU.

  5. If you need to connect to NMU resources on your home network (or other non-NMU network), such as art servers or department servers, you will need to use a VPN connection by clicking the VPN icon in the upper right of the screen. If that icon is not available see the Setting up the NMU VPN on a Mac page.

Note: The first time you connect a computer to the campus network, you must register the computer's network interface(s).

Connecting to NMU LTE

Documentation

Is NMU LTE available in your area?

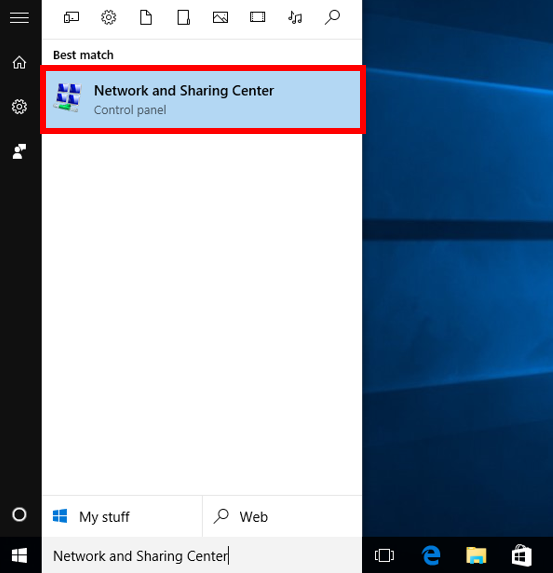
NMU LTE is available everywhere NMU EAN is available. Go to the Check Availabilty page and click the "Check Availabilty" button. Enter your complete address with Street Address, City, State, and Zip code to see if NMU LTE is available in your location.

If you were issued an NMU ThinkPads NMU LTE is not installed by default. You can get the NMU LTE network and SIM cards installed at no charge so the computer can access the NMU LTE network. If you have not already done so, please stop at the Helpdesk to get a work order for the LTE hardware to be installed. 

Connecting the ThinkPad to NMU (LTE)
 

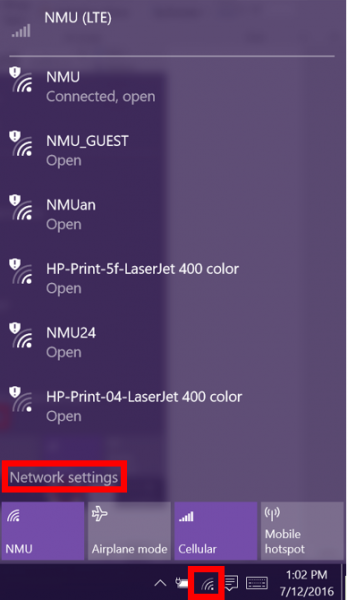
1.Left click the “WiFi” or “Ethernet” icon in the system tray in the lower right corner of the Windows desktop.
  

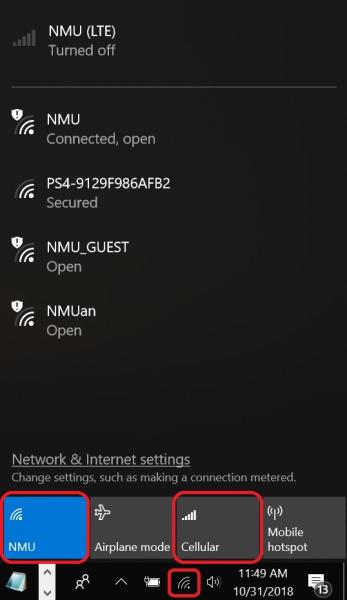
2.Make sure an Ethernet cable is not connected,  “NMU" "WiFi” is "Off" (grayed out) and “Cellular"or "Mobile Broadband" is turned "On" (displayed in blue) and click the “NMU (LTE)” icon in the top section of the “Networks” menu.
  

3.Check the “Connect automatically” checkbox if it isn’t already checked and click the “Connect” button. The icon initially may indicate a “Limited” connection but then display “Connected”
 

4.The “LTE” icon will appear in the system tray when NMU (LTE) is in use. The number of white bars indicates the signal strength. You should now be able to access the NMU network using NMU LTE.
  

Connecting the ThinkPad to NMU WiFi (preferred if on campus)

1.Left click the “LTE” or “Ethernet” icon in the system tray in the lower right corner of the Windows desktop. 
  

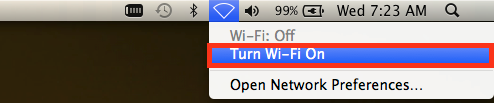
2.Click the "NMU" "WiFi" to turn on (turn blue) the WiFi network adapter in the “Networks” menu.
  

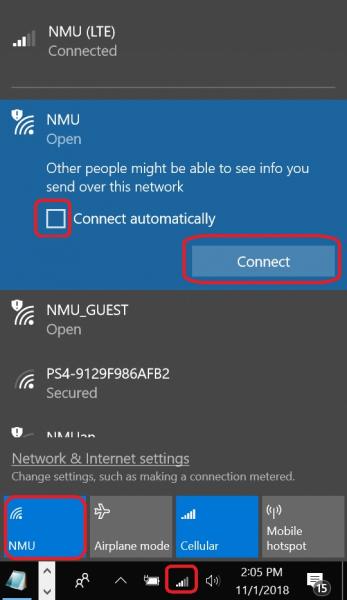
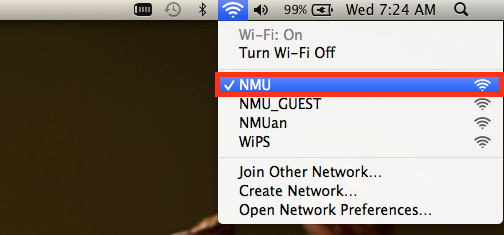
3.Select the WiFi connection you want to use (Use the “NMU” WiFi connection if on campus). 
 

4.Check the “Connect automatically” checkbox if it isn’t already checked and click the “Connect” button. The icon initially may indicate a “Limited” connection but then display “Connected”.
  

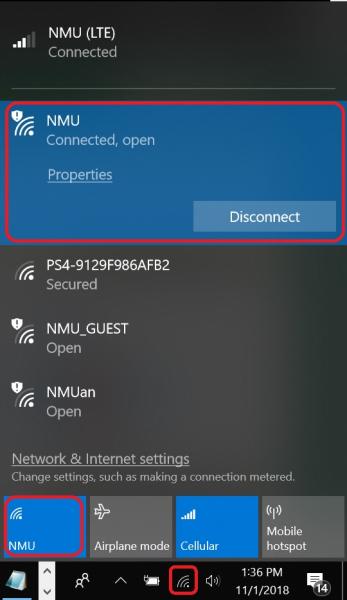
 5.The “WiFi” icon will appear in the system tray when WiFi is in use. The number of white bars indicates the signal strength. You should now be able to access the NMU network using NMU WiFi. NOTE: The system will use the WiFi connection by default even if the NMU (LTE) connection is on.

Connect a Device to the NMU Network

Documentation

For full access to the Internet and NMU network services over the NMU on-campus wired and wireless areas, you must register each network interface (wired and wireless are separate entries) on your computer. Before you register, you will only be able to access limited on-campus Web sites, and you will not have E-mail access.


Keep the following mind while registering:

  • Must be on-campus and using the NMU WiFi or Ethernet network to register.
  • Users will be required to register their machine once per semester.
  • NMU issued computers with have both the wired and wireless connections registered when registering using either connection.
  • Your NMU account must be active in order to have computers and devices registered. 
  • You are limited to registering 3 devices via the "register.nmu.edu/device" option.

There is no limit to the number of computers you can register. However, please note that your NMU ID will be attached to each computer you register, and you will be responsible for the actions performed using this machine.

Choose a device type below for instructions on registering it. 

Checking TCP or IP Address Settings

Documentation

If you're having network issues, it may be a good idea to check your settings. Click below to get started.
Mac OS X
Windows 10 (Similar to earlier versions)


MAC OS X

1. Click on "System Preferences" on the dock.


2. Click on "Network.


3. To check Wifi settings, click here. To check Ethernet, click here.


WIFI
 

1. Click on "WiFi," then click on "Advanced."


2. In the "TCP/IP" tab, verify that "Configure IPv4" is set to "Using DHCP." Then, verify that "Configure IPv6" is set to "Automatically."


3. Click the "DNS" tab, and verify that the DNS Servers and Search Domains match what is shown below. 


4. Click "Proxies" and be sure that everything is unchecked except "Use Passive FTP Mode (PASV)." Click "OK" to exit.


ETHERNET
 

1. Click on "Ethernet" and veryfy that "Configure IPv4 is set to "Using DHCP." Now, click "Advanced.


2. In the "TCP/IP" tab, verify that "Configure IPv4" is set to "Using DHCP." Then, verify that "Configure IPv6" is set to "Automatically.


3. Click the "DNS" tab, and verify that the DNS Servers and Search Domains match what is shown.


4. Click "Proxies" and be sure that everything is unchecked except "Use Passive FTP Mode (PASV).


Windows 10

1. In the Start menu or search bar, type "Network and Sharing Center" and select that option. 


2. Select "Change adapter settings" to the right. 


3. Right click the network you'd like to check and select "Properties." The information will be the same for both ethernet and WiFi. 


4. In the new window, scroll down to select "Internet Protocol Version 4 (TCP/IPv4)" and click "Properties." 


5. Assure that "Obtain an IP address automatically" and "Obtain DNS server address automatically," then click the "Advanced" button. 


6. Ensure that the settings in the
tab match those shown below. 


7. Ensure that the settings in the "DNS" tab match those shown below. Click "OK" to close the window. 
    

Subscribe to network